I tried enABL'ing some small speakers (2") and noticed a small change in sound; I wonder if I am doing it correctly:
1.) Apply 2 coats of diluted ModPodge 6hrs apart onto the cone (for paper drivers)
2.)Apply the dot-dash ring sets, one near surround, one near/on dustcap, then tap test (I notice a slight difference in tap tone, I assume if I put some rings here but they are in the wrong position it won't make the sound bad?)
3.)Apply the gloss coat, but I haven't the micro Gloss because the store needs to order "in large quantities", and I've forgotten what to do with this anyway...
Also, does the height of the blocks matter much? i.e. do a double coat to make sure it isn't too thin?
Thank you for taking the time to read, I need more practice before I try enABL on anything more expensive 😉
1.) Apply 2 coats of diluted ModPodge 6hrs apart onto the cone (for paper drivers)
This bit has nothing to do with EnABL, it is something i (often) do to paper cones. Speaker Tweeks -- Puzzlecoat & Ductseal
2.)Apply the dot-dash ring sets, one near surround, one near/on dustcap, then tap test (I notice a slight difference in tap tone, I assume if I put some rings here but they are in the wrong position it won't make the sound bad?)
You pur the rings in the generic "classic" EnABL1 position. The tap test allows you to put the rings where the driver tells you to to get EnABL2.
3.)Apply the gloss coat, but I haven't the micro Gloss because the store needs to order "in large quantities", and I've forgotten what to do with this anyway...
I feel that the gloss coat is very important... particularily on any cone that has been mod-podged.
Also, does the height of the blocks matter much? i.e. do a double coat to make sure it isn't too thin?
Npt really.
I need more practice before I try enABL on anything more expensive 😉
Practise cannot be underestimated. After a certaon point improvements in technique become mostly cosmetic. I know that my technique is getting better, and even Bud, the master, is finding new ways to make the process work better.
dave
Thanks Dave, I'll have to see if the store has any of the micro gloss, since it has been a year since I last went 😉 (Actually, I was amazed I could get the enABL equipment from local stores, as usually anything to do with DIY audio is fairly limited where I live unless you go online)
Thanks Dave, I'll have to see if the store has any of the micro gloss, since it has been a year since I last went 😉 (Actually, I was amazed I could get the enABL equipment from local stores, as usually anything to do with DIY audio is fairly limited where I live unless you go online)
Ed LaFontaine has an EnABL kit complete with all you need - US$32 including delivery to Oz.
I've bought all my EnABL stuff from Ed, including restocking bits and pieces as required.
http://www.diyaudio.com/forums/swap-meet/119852-enabl-kit-6.html
Cheers,
Alex
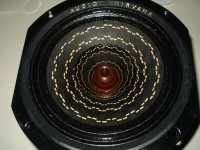
Audio Nirvana Super 8
What a set of unusual contrasts come stock with this driver. Very good depth of field, native coherence, excellent dynamic range, coupled with an ability to drill out your ears with shrieks at inopportune moments.
As I began to discover what was actually occurring with this driver I found three distinct Raleigh wave events. One at the bottom 1/4 inch and upper 1/8 inch of the whizzer, with exemplary performance from the phase plug. Another in the last 3/8 inch of the main cone, just before the heavily doped cloth accordion surround attachment. The final one, at the peak of the first surround pleat was probably the most noticeable and the hardest to find. I located it only after everything else had settled down to a bold, lush and extremely detailed performance. We will cure all three with the ever sticky acrylic glue that Ed says he can supply in new kits and hopefully for current kit holders.
As you look over where the pattern guide rings go, on the various surfaces, you may notice that the resulting rings on all three cone / whizzer surfaces are a bit tighter in the radial space between pairs than is usual. This is due to the extremely narrow null and ringing node zones on cone and whizzer. I assume this is due to the Raleigh waves and how they need to be cured. For the damping on the back side, apply two thick coats of ever sticky acrylic glue, from the upper edge (closest to the voice coil) of the backside mid cone ring , over the outer cone ring, to the edge of the cone. The top coat of these two extends beyond that mid ring up to the voice coil and also continues on, from the edge of the cone, to cover the backside of the first surround pleated surface and the crease at the top of that pleat face, that make up the begining of the surround.
The best way to cure a Raleigh wave is to damp it's back side, but it is not the only way.
The whizzer/phase plug is really the best I have come across. However, the whizzer has two Raleigh waves and needs unusual node and null locations for the patten rings. There is also an unusual application scheme here. The whizzer rings are all applied at the same time. Then you apply a well drained coating of 50% gloss, in one radial stroke per location, applying three radial strokes per well drained brush load. You start at the voice coil joint with the whizzer and end at the midddle of the top ring set and that is all of the Gloss you apply to the whizzer. You then coat the remaining area of the whizzer, above the middle of the top ring, with the acrylic glue, on the front side, over the top flat hat brim and around on the back side, to beyond the crease from brim to whizzer by a thin brush width. A second coat of glue, a welt of it really, is applied right on top of the whizzer hat brim. Make it a blue thread from edge to edge. Plus, you must apply 3 interleaved coats of gloss (counting the first Gloss coat applied) and glue, from the voice coil joint to just over the entire first ring, up from the voice coil. Another single coat of Glue needs to applied to the bottom back side of the whizzer to approximately this same heght. Leave all of these final glue coats uncovered with Gloss. You must have pre bent the ferrule of a thin pointed paint brush by 30 degrees to allow you to paint the underside of the whizzer hat, just as with the Lowther DX4 and PM6A drivers, a few million words ago. .
You should apply the rest of the main cone rings and the backside cone rings next. Again, they are in unusual positions, with the inner cone ring just smaller in diameter than the whizzer outer diameter, rather than down as close to the voice coil as possible. This driver just does not need a ring sown in that tight space, so do not put one there.
Gloss coat only from between the rings on the lower ring set right to the join between cone and surround. Keep it off of the surround coating. Do not Gloss coat over the glue coating on the back side. DO NOT PAINT GLOSS ON THE GLUE COVERING THE INSIDE OF THE SURROUND.
And that's all folks. Not a drop of anything on the phase plug. Hardly any Gloss coating and pattern rings in odd places and applied in less radial space, with thinner blocks, than is usual.
The result is an out standing full range driver. Huge dynamic range, huge, bold, portrayal of performance spaces. Outstanding high frequencies, easily the equal of any ribbon tweeter I have heard. Clear, dynamic mid range. The most continuous voice portrayal I have heard. Not as detailed and technically correct as the Fostex F 200 A. Not as colorfully dynamic as the Lowther PM6A. A perfect mix of those two drivers and easily as good as either in musicality.
And then you put on some dense, dynamic, Hi Rez orchestral music, from Reference Recordings Tutti SACD for example. This is where this driver comes into it's own. Nothing is overwhelmed, nothing is lost, even the most delicate triangles are clear, embedded in a torrent of equally clear sounds and all of it together is perfectly portrayed in three dimensional space. Absolutely natural sounding horn fanfares, beautifully floating violins, complete tympani strokes, even bass clarinets are correct. If you love orchestral music, these are the drivers you want. And Patty Barber's voice sounds lovely too, and then she plays her piano.......
The Super 8 pictures are at my Picassa site here.
https://picasaweb.google.com/hpurvine/AudioNirvanaSuper8#
Bud
Attachments
Last edited:
I thought I'd weasel in for a bit of an OT blurb.
For you people here in the SeaTac area, next Thursday (May 12th) Doc Bottlehead is giving a Demo of his products, sourced from his tapedeck and Master Tapes from "The Tape Project" at the Pacific Northwest Audio Society meeting.
So Terry, what does this have to do with enABL?
Good question, but at the following month's club meeting on June 9th, BudP will be giving an A/B demo of untreated and treated speaker drivers, as well as discussing the process. So if anyone is curious if the enABL treatment actually works, this meeting should answer any questions you may have. If we have time, I'll be doing a bit about some of the other driver mods, with examples of the various stages. Bud's a far more interesting person, but just the same, I'll try to hold my end up as well.
😀.
The meetings will be in the basement of the Church and is accessed from the lower parking lot. It's not too hard to find it. The meeting will officially start at 7:30 pm (the usual time). BTW: It's free to the public.
Here's the address:
Mercer Island Congregational Church (in the basement)
4545 Island Crest Way
Mercer Island, WA 98040
So there you go, two meetings back to back catering to the DIY Crowd!
Hope to see you there.
Best Regards,
TerryO
Hi all,
Budp, I emailed Ed and he asked if I could clarify if the "ever sticky acrylic glue" referred to is the Zig 2-way glue?
If this is the case he can organise supply.
many Thanks
Ian
Budp, I emailed Ed and he asked if I could clarify if the "ever sticky acrylic glue" referred to is the Zig 2-way glue?
If this is the case he can organise supply.
many Thanks
Ian
Hi all,
Budp, I emailed Ed and he asked if I could clarify if the "ever sticky acrylic glue" referred to is the Zig 2-way glue?
If this is the case he can organise supply.
many Thanks
Ian
Available from Amazon here in the States...
Thanks francolargo,
But is it the same glue that Budp is referring too?
Ed can said he could supply it as part of the kit if it is, but needs confirmation first.
Thanks
ian
But is it the same glue that Budp is referring too?
Ed can said he could supply it as part of the kit if it is, but needs confirmation first.
Thanks
ian
But is it the same glue that Budp is referring too?
Ed can said he could supply it as part of the kit if it is, but needs confirmation first.
Searching Amazon for "Zig 2-way glue", you will find many different applicators all containing the same blue liquid. It is the same material Bud refers to. To get even application to a driver, however, I suggest using a flat artist's brush. I simply drained a small amount of the liquid onto aluminum foil and picked it up using the brush. Thus, in my opinion none of the specialized applicator packages are useful for loudspeakers. That might be where Ed could simplify things...
Cheers,
Frank
Available from Amazon here in the States...
Available at your local Michael's craft store here in Canada.
dave
in my opinion none of the specialized applicator packages are useful for loudspeakers.
I use the applictor i have directly. Sort of like a large felt pen.
dave
I do use a separate brush to apply the glue, like Frank. The built in applicator scares me. I cannot seem to apply the glue from it in an even coating. Some analysis of your technique would be very much appreciated Dave.
Bud
Bud
I use the applictor i have directly. Sort of like a large felt pen.
dave
I found that applicator to be useful to apply glue to the pattern edges. After it was dry it would help me to position the sometimes cantankerous paper rings. Glue before cutting or risk smearing your printer ink! 😛
I found that applicator to be useful to apply glue to the pattern edges. After it was dry it would help me to position the sometimes cantankerous paper rings. Glue before cutting or risk smearing your printer ink!
Nice😉
Available from WH Smith's in the UK too 🙂
Hi All,
Simon, do WH Smith sell it as Zig 2 Way Glue, Looked on the website and couldn't find it?
This would save Ed posting it halfway around the globe 😉
Cheers
Ian
- Home
- Loudspeakers
- Multi-Way
- EnABL - Listening impressions & techniques