MJL21193 said:Aw, come on Mr. Weldon...try it out. Your compliantly brief sig line says "always curious". I think that it will make a huge improvement. 😀
Now John. 😉
Alex from Oz said:Notice the EnABL pattern on the drivers?
Subwoofers too!
Guess where those came from 🙂
dave
WTF,
Can't anyone just post what they think??? The canadians seem to have caught our disease...and you'all think you are better...same bs...
t
Can't anyone just post what they think??? The canadians seem to have caught our disease...and you'all think you are better...same bs...
t
planet10 said:Guess where those came from 🙂
😀
That certain puzzlecoat shine gave it away - oh, and the triangle pattern in the double horns! (last pic).
Hey t-head, are you missing your EnABL'd Jordans?
Port EnABL for Transmission Line
I'm currently making up some EnABL strips for a forum member to go in the ports (vents? mouths?) of his transmission lines.
When he has them in I'll ask him to post comments here.
Cheers,
Alex
I'm currently making up some EnABL strips for a forum member to go in the ports (vents? mouths?) of his transmission lines.
When he has them in I'll ask him to post comments here.
Cheers,
Alex
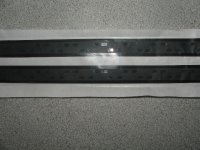
OK, so here's a pic of what the two strips look like.
- PVC duct tape on the bottom (black of course because I like a 'darker background' 😀 )
- Sellotape 'Invisible tape' (or Scotch 'Magic tape') on top
- Norton 'All Weather Tape' for the blocks
Ports are rectangular - 110mm x 50mm
Calculated block size for 10 block pairs is 6.4mm x 3.2mm - so I rounded down to 6mm x 3mm
I'll send these in the mail today.
Cheers,
Alex
Attachments
Thickness?
What would cognizant practitioners think the minimum thickness would be for patterning around say a 4" port? I have .004" vinyl at hand.
What would cognizant practitioners think the minimum thickness would be for patterning around say a 4" port? I have .004" vinyl at hand.
G'day voldigicam,
The .004" vinyl you have is fine to use.
What type of speakers do you have?
I assume you have round ports - are they flared or straight?
-----------------------------
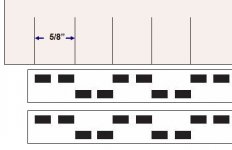
For a round port 4" diameter
Block size = 2/8" x 1/8"
Strip length = 12.6"
-----------------------------
Start with a 13" strip, lay your blocks and then trim off the extra length when sticking the strip around the inside of the port.
Mark up a sheet of paper as a guide with marks every 5/8" to make sure the pattern stays consistent. (see pic)
Cheers,
Alex
The .004" vinyl you have is fine to use.
What type of speakers do you have?
I assume you have round ports - are they flared or straight?
-----------------------------
For a round port 4" diameter
Block size = 2/8" x 1/8"
Strip length = 12.6"
-----------------------------
Start with a 13" strip, lay your blocks and then trim off the extra length when sticking the strip around the inside of the port.
Mark up a sheet of paper as a guide with marks every 5/8" to make sure the pattern stays consistent. (see pic)
Cheers,
Alex
Attachments
Thanks! That will do well. I'll try the vinyl. When I get my big sub running again I'll do it, to. Plate amp blew out on it. Power surge.
Cabinet EnABL - Chilli Chang
This is a reworking of a couple of posts I made in another thread in the Fullrange forum.
If you own a pair of Chilli Changs and have a genuine interest in exploring EnABL then perhaps you might like to try this.
- - - - - - - - - - - - - - - - - - - - - - - - - - - - - - - - - - - - - - - - - - - - - -
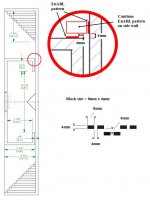
Have a look at the pic below.
This is the first place I would start with cabinet EnABL for your speakers for three reasons:
1) requires a minimum number of blocks
2) should provide an audible change - which will encourage you to continue
3) it's completely reversable.
Obviously you need to repeat this top and bottom for both speakers.
This is a reworking of a couple of posts I made in another thread in the Fullrange forum.
If you own a pair of Chilli Changs and have a genuine interest in exploring EnABL then perhaps you might like to try this.
- - - - - - - - - - - - - - - - - - - - - - - - - - - - - - - - - - - - - - - - - - - - - -
Have a look at the pic below.
This is the first place I would start with cabinet EnABL for your speakers for three reasons:
1) requires a minimum number of blocks
2) should provide an audible change - which will encourage you to continue
3) it's completely reversable.
Obviously you need to repeat this top and bottom for both speakers.
Attachments
Chilli Chang cabinet EnABL - Pt 2
Parts List
1. Cutting mat
2. Blade
3. Ruler
4. 18mm Scotch 'Magic tape' or similar
5. PVC duct tape or Norton brand "All Weather Tape"
I prefer the "All Weather Tape" because it's clear and easier to cut, but PVC duct tape is also fine to use.
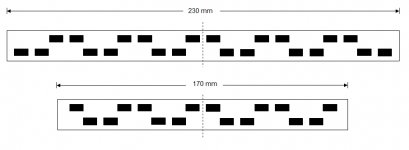
Lay the "All Weather Tape" sticky side down on the cutting mat and cut into rectangular blocks 8mm x 4mm.
Block size is calculated based on 18 block pairs using 4 x internal width of the mouth as the circumference.
See the EnABL block size calculator.
Once you have your blocks cut, lay a strip of Scotch 'magic tape' sticky side down on the cutting mat and then lay the blocks on top.
- - - - - - - - - - - - - -
Look at the attached pic.
The dotted line is the middle of the strip.
The longer strip is for the back wall and the shorter one for the horizontal part.
- - - - - - - - - - - - - -
You will need to make up four (4) of each strip to do both speakers - which equates to 152 blocks in total.
Once the strips are made, simply peel them up and stick them in place.
So long as the edge of the blocks is positioned as shown in my earlier post it will work as intended.
Try doing one speaker first, then listen to them in stereo.
Usually they will sound strangely unbalanced.
Listen with your ear close to the driver of the treated speaker and then compare with the untreated speaker - can you hear a difference?
Then do the other side and enjoy.
If there is any interest, I'll describe how to EnABL the baffle and mouths.
Cheers,
Alex
Parts List
1. Cutting mat
2. Blade
3. Ruler
4. 18mm Scotch 'Magic tape' or similar
5. PVC duct tape or Norton brand "All Weather Tape"
I prefer the "All Weather Tape" because it's clear and easier to cut, but PVC duct tape is also fine to use.
Lay the "All Weather Tape" sticky side down on the cutting mat and cut into rectangular blocks 8mm x 4mm.
Block size is calculated based on 18 block pairs using 4 x internal width of the mouth as the circumference.
See the EnABL block size calculator.
Once you have your blocks cut, lay a strip of Scotch 'magic tape' sticky side down on the cutting mat and then lay the blocks on top.
- - - - - - - - - - - - - -
Look at the attached pic.
The dotted line is the middle of the strip.
The longer strip is for the back wall and the shorter one for the horizontal part.
- - - - - - - - - - - - - -
You will need to make up four (4) of each strip to do both speakers - which equates to 152 blocks in total.
Once the strips are made, simply peel them up and stick them in place.
So long as the edge of the blocks is positioned as shown in my earlier post it will work as intended.
Try doing one speaker first, then listen to them in stereo.
Usually they will sound strangely unbalanced.
Listen with your ear close to the driver of the treated speaker and then compare with the untreated speaker - can you hear a difference?
Then do the other side and enjoy.
If there is any interest, I'll describe how to EnABL the baffle and mouths.
Cheers,
Alex
Attachments
Alex,
Please continue...half a world away, we follow similar paths, for I have a set of Curvy Changs...😉
Please continue...half a world away, we follow similar paths, for I have a set of Curvy Changs...😉
An externally hosted image should be here but it was not working when we last tested it.
G'day Ed,
I haven't built the Chilli Changs myself.
It's an application based on over 12 months of successful EnABLing to ports, mouths and cabinets to many different types of speakers.
Unfortunately I can't build them all - but I can share my accumulated knowledge.
I'll be away for the next few days, but will do some more when I get back.
Cheers,
Alex
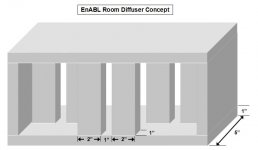
EnABL Room Diffuser Concept
G'day,
Too many ideas not enough time!
In a post a while back I mentioned that I had some ideas for EnABL room diffusers.
I have not built these but I wanted to share them with you all anyway.
The idea is really an extension of Bud's wave tank description here.
My assumption is that the range of frequencies generated in the wave tank would probably be roughly the same as the problematic ones in room ie. low frequencies.
Since EnABL blocks dealt effectively with low frequencies in the water tank, I reasoned that this could also be effective in room.
Bass trap perhaps?
See the pic below.
- Height is not specified.
In the wave tank test, a 1/2" high block pattern was effective for a 8 inch by 4 foot fish tank filled 6" deep with water.
How do we apply this in a room filled with air? Who knows.
- The 2" space behind the second row of blocks is to allow room for absorbant material to be added as/if required.
Maybe someone has some time and material to try this and give some feedback.
Cheers,
Alex
Attachments
These ones were a pain to do, but on 1st listen, it seems worth it (maybe not if someone has to pay me to do anymore, but i'd encourge end-users to do theirs)
I'm going to do a separate thread on these, as there are other comments & potential mods that can further improve these.
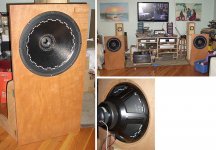
Anywhere here is picture (Hawthorne Silver Iris 15" Coaxial open baffles)
dave
I'm going to do a separate thread on these, as there are other comments & potential mods that can further improve these.
Anywhere here is picture (Hawthorne Silver Iris 15" Coaxial open baffles)
dave
Attachments
Hi gentlemen,
Excuse my ignorance but I posted my EnABL listening impressions in a new thread (my apologies, as I did not know about this thread). If you read the post, please also forgive the numerous misspellings of EnABL (and thank you Cal for fixing the spelling in the title).
http://www.diyaudio.com/forums/showthread.php?s=&threadid=136957
Edit: fixed the link. 🙁
planet10 said:I'm going to do a separate thread on these, as there are other comments & potential mods that can further improve these.
Those baffle edges are screaming "EnABL me, EnABL me" 😀😀
- Home
- Loudspeakers
- Multi-Way
- EnABL - Listening impressions & techniques