Alan Hope
This is going to be tedious!
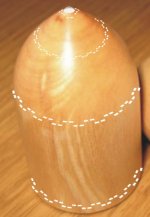
The two barrel patterns and tip treatment are the minimum needed. The interim round over pattern can be saved till all of the gloss coating is done and may not be needed at all.
These are of course virtual patterns. Their placement is visually close to where you want the actual patterns. The upper barrel pattern should begin at the break over for the bullet nose, with the top row definitely on that break over portion and the lower edge of the lower pattern right at the break over point, or as close as you can eyeball it.
Apply the patterns with a pen nib so that you can get a paint ridge to form when wet. This will dry with just a small ridge left over.
The tip patterns have a central paint circle of about 2mm in diameter with a PVA drop that size on top. See if you can support the plug upside down to get the drop to form a rounded blob.
The Gloss coat needs to go on full strength, or double coat a 50% coat. One full coat, top to bottom. Another coat over the bullet nose and covering the pattern placed there, will be the most likely Gloss coat coverage needed.
You need to listen to an event, before applying the first Gloss coat. Pick an alto female voice and play it at less than room filling volume. Get right up on the speaker and with your ear aimed at the thing, move your ear across the cone to whizzer area and over the phase plug. Anywhere within 6 inches should do for ear placement. You are listening for a shriek to the voice that eliminates the vibration and imposes an artificial and unusually loud character to this voice, as it slides up and down her range. If you do not hear any of this then listen out in the sound field to see if the "enriched" sound from the whizzer included angle has been tamed, with just the patterns.
If not, then apply the first full length coat and listen to the drivers after it has had a 24 hour cure period. If there is still some enrichment left, apply a coat over the bullet nose, except for the PVA dome.
If this still does not finish the job you will need to add a mid whizzer ring of blocks to the inside of the whizzer cone and likely an ever sticky acrylic paper glue coating to the out side of the Whizzer cone. At this point you are manipulating the overall impedence to high frequencies and redirecting that energy into the main cone. Not much of it needs to be redirected, usually.
Now, if you really want to get into trouble and also learn more about how you can manipulate the energy being emitted, a mid cone ring and a back side set of pattern rings will do nicely for this sort of terror. Take a look at the Hemp FR8c pattern pictures and pattern PDF located here
http://picasaweb.google.com/hpurvine/HempFR8
and here on post 1049,
http://www.diyaudio.com/forums/showthread.php?postid=1363694#post1363694
I have provided the oic for the virtual patterns below,
Bud
This is going to be tedious!
The two barrel patterns and tip treatment are the minimum needed. The interim round over pattern can be saved till all of the gloss coating is done and may not be needed at all.
These are of course virtual patterns. Their placement is visually close to where you want the actual patterns. The upper barrel pattern should begin at the break over for the bullet nose, with the top row definitely on that break over portion and the lower edge of the lower pattern right at the break over point, or as close as you can eyeball it.
Apply the patterns with a pen nib so that you can get a paint ridge to form when wet. This will dry with just a small ridge left over.
The tip patterns have a central paint circle of about 2mm in diameter with a PVA drop that size on top. See if you can support the plug upside down to get the drop to form a rounded blob.
The Gloss coat needs to go on full strength, or double coat a 50% coat. One full coat, top to bottom. Another coat over the bullet nose and covering the pattern placed there, will be the most likely Gloss coat coverage needed.
You need to listen to an event, before applying the first Gloss coat. Pick an alto female voice and play it at less than room filling volume. Get right up on the speaker and with your ear aimed at the thing, move your ear across the cone to whizzer area and over the phase plug. Anywhere within 6 inches should do for ear placement. You are listening for a shriek to the voice that eliminates the vibration and imposes an artificial and unusually loud character to this voice, as it slides up and down her range. If you do not hear any of this then listen out in the sound field to see if the "enriched" sound from the whizzer included angle has been tamed, with just the patterns.
If not, then apply the first full length coat and listen to the drivers after it has had a 24 hour cure period. If there is still some enrichment left, apply a coat over the bullet nose, except for the PVA dome.
If this still does not finish the job you will need to add a mid whizzer ring of blocks to the inside of the whizzer cone and likely an ever sticky acrylic paper glue coating to the out side of the Whizzer cone. At this point you are manipulating the overall impedence to high frequencies and redirecting that energy into the main cone. Not much of it needs to be redirected, usually.
Now, if you really want to get into trouble and also learn more about how you can manipulate the energy being emitted, a mid cone ring and a back side set of pattern rings will do nicely for this sort of terror. Take a look at the Hemp FR8c pattern pictures and pattern PDF located here
http://picasaweb.google.com/hpurvine/HempFR8
and here on post 1049,
http://www.diyaudio.com/forums/showthread.php?postid=1363694#post1363694
I have provided the oic for the virtual patterns below,
Bud
Attachments
Graham Maynard
I have found all of these comments to be true. Interestingly, a pattern set applied to a concave dome, as in some EMI systems and EPI tweeters, does provide the same benefits to low level signal coherence and intelligibility, as doing so on a convex dome. It does not alter the radiation pattern, but will eliminate the very narrow on axis peak power response, at least audibly. If you can accept the harrower dispersion, a treated concave tweeter generally sounds more natural than a convex one does. The differences are slight, except for the dispersion angle.
Another place the rings aid is in a mid cone, or perhaps closer to 2/5 from the voice coil to cone edge position, as first shown by Soongsc. This appears to equate to a major resonance node for cone drivers. The same audible benefits are found, with application of the mid ring, even on the one driver where a damping patch was applied across this area, on the back side.
There are some very interesting points being raised about cone surfaces here. http://madspeaker.com/
Bud
Can anyone comment on the effects on the ability to do the "disappearing act" before and after the EnABL treatment ?
If regarding the FE166E, it would be great...
I have a couple BIB with the FE166E that I wish could "disappear" as well as my FE108ES in the FE108S Fostex recommended spiral horns.
I will apply the EnABL treatment anyway, but would like to know that in advance just as to set up the right level of expectations...
Gastón
ghpicard said:Can anyone comment on the effects on the ability to do the "disappearing act" before and after the EnABL treatment ?
"disappearing act" is a goal i have been working at for years. I thot i had been really getting there until i was shown by the EnABLed speakers Bud did for me that much more could be achieved.
dave
Jordan EnABL Toothgel - Update
I haven't touched the drivers since EnABLing them a week ago (or was it two weeks ago). The tooth gel has dried out now (I determine this by touching my test samples I did at the same time).
The EnABL modification is very nice (even in tooth gel, I haven't used the recommend paint yet). A couple nights ago I removed a small 0.4 mh coil I had in series with the Jordan driver to run it full range again. What I found was that I don't need this coil anymore. I continue to use my ribbon tweeter with the same 3 uf Sonicap with .22 Sonicap Gen II bypass cap.
The combo sounds really nice. I believe the tooth gel is lowering the high frequency response of the Jordan by just the right amount. My guess is that it is absorbing it.
Cheers,
Brent
ghpicard
Before you tackle all of those Fostex drivers, please get some experience under your belt. One of the more interesting things to do is to tack solder a air of meter long insulated circuit wires or lamp cord, to a cheap full range driver. Perhaps a computer speaker or inexpensive car speaker. Then hook it up to a source, like a computer sound card and apply the pattern to just the outside ring set on the cone. Scale one of the many pattern guide rigs to fit around the outside of the cone, on the basket. Then, while listening to a small chorus or a jazz combo, put the pattern on. The long cord allows you to rotate the driver while applying that outer pattern set. For the last three or four pattern block pairs listen carefully to how the speaker's radiation pattern changes.
If you follow the gloss instructions and pattern sets for your drivers you will have the disappearing driver event. Poof, you will not "hear" their location from anywhere in the room. If you end up with a small area of enriched sound on axis, there are specific remedies, depending upon your driver type and just where you have applied Gloss material.
Bud
BudP said:ghpicard
Before you tackle all of those Fostex drivers, please get some experience under your belt. One of the more interesting things to do is to tack solder a air of meter long insulated circuit wires or lamp cord, to a cheap full range driver. Perhaps a computer speaker or inexpensive car speaker. Then hook it up to a source, like a computer sound card and apply the pattern to just the outside ring set on the cone. Scale one of the many pattern guide rigs to fit around the outside of the cone, on the basket. Then, while listening to a small chorus or a jazz combo, put the pattern on. The long cord allows you to rotate the driver while applying that outer pattern set. For the last three or four pattern block pairs listen carefully to how the speaker's radiation pattern changes.
If you follow the gloss instructions and pattern sets for your drivers you will have the disappearing driver event. Poof, you will not "hear" their location from anywhere in the room. If you end up with a small area of enriched sound on axis, there are specific remedies, depending upon your driver type and just where you have applied Gloss material.
Bud
Thanks, Bud !
I hope the EnABL works as expected. One of the (to me) annoying things of the FE166E BIBs, being used to the FE108s "invisibility", is the 166s inability to do that.
Once you get used to "be there", being in front of loudspeakers that "try to convince you are there but not get it" is annoying to some degree. 🙂
I will not tackle the fostexes before having practiced for a while. Fortunately I'm one of those characters that stick to the past and like to write on real paper with real pens instead of ballpoints, or word processors, so I have a 10% of the way already trodden 😉
I don't remember seeing instructions or specifics on the FE166 so this is my intended approach, very similar to Alan Hope's on his 206's:
1 - Use the barrel pattern, appropriately scaled for every of the circles to be painted.
2 - Circles to be painted:
- Main cone, outer pattern, two lines of blocks, next to the surround (as usual).
- Main cone, inner pattern, next to the whizzer/ VC union. Two lines of blocks. I'm afraid that making it a 3 line with one in the union and other over the base of the whizzer itself could prove to be an impossible task, and result in a disaster.
- Whizzer cone, outer pattern, three lines of blocks, one in the flat portion, one in the boundary line (the angle), one on the conical portion itself.
- Whizzer cone, inner pattern / dustcap boundary, three lines of blocks, one in the cone, other over the boundary, another over the dustcap. If I later decide to phase-plug it, I could draw another (outer) line of dots and be done.
- Dustcap, inner pattern, two lines of blocks around the inner void/vent/ring radiator. I suspect this pattern could be really helpful and perhaps even eliminate the need for phase plugs !
After this is done, well dried and evaluated, then it would came Gloss stage, as you very extensively described in previous posts and several threads/forums.
If still wanting for more in the midrange, then soongsc "mid-cone" (actually at 2/5 as you suggested) pattern would finish the treatment...
OT to this thread but still interesting, I'm more for the stress / rest method for break-in (have read that Ed Schilling is too) than for the brute-force one shot (either with music or test-tones) one. I noticed that after one week of high SPL workout, and one week of forced (job requirements) rest, things were noticeable better in my 166s... Kept getting better on that workout scheme until recently, when things seem to have stabilized. The same happened in the past with my FE108s.
Right on time to do the dreaded "International Post Office Orc Guild test" with Ed's EnABL kit, and then, if the kit passed the test, start to tread the EnABLE path.
Lotsa fun in the future, it seems. 🙂
Gastón
ghpicard said:I don't remember seeing instructions or specifics on the FE166 so this is my intended approach, very similar to Alan Hope's on his 206's:
I just did another set of FE166 (except for the plugs) so if you want to mail me i can provide specifics.
dave
Attachments
Hi all,
Just a note on the Poly s paint.
In talking to a couple of folks who are building a huge scale train set up, they recommended that if you use these paints, with an open bottle lid, as most of us will do, that you have a small syringe dispenser, one without needle, with some 99% pure isopropyl alcohol on hand.
A couple of drops and a vigorous shake before use and a couple of drops before closing the bottle for storage, will keep the paint from clotting. You can use mineral free water to thin the paint but it will not help with pen flow issues. The alcohol solves the pen floe problems.
They did say that there is supposed to be a new Poly S thinner out someday, but for now this is what to do.
Bud
ghpicard
All that you posted sounds correct.
On the mid cone ring, well, it is a bit more complex than just measuring 2/5 from the voice coil out onto the cone. With all other patterns on and what gloss coat you need planned, take a thin fairly dense probe, like the big end of the pen holder, and tap on the cone in a radial line. A smaller diameter is all you can use under the whizzer, so perhaps a glass thermometer.
Tap lightly, with a quick removal of the stick from cone surface. Listen carefully as you move the radial position of the tapping towards the surround. If there is a change in the ringing, after the tap, as you cross a particular point, this is most likely to be a major resonance node. Mark this spot lightly with a white pencil or black, depending upon your cone color, and move around the cone testing it radially at different spots.
You can be fooled by the close proximity of a whizzer cone, so move your ear position around a bit as you tap across what sounds like a null, if you have a whizzer involved.
If all of the radians provide the same point, as an almost null, between two distinctively different characteristic ringing decays, then this is a node.
Now flip the driver over and do the same thing on the back side. If you find a similar point of change, then the mid cone patterns will need to be applied to both sides of the cone. The blocks don't appear to need to be aligned with each other, with respect to the pattern block placement, in any direction.
I do not suggest you do this to your Fostex cones, without first doing the whole process on a few inexpensive cones. Once you are sure of the null sound and the two differing decay characters, then you can find them on any cone, and also on domes.
I must warn you about the results though. While it certainly aids in the "quickness" of how notes are expressed and also in the depth of coherent detail, you may also end up with a lot more high frequency information than you expected.
This appears to be some sort of reduction in impedence to the high frequencies actually being expressed across the entire cone surface.
I have tried these patterns both under and over the Gloss coat. I personally prefer application over the Gloss coat, sonically. It seems to provide a bit more information about voices and, oddly, how wet the singers mouth is. An unusual level of detail is available, in either case, with the Gloss coated mid pattern being smoother sounding.
Do spend some time with this mid cone ring, and it can be added later and brushed over with Gloss then too, so no reason to do it initially. This is also true for all other finished cones and so far, has been beneficial, most especially on the Fostex 126 driver, which only needs the patterns on the front side and should likely not be brushed over with Gloss.
Bud
Bud,
Thanks again for your (as usual) detailed procedure.
I will do the complete process without the mid cone ring and take my time to evaluate, and enjoy. Usually I wouldn't care much for HF content, as I am not very sensitive to that part of the spectrum. I'm in my forties, but sometimes have a strong tinnitus at 8 KHz that spoils my hearing around that range and up. The good side of it is that I don't feel the compulsion to buy expensive super-tweeters to go with my FRs 🙂 . However, I tend to feel the 166s much livelier but with less resolution than the 108ESs, besides that unnerving fact that they appear and disappear, sometimes several times during the same piece of music.
So I will be very careful and weigh all what you said before taking that final plunge.
Dave,
Thanks, I sent you mail.
Gaston
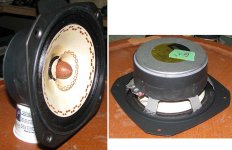
Here is a message sent to me by the owner of those Fostex F 200 A drivers that caused some feathers to ruffle a few weeks back. Looks like those same feathers will need to be disturbed again. A very interesting confluence here.
So, in the words of Gilbert.
" Hi Bud I'll post with you and let you post it for the other's, but first, those are my two girls and I am the guy in the collage, on the left, with my back in full and holding the clock------ The Fostex F200 A, in John K's cabinets, sounded great I thought, before I had even heard of this Enable process. But now, things are more than I could dream about!
Bud changed the characteristic of the f200a 's and they are the most 3D sounding speaker I've ever had. It's like opening a window and hearing everything. Bass is two or three octave's lower, they are so fast and you are really in the center of the sound, it's like a brand new speaker, all for the better, thanks Bud"
John K's cabinets are quite impressive. I have an interior picture showing just how thick walled these things are and he signs his work. Good for you John. What sort of bass loading do these provide, are they a back horn or a bass reflex or what John?
Bud
Attachments
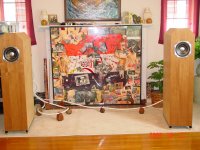
I don't know who's cabinets they are (in Bud's post), but they aren't this john k's. Just wanted to make that clear.
Oh darn John, I thought you were really giving the tweako thing a go! What, with trying the EnAbl AND speaker cable risers and all! 
Has anyone modified visaton B200 drivers yet? I've got a pair, and Ed's kit (thanks!), and want to do it. Just wondering if anyone has tips/experiences to share...
why not Enable those cable risers?
it should lift soundstage from the ground and promote healthy protons flow in cables.
I enjoy doing this kind of mods too, I had hard time deciding which phase plug sounds better, one that's made out of white or
red wine cork. 😀
it should lift soundstage from the ground and promote healthy protons flow in cables.
I enjoy doing this kind of mods too, I had hard time deciding which phase plug sounds better, one that's made out of white or
red wine cork. 😀
Ah, found this (post #1093):
http://www.diyaudio.com/forums/showthread.php?postid=1367676#post1367676
I guess I'm looking for a ring pattern if anyone can share...
http://www.diyaudio.com/forums/showthread.php?postid=1367676#post1367676
I guess I'm looking for a ring pattern if anyone can share...
Just start with the generic rings... i've just kept scaling & printing, and always go to my already made templates to see if i have one the right size.
dave
dave
Just a note to those who are planning to attend the VSAC 2008 show in Vancouver WA. over our labor day weekend. Wright Sound will have a room with a pair of Bamboo Fonken's, with full on Planet 10 EnABL'd FE 127 drivers installed. And for those of you who really love to argue, there will be some super special, highly secret, EnABL cables littering the debris field.
Hope to meet many of you there. I intend to attend on Saturday and will be in and out of Wright Sound, Lowther America and Grant Audio during the day.
Bud
Hope to meet many of you there. I intend to attend on Saturday and will be in and out of Wright Sound, Lowther America and Grant Audio during the day.
Bud
cuibono
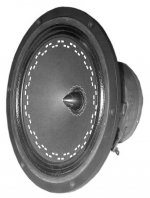
Here is a virtual treatment pattern for the B200 driver, I will also post a pdf with a generic set of 8 inch pattern guides and a conic section that you can print in Acrobat and change by % in the printer instructions. And I will post a set of generic flat pattern rigs that you can do the same thing with.
Bud
Attachments
- Home
- Loudspeakers
- Multi-Way
- EnABL - Listening impressions & techniques