Good advice, Andrew! Thanks!
Maybe I can work out some sort of modular design, like AJT's. That way I can store everything more conveniently when not building and/or waiting for parts. And it may be easier to test, tansport and assemble when finished.
I was thinking about the 5u deluxe chassis, because it looks good and is flexible in it's internal lay out. Perhaps there are other good but cheaper solutions out there.
There are lots of cases on Ebay thst are considerably cheaper but you need to machine more of it yourself.
[...]
I'm building my amps in the 4U deluxe case at least partially in an attempt to appease her sense of style. I asked if she preferred the plain face or with handles. Her response was that a TV, cable box and Bluray player were enough electronics for our living room. Uh Oh. Guess I have to figure a way to hide the equipment rack and make my speakers look like sculpture.
Bob, my listening/building area is in our unfinished basement for precisely that reason.
Women... Can't live with them, can't live without them 😀
Last edited:
@ AJT: Do you DIY all the metalwork yourself as well? 😱
yes....
Does anyone has experience with this case or vendor/maker? Looks like a nice alternative to the 5u deluxe chassis. It's a bit less tall, but still high enough, I think. Could use more cooling slots in the top panel. Probably big enough heat sinks. But, as per AndrewT's suggestion, this will probably (need to) be ordered last.
It will same some €40,- incl tax and shipping. I don't know if the quality of the case justifies the (still quite steep) price. It brings total cost down to some €1100,-- How do you guys build for so little money?? Do you have piles of parts lying around?
It will same some €40,- incl tax and shipping. I don't know if the quality of the case justifies the (still quite steep) price. It brings total cost down to some €1100,-- How do you guys build for so little money?? Do you have piles of parts lying around?
Last edited:
Must be great if you can do it all yourself. I sure can't... 😉yes....
Must be great if you can do it all yourself. I sure can't... 😉
you can do it too...😉
btw, i am planning an elaborate scheme to shut down the amp in case
something goes wrong, SOA protection for the output trannies, and overheating/input muting in case of signal overdrive....
hopefully i can make this amp as bulletproof as i can...😎
James - IOW, it's called properly planning your amp build. With good planning you increase your chances of being successful. 🙂Leave the case/chassis to last.
Use a temporary heatsink during testing.
Find out how big and how many modules you want to fit in the case.
Lay them out and test them in the "shape" you intend to use.
That tells you the size of case you will need.
Typical modules for a Power Amplifier:
transformer, PSU, two Amp PCBs, soft start, DC blocker, speaker protection, auxiliary transformer, remote ON/OFF,
Currently I'm calculating the total cost for all the parts needed. And concidering I can probably put in more safety measures, like AJT is doing, I'm not finished. The total cost is rising to a point where I will cancel the whole thing, because it's simply getting too expensive to accomplish. Had I not done this, I would have probably bought the wrong power transformers and started buying other parts, before coming the conclusion that it was getting too complicated and expensive, leaving me with a partially finished and unusable amp.James - IOW, it's called properly planning your amp build. With good planning you increase your chances of being successful. 🙂
There's probably a lot more to figure out and plan. I'll soldier on for now, looking for ways to save costs on parts, without compromising quality. Or break the thing in more manageable chunks.
Don't get me wrong, though. My hands are *itching* to get dirty! But as long as I'm not convinced that I've got all my bases covered, I won't start. Though perhaps it won't hurt to purchase and roughly match transistors. As will building the PSU's... Hmmm... where to start?? 😛
Without being too much of a skeptic... and certainly not to discourage you, one thing I have learned in my 62 years is that - almost universally - everything costs more than originally thought or planned for. At least my DIY projects do! 🙂 But then I'm super fastidious too. 🙂Don't get me wrong, though. My hands are *itching* to get dirty! But as long as I'm not convinced that I've got all my bases covered, I won't start. Though perhaps it won't hurt to purchase and roughly match transistors. As will building the PSU's... Hmmm... where to start?? 😛
Mr. Blond,
I've built many cases for many projects, all of them from scratch. Tools you will need:
Jig Saw and metal blades
Drill motor and bits
Metal files
Screwdrivers and wrenches (I really like Allen bolts)
Needle nose pliers
Taps for making threads in the heatsinks. (3mm is a good one)
A good multi-meter
Soldering Iron, Pencil tip 1/32" - 1/16" tip
Different gauges of hook up wire. 16 /18ga stranded is a good general purpose size.
Buy all your boards that you intend to use for your amp. Including PS board.
Buy the Transformer
Buy the Heatsinks. Know what size you need, don't guess.
Lay out all the pieces on a piece of cardboard, then start arranging the parts to fit in the best locations. Keep A/C power away from signal wires!
They sort of build themselves as you go.
Don't give up!
Look for a scrap metal retail / recyclers seller in your city.
Look for used/broken power amplifiers (your country) or on Ebay (your country) The Transformer is usually good and you can salvage many parts.
You may even be able to use the case! or at least part of it!
Consider tools as an investment in your future education.
Ron
HB Bias question????
Hi All,
I have HB output bias newb question, Had a few problems getting one board going but it seems to be working now.
Question IS... after the "start - up" I left the probes on TP1 & TP2 just because That was my main problem before the fix.,
I am seeing,, a fluctuation of the voltage, It goes from about 25 mV to 100+ mV with the input volume turned up or down.
Kind of like a VU meter. 😕 It does go back down to about 26 - 27 mV when I turn the input signal from the preamp to zero . Is this normal?
It has been running for about 2 hours now and the heat sink temp is about 110 F.
Cheers,
LJS
Incentive
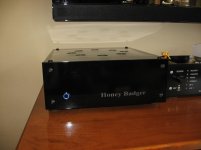
As promised photos of my quiet as the dead H.B.
Zero noise from the speakers until music.
I will give my impression of the amp after it has settled in and the caps have em, finalized. (no flame posts!)
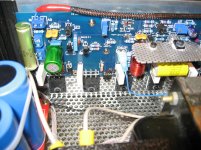
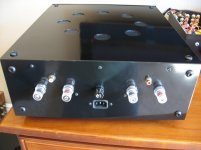
Case is homemade, Transformer is from a Hafler DH-200. (recycled)
120,000uF power supply @ 63V.
Heatsink from Heatsink USA, 10" x 5" polished where transistors are mounted.
Silver 20ga. signal wire. Homemade shielded twisted input (thanks OS)
10 Ohm signal --->ground lift with 35A bridge and cap.
Speaker protection circuit and soft start circuit.
Many, many thanks to O.S. and those who have contributed so much. It IS appreciated. I don't want to name names as I might inadvertently leave someone out and cause hurt feelings. Suffice to say I have learned quite a bit and I am grateful for your assistance and teachings.
This has been a very fun and out of my comfort zone project from the start, but this is how we improve ourselves.
Thanks friends, you are many.
Ron
As promised photos of my quiet as the dead H.B.
Zero noise from the speakers until music.
I will give my impression of the amp after it has settled in and the caps have em, finalized. (no flame posts!)
Case is homemade, Transformer is from a Hafler DH-200. (recycled)
120,000uF power supply @ 63V.
Heatsink from Heatsink USA, 10" x 5" polished where transistors are mounted.
Silver 20ga. signal wire. Homemade shielded twisted input (thanks OS)
10 Ohm signal --->ground lift with 35A bridge and cap.
Speaker protection circuit and soft start circuit.
Many, many thanks to O.S. and those who have contributed so much. It IS appreciated. I don't want to name names as I might inadvertently leave someone out and cause hurt feelings. Suffice to say I have learned quite a bit and I am grateful for your assistance and teachings.
This has been a very fun and out of my comfort zone project from the start, but this is how we improve ourselves.
Thanks friends, you are many.
Ron
Attachments


Last edited:
Renron,
Nice case, very good job.
However, with these swiss cheese VAS heatsinks you are asking for trouble in the long run. The whole area of the transistor must be heatsinked evenly. Somehow bolts got loose on my VAS transistors and although when cool these still measured well they did not perform well when hot.
cheers,
Last edited:
Found a couple of inductors that is 0,2mH , but i don't have a lcr meter , is there some other way i find out to get 1,5uH ?
Found a couple of inductors that is 0,2mH , but i don't have a lcr meter , is there some other way i find out to get 1,5uH ?
Just hand wind the inductor. It isn't critical. 13 turns of 16 gauge wire around a 5/8" (AA Battery) form will give you 1.5uH.
Air Core Inductor Coil Inductance Calculator
RenRon,
looks very nice! I like the silkscreened (?) text on the front panel! I'm very curious about your impressions of the Honey "Bad ***" Badger.
Where did you get the power button? I'd like to use something like that in my amp. How is the light inside it powered?
looks very nice! I like the silkscreened (?) text on the front panel! I'm very curious about your impressions of the Honey "Bad ***" Badger.
Where did you get the power button? I'd like to use something like that in my amp. How is the light inside it powered?
Just hand wind the inductor. It isn't critical. 13 turns of 16 gauge wire around a 5/8" (AA Battery) form will give you 1.5uH.
Air Core Inductor Coil Inductance Calculator
thanks😀
- Home
- Amplifiers
- Solid State
- diyAB Amp The "Honey Badger" build thread