*LOL* Re #558 Mags (and Cochleus)...as a child of the '60's, I've got these preconceptions tha linger...😉 The only one we've got around here is a cheapy postal scale which one does better by guessing...
Ah, the Carbon Collective is gathering...*G* I'll just kibitz and record for later reference.
Laying out the cone's shape/profile is the easy part, MHO...it's the 'what' that can get involved, and the adhesive for a reliable and robust seam. The 3M VHB I used on the V2's is still strong, but I've epoxied a seam on a V3 that was beginning to release. There's a shelf life on certain adhesives, and I suspect that what I've in hand has surpassed that point. But I think it's time to leave the 5mil alum behind and move on, which is where I'm at now.
But, do carry on, y'all....*S*
I've been thinking it might be better to lay-up the carbon fabric on a cone mandrel. That way the cone wouldn't be pre-stressed.
Made a new cone testing a new material, 0.15mm polypropylene. Beats my previous cones both in sound quality and durability. It is 14cm diameter and weighs 4.5g. I made it less steep at 60 degrees due to lower modulus of material. I like the way it sounds, and I'll give it a better test run later (when everybody else is awake).
Attachments
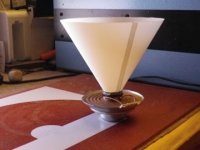
Nice looking, and polyprop for a cone is interesting. I've been thinking of Mylar or the eq. for a trial. It'd be fun to have a clear cone, just for the 'ell of it, and it might even sound acceptable...
Re laying up a cf cone on a mandrel...I don't know if it would stick to said mandrel, but...from my sign fab days, there's a material called release paper, the backing to vinyl graphics. Nothing sticks to it, and it gets thrown away after use. You might haunt a sign shop for a chunk of it to try it out if 'things get sticky'....
Re laying up a cf cone on a mandrel...I don't know if it would stick to said mandrel, but...from my sign fab days, there's a material called release paper, the backing to vinyl graphics. Nothing sticks to it, and it gets thrown away after use. You might haunt a sign shop for a chunk of it to try it out if 'things get sticky'....
Re laying up a cf cone on a mandrel...I don't know if it would stick to said mandrel, but...
What if you made the mandrel out of casting wax...? You could just melt it away if it didn't release. 🙂
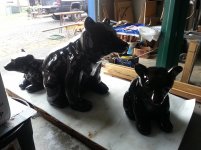
BTW...Your bears look "better than the average"...🙄
Sounds messy...and then there's casting the mandrel repeatedly if you're like me and you'd prefer pairs over one-offs. But to each...
'Da bears'....since my spouse is a red head, we've had fun with Goldilocks puns. They are well behaved, no problem to feed, and no real threat. In fact, you could say they're pretty inert, and be right on. *L*
They're for a dinky (850 sq. ft.) 'play area' at the main entrance to a hospital in Cherokee, 'bout 1 1/2 hrs. S/W of us. It's been a real PIA/JFH job, more details per sq.ft. than anything we've ever encountered. The landscape architect begged us to take the job, as we were the only co. that bothered to call him back. In retrospect...we should have told him to take a hike. But, it'll be 'high-profile' due to it's position and ought to look good when the dust finally settles....
Another notch in the belt...and we might break a little better than even...
The landscape architect begged us to take the job, as we were the only co. that bothered to call him back. In retrospect...we should have told him to take a hike. 😀
Another notch in the belt...and we might break a little better than even...
That's awesum. Are you selling stock?
*L* Only if by 'stock', you're referring to what we make and install. By US gov standards, we don't even rate as a 'micro business'. So we've decided to create a 'nano business' category, even if we're the only ones to claim the fame....
Most playground co.'s are privately owned. Not big enough to get the sharks' attention, much less make them drool. Besides, these days their attention is always easy money by leveraging everything until the bubble bursts after they've cruised away with 'their share'...a.k.a we don't GAS what or how, or who might suffer, as long as we've got Ours....and the rest of you can KMA.
I think you can fill in the initials...😉
The 'financial society' isn't for the faint of heart...nor does it seem to have much of one...IMHO....
...but I'm somewhat cynical...it's just a form of organized gambling without the neon, glitz, and show girls, again IMHO. *L* Leave it to those who can throw their $ about like that. Buy dirt (land); they're not making any more of it, until we get to Mars.
The view will be interesting, as long as you like staying inside... 😉
The view will be interesting, as long as you like staying inside... 😉
What if you made the mandrel out of casting wax...? You could just melt it away if it didn't release. 🙂
BTW...Your bears look "better than the average"...🙄
you guys are showing your green horns. 🙄
Making a mandrel is easy enough and the suggestions thus far seem off. There are however things to consider. To get a finish like that seen in the German physics unit nothing but a mirror will do. Second it will be difficult to have an overlap to be glued. Third flat sheets are MUCH easier and requires no tooling with great results.
Heres the break down on the w's of the process.
Use a mirror to get a mirrored finish. A release agent like Frekote must be applied to the surface. For resin prep I recommend the following. MGS resin or really anything with a slower cure. Mix as accurate as you can a digital scale really is the best. mix well. heat slightly to lower the viscosity and degas. Now apply a thin layer on the mirror apply the carbon I recommend cutting a rectangular area that is 2 inches larger in all directions than the cut-out to allow for cutting of flashing. I also recommend taping the edges The process for this is easy. Measure the area of carbon you want. Tape the outline with scotch tape of a non stretchable tape, then use a rotary cutter and cut in the middle of the tape. You now have a very robust sheet of carbon. Next soak the carbon and spread using a bondo spreader the small ones making sure to not only spread the epoxy but also the fibers flat take your time and let it set in. Then vacuum bag or make a releasable press with the same Frekote. Cure for 3 days and then post cure IN THE MOLD OR UNDER PRESSURE!. This will prevent warping.
Use a mirror to get a mirrored finish. A release agent like Frekote must be applied to the surface. For resin prep I recommend the following. MGS resin or really anything with a slower cure. Mix as accurate as you can a digital scale really is the best. mix well. heat slightly to lower the viscosity and degas. Now apply a thin layer on the mirror apply the carbon I recommend cutting a rectangular area that is 2 inches larger in all directions than the cut-out to allow for cutting of flashing. I also recommend taping the edges The process for this is easy. Measure the area of carbon you want. Tape the outline with scotch tape of a non stretchable tape, then use a rotary cutter and cut in the middle of the tape. You now have a very robust sheet of carbon. Next soak the carbon and spread using a bondo spreader the small ones making sure to not only spread the epoxy but also the fibers flat take your time and let it set in. Then vacuum bag or make a releasable press with the same Frekote. Cure for 3 days and then post cure IN THE MOLD OR UNDER PRESSURE!. This will prevent warping.
Once you have a perfect laminate make the stencil. Use a cad program and basic geometry. Print and then spray a reusable adhesive like loctite spray adhesive. Then apply to the laminate. cut using scissors taking your time and sand as needed. The stencil must have an extra material to allow the ends to be glued. Then glue the ends Using a plastic oriented glue I recommend Scothweld ca40h. Its really that simple.
I've been thinking of Mylar or the eq. for a trial.
Good idea. Polyimide (kapton) seems worth trying, too. I like the prospect of cut and roll...your done! 🙂
*L* Re #572....To quote Van Morrison & Kermit the frog, "It's not easy being green..." 😉
...and that's a great step by step 'how to'....Thanks. *S*
...and that's a great step by step 'how to'....Thanks. *S*
....and it's a 'how to' aimed at what we're about, which is priceless. I've poked and prodded about cf diy sites, most of which are aimed at car parts or vinyl 'cf' (which ain't). You've cut to the chase in your typ. fashion....
Dr. Mags is 'IN'. Patient will be doing the macarena in 5,4,3,2,1... *L*
Brilliant. Thanks again.
(Re lunch in ASV...what do you like to eat? Drink? PM if Vegan...😉...)
Dr. Mags is 'IN'. Patient will be doing the macarena in 5,4,3,2,1... *L*
Brilliant. Thanks again.
(Re lunch in ASV...what do you like to eat? Drink? PM if Vegan...😉...)
*L* Re #578...Ahem...per Wikipedia....
"Cuerno Verde, which translates to "Green Horn" in English, is the Spanish name given to Tabivo Naritgant because of the green tinted horns that he wore on his head-dress in battle. The English translation of the original Comanche name is "Dangerous Man". He inherited both his name and his distinctive head dress from his father, who was killed in combat against the Spanish at Ojo Caliente, in what is now New Mexico, in October 1768."
I think I'll roll with the Comanche translation....*evil L* I know I've got some LA freeway moves that'll support that...😉
- Home
- Loudspeakers
- Planars & Exotics
- DIY Walsh driver revisited