OK this is gonna be fun!!
Got everything plugged it, lots of lovely little leds glowing all over the place. All my supply voltages check out. I'm happy with that side of things.
BUT No sound and no scope for troubleshooting so lets look at the easy stuff first.
Diode on my I2S>Simultaneous board was reversed so sorted that out first off.
Not sure if I am tweaking the offset correctly? I'm using D1 Nelson Pass I/V - I soldered it ages ago and it has been sitting waiting for me so it is untested. I have depopulated the I/V arrangement on the Distinction board and feeding the D1 directly - correct?
So like a real man I go back to read instructions about the D1 and found I was probing the wrong thing (output) to zero the DC (input) - got that sorted. Nice on both sides as good as zero
BUT No sound
Oh look!! Doh! I have the output wires from DAC reversed - sorted.
BUT No sound
Let's wait - yep here it comes!!! Those caps take longer to charge than on my Arcam Alpha board version - different caps.
MUSIC!!! SO I am going to call that as good as going first go around!! Lucky me!!
Got a standard chip in there at the moment - will give it a few hours just to check there are no problems arising before I pop a S1 in there.
First impressions, bearing in mind for me this is new DAC circuit and a new I/V that I am listening to (other DAC is valve output) and everything is fresh in there I fancy it might be a bit sibilant but I will reserve judgement of course until after a fair few hours.
I'll post some pics once I have finished tidying up the wires and have the case finalised - may have to cut some more ventilation into it on account of 3x Reflektor-Ds and other thermal generators in there. Might slap a heat sink on top of the TDA as well.
Very happy with my week. Have about 48hrs to spare before my partner gets back from her work trip - should be able to finish the case work by then. For now going to swap a few of my favourite tracks through there to have a listen. Celebratory beers will be drank tonight that is for sure.
Best wishes to the others on this thread trying to get theirs going.
Great job! Enjoy!
Done.
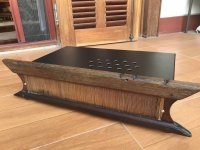
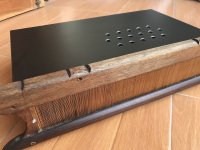
As promised some photos
The front is from a traditional Lao loom so the wood is probably teak, at least that bottom piece looks teak-ish not sure about the top rail.
I added some breathing holes to the top and because the whole front is porous on account of it being the loom piece it should draw some air there. I am happy how they came out using the step bit on my hand drill.
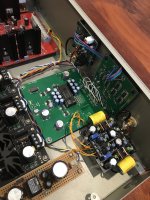
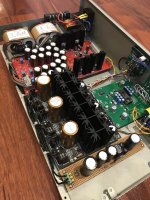
Before closing it all up I put in the S1 and heatsinked it; added some hot glue where I've soldered wires directly to the I2S > Simultaneous board; and slapped some SilentCoat around the chassis to make it nice and dull.
Hope I won't have to open it up for a long while - don't think there is anything else I want to do to it right now. But never say never. I've got a second D3 board .... parallel? differential? 🙂
Very happy.
Big thanks to Ryan for his support.
What's next?
As promised some photos
The front is from a traditional Lao loom so the wood is probably teak, at least that bottom piece looks teak-ish not sure about the top rail.
I added some breathing holes to the top and because the whole front is porous on account of it being the loom piece it should draw some air there. I am happy how they came out using the step bit on my hand drill.
Before closing it all up I put in the S1 and heatsinked it; added some hot glue where I've soldered wires directly to the I2S > Simultaneous board; and slapped some SilentCoat around the chassis to make it nice and dull.
Hope I won't have to open it up for a long while - don't think there is anything else I want to do to it right now. But never say never. I've got a second D3 board .... parallel? differential? 🙂
Very happy.
Big thanks to Ryan for his support.
What's next?
Attachments

Last edited:
Done.
As promised some photos
The front is from a traditional Lao loom so the wood is probably teak, at least that bottom piece looks teak-ish not sure about the top rail.
I added some breathing holes to the top and because the whole front is porous on account of it being the loom piece it should draw some air there. I am happy how they came out using the step bit on my hand drill.
Before closing it all up I put in the S1 and heatsinked it; added some hot glue where I've soldered wires directly to the I2S > Simultaneous board; and slapped some SilentCoat around the chassis to make it nice and dull.
Hope I won't have to open it up for a long while - don't think there is anything else I want to do to it right now. But never say never. I've got a second D3 board .... parallel? differential? 🙂
Very happy.
Big thanks to Ryan for his support.
What's next?
Very cool!!
Hi group,
Can each of you sound-off on how you did your U.Fl male smd connectors? I'm assuming hot air rework or oven?
Cheers,
Greg
Can each of you sound-off on how you did your U.Fl male smd connectors? I'm assuming hot air rework or oven?
Cheers,
Greg
Hi Greg,
I have a budget hot air rework station that I purchased from Amazon a few years ago. it looks just like this one: https://www.amazon.com/Tek-Motion-D...2ZV5YEG7EKV&psc=1&refRID=H5M5YTBR32ZV5YEG7EKV
I used it to put together both my D3 and I2S to Simultaneous boards.
Ben
I have a budget hot air rework station that I purchased from Amazon a few years ago. it looks just like this one: https://www.amazon.com/Tek-Motion-D...2ZV5YEG7EKV&psc=1&refRID=H5M5YTBR32ZV5YEG7EKV
I used it to put together both my D3 and I2S to Simultaneous boards.
Ben
Fantastic build Clayton, very neat, the face plate is a nice creative touch.
Im testing out a differential setup in my DAC at the moment, its sounding pretty good. I made another I2S2SIM PCB that has inverted data output. The output of the D3 is going into a transformer with the center tap going to a -4mA CCS with an IV resistor of 60R on each output.
Im testing out a differential setup in my DAC at the moment, its sounding pretty good. I made another I2S2SIM PCB that has inverted data output. The output of the D3 is going into a transformer with the center tap going to a -4mA CCS with an IV resistor of 60R on each output.
Done.
As promised some photos
The front is from a traditional Lao loom so the wood is probably teak, at least that bottom piece looks teak-ish not sure about the top rail.
I added some breathing holes to the top and because the whole front is porous on account of it being the loom piece it should draw some air there. I am happy how they came out using the step bit on my hand drill.
Before closing it all up I put in the S1 and heatsinked it; added some hot glue where I've soldered wires directly to the I2S > Simultaneous board; and slapped some SilentCoat around the chassis to make it nice and dull.
Hope I won't have to open it up for a long while - don't think there is anything else I want to do to it right now. But never say never. I've got a second D3 board .... parallel? differential? 🙂
Very happy.
Big thanks to Ryan for his support.
What's next?
I usually tin the signal pad first with enough solder to tack the connector on the pads, then solder the ground pads and then go back to the signal pad with some flux and a little more solder. I use .48mm 5 core solder. I set my iron to about 330C.
Hi group,
Can each of you sound-off on how you did your U.Fl male smd connectors? I'm assuming hot air rework or oven?
Cheers,
Greg
Fantastic build Clayton, very neat, the face plate is a nice creative touch.
Im testing out a differential setup in my DAC at the moment, its sounding pretty good. I made another I2S2SIM PCB that has inverted data output. The output of the D3 is going into a transformer with the center tap going to a -4mA CCS with an IV resistor of 60R on each output.
Interesting ryanj
Canot wait to see photo of differential setup
Last edited:
Hi group,
Can each of you sound-off on how you did your U.Fl male smd connectors? I'm assuming hot air rework or oven?
Cheers,
Greg
A bit of solder paste and then use an iron. If I need a bit more solder then I use 0.5 solder like Ryan has also suggested. I have hot air station but have found that I still revert to using the iron.
U.Fl male smd connectors
Its my one niggle with these boards. I'd prefer simple through hole connections 🙂 the terminated wires that you need to fit to these terminals are expensive! and you need to plan in advance to buy the correct length
Fantastic build Clayton, very neat, the face plate is a nice creative touch.
Im testing out a differential setup in my DAC at the moment, its sounding pretty good. I made another I2S2SIM PCB that has inverted data output. The output of the D3 is going into a transformer with the center tap going to a -4mA CCS with an IV resistor of 60R on each output.
Thanks Ryan
Interesting ryanj
Canot wait to see photo of differential setup
Yes I will eventually, its a real birds nest at the moment and its only going to get worse as I want to try adding another 2 D3 pcbs to make it a parallel differential configuration.
What output stage are you using?
Nelson Pass D1 with mix of Kiwame and Shinkoh resistors and M-Cap, Auricap & WiMA caps powered by r-core trafo into Sjostrom SSR03 super regulator.
One part of me wants to swap it out for my old SRPP output to check which I prefer but the other part of me can’t be bothered🙂 anyways got to many other things to get on with rather than keep playing with this project
Hi group,
Can each of you sound-off on how you did your U.Fl male smd connectors? I'm assuming hot air rework or oven?
Cheers,
Greg
Hi Greg,
I used a Hakko-888D iron with a small pointy tip and very small solder wire.
Mark K.
if I use d3 panel in Simultaneous mode, do I need to use the 5V power connector next to the 26V power connector? What does it nourish?
Hi,
The TDA chip needs 3 different voltage supplies, +5V, -5V and -15V. The +5V feeds the +5V, the floating 26V feeds the -5V and -15V. Take a look on the chip datasheet.
The TDA chip needs 3 different voltage supplies, +5V, -5V and -15V. The +5V feeds the +5V, the floating 26V feeds the -5V and -15V. Take a look on the chip datasheet.
Actually, the floating 26V provides power to the +5V, -5V, and -15V supplies for the TDA1541A. The +5V input provides power to the +4.5V supply for the input attenuator circuits to attenuate the voltage levels of the input signals.
- Home
- Group Buys
- DIY TDA1541A PCB "D3"