Ron,
Thanks for the detailed response. There's an OSH here, too, and I'm pretty sure I know which bushing you're talking about. I'm looking forward to adding this rig to my drill press. It's floor standing, a garage sale wonder, and about the best $75 I ever spent on tools. I was doing some turning by just putting short stock in the chuck, which worked fairly well, but anything over a couple of inches wobbled badly.
And, next, some decent drilling jigs - - - -
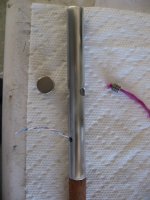
And it was going so well too. 🙁 While trying to press-fit the N48 magnet in the tonearm wand section it cracked. I removed too much of the inner wall trying to align it perfectly. It is harder than it looks to drill a hole straight through the diameter of a tube, I was off just a "RCH" and was never able to center it up perfectly. Oh Well, good excuse to make another one, now that I have some experience! 🙄
Ron
Ron
Attachments
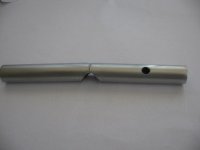
For those of you who don't know the measurement "RCH", it stand for Red "Cat" Hair" defined as a very very small thickness.... well not actually a "Cat" hair but a much youger feline, but that would be a "RPH". To tell the truth, the "C" word in "RCH", rhymes with "hunt".
JD
QUOTE=Renron;2147340]And it was going so well too. 🙁 While trying to press-fit the N48 magnet in the tonearm wand section it cracked. I removed too much of the inner wall trying to align it perfectly. It is harder than it looks to drill a hole straight through the diameter of a tube, I was off just a "RCH" and was never able to center it up perfectly. Oh Well, good excuse to make another one, now that I have some experience! 🙄
Ron[/QUOTE]
Too bad, one more instance of being close to a RCH that doesn't work out well 😀And it was going so well too. 🙁 While trying to press-fit the N48 magnet in the tonearm wand section it cracked. I removed too much of the inner wall trying to align it perfectly. It is harder than it looks to drill a hole straight through the diameter of a tube, I was off just a "RCH" and was never able to center it up perfectly. Oh Well, good excuse to make another one, now that I have some experience! 🙄
Ron
What size and wall thickness tube are you using? Another question, if you don't mind: What size and strength are the magnets?
I am inching closer to this tonearm build and your posts are very helpful.

Mr. Davidson,
Glad to see your still hanging around this thread, your insight and photographs are what has inspired me to attempt a "version" of Franks wonderful tonearm.
JD, that RCH comment was directed at you, as it gave me a side ache from laughing so hard the first time you used that measurement. Thanks.
OK, emmm, back on topic. I'm trying to understand the VTA adjustment on your implementation of the reference arm. Is the center rod is hard mounted (attached by grub screw?) to the lower tower over which the upper tower slides? Which is then adjusted by an internal long allen set screw which pushes down on the rod from threads on the upper tower? I see that you also have included a keyway in your design that was mentioned as missing in a different thread from the original design. Is that correct? If so, good idea! It was mentioned that adjusting the VTA may change the overhang on Franks commercial product, your inclusion of the keyway would prevent that. If I see it correctly.
Does the arm lifting device provide enough vertical travel? I'm looking at one on FleaBay for $50. Jelco JL-45. JELCO JL-45 CUEING DEVICE(LIFT/LOWER) - eBay (item 300414166685 end time May-03-10 21:00:45 PDT)
Thanks again for all of your photographs, they have helped tremendously!
Westend, I'm glad you too are starting this project, we can flounder together! Figuratively of course. I'm using 1/2" aluminum tubing, wall thickness .05" , that doesn't leave a lot of meat left for the grub screw threads which support the arm tube. I think I'll use some loctite when it comes time for the final assembly.
This project looks simple and easy, it is far from that in reality. Lots of fun and I'm enjoying this immensely.
AuroraB, you are correct, it has been my experience that it is indeed a larger unit of measure than say, a BCH. 😱 Which I prefer. YMMV.
Frank, I presume your still watching your students here on this thread,
Thank you soooo much for allowing us to mimic (at best) your years of hard work and very successful accomplishments in the field of tonearm design. (Mr. Schroder) BTW, I've seen Frank's last name spelled with and without the e after the o, sorry, no umlats on my keyboard. 😀
Last edited:
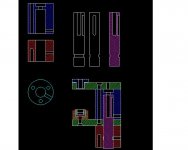
vta adjustment....
there is a central rod that is inside the base and the top main body.
at the bottom of that rod is a groove that runs around the circumference that is captured, held in place and locked byt the set screw in the base.
on top of that central rod is a threaded hole, and in that threaded hole is a captured hex head machine screw. The top plate has a central hole directly over that machine screw to accsess it with a hex wrench.
The central body has a land area that the screw works against so that by rotating the screw the assembly raises or lowers, while the central rod stays stationary locked to the base..
I can post a cut-a-way without dimensions for better explaination, provided that it would be allowed by Frank (even tho this is not part of his patent)
JD
Mr. Davidson,
Glad to see your still hanging around this thread, your insight and photographs are what has inspired me to attempt a "version" of Franks wonderful tonearm.
JD, that RCH comment was directed at you, as it gave me a side ache from laughing so hard the first time you used that measurement. Thanks.
OK, emmm, back on topic. I'm trying to understand the VTA adjustment on your implementation of the reference arm. Is the center rod is hard mounted (attached by grub screw?) to the lower tower over which the upper tower slides? Which is then adjusted by an internal long allen set screw which pushes down on the rod from threads on the upper tower? I see that you also have included a keyway in your design that was mentioned as missing in a different thread from the original design. Is that correct? If so, good idea! It was mentioned that adjusting the VTA may change the overhang on Franks commercial product, your inclusion of the keyway would prevent that. If I see it correctly.
Does the arm lifting device provide enough vertical travel? I'm looking at one on FleaBay for $50. Jelco JL-45. JELCO JL-45 CUEING DEVICE(LIFT/LOWER) - eBay (item 300414166685 end time May-03-10 21:00:45 PDT)
Thanks again for all of your photographs, they have helped tremendously!
Westend, I'm glad you too are starting this project, we can flounder together! Figuratively of course. I'm using 1/2" aluminum tubing, wall thickness .05" , that doesn't leave a lot of meat left for the grub screw threads which support the arm tube. I think I'll use some loctite when it comes time for the final assembly.
This project looks simple and easy, it is far from that in reality. Lots of fun and I'm enjoying this immensely.
AuroraB, you are correct, it has been my experience that it is indeed a larger unit of measure than say, a BCH. 😱 Which I prefer. YMMV.
Frank, I presume your still watching your students here on this thread,
Thank you soooo much for allowing us to mimic (at best) your years of hard work and very successful accomplishments in the field of tonearm design. (Mr. Schroder) BTW, I've seen Frank's last name spelled with and without the e after the o, sorry, no umlats on my keyboard. 😀
Attachments

Westend,
Oops, sorry, forgot to answer the other questions;
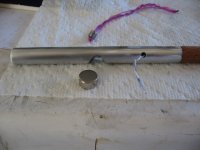
Magnets are N48 1/2 diameter x 1/4 thick, shocking how strong they are for being such little buggers.
I reshaped my armwand, and got lucky and found a way that works great to drill the hole for the magnet. At first I used a set of drill bits but found it hard to center exactly. Very frustrating. 3 pipes later I tried just using a 1/2" counter sink bit, Voila, the clouds parted, sun came out, and the birds began to sing. Perfect hole. Yahoo! Sometimes we just stumble onto something that works. (I got lucky)
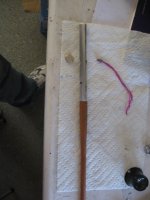
The string is just for trial purposes. Not what I will use in final build.
Ron
Oops, sorry, forgot to answer the other questions;
Magnets are N48 1/2 diameter x 1/4 thick, shocking how strong they are for being such little buggers.
I reshaped my armwand, and got lucky and found a way that works great to drill the hole for the magnet. At first I used a set of drill bits but found it hard to center exactly. Very frustrating. 3 pipes later I tried just using a 1/2" counter sink bit, Voila, the clouds parted, sun came out, and the birds began to sing. Perfect hole. Yahoo! Sometimes we just stumble onto something that works. (I got lucky)
The string is just for trial purposes. Not what I will use in final build.
Ron
Attachments
The vertical "key way" on the internal support rod serves two fuctions:
1, it limits rotation of the arm, thereby not effecting overhang ( other than changing the geometry of the triangle formed by the arm at stylus to top of assembly, the stylus to assembly (at platter height) and the height of the assebly. If you change the VTA, you are changing the Hypontenuse (?) of the right triangle formed so the arm may need to be rotated to get the correct pivot to spindel distance, etc..
2, it also serves as a limit to the total up and down height (once the set screw in th main body is loosened (unlocked) when the VTA internal adjust ment screw is rotated.
Mr. Davidson,
Glad to see your still hanging around this thread, your insight and photographs are what has inspired me to attempt a "version" of Franks wonderful tonearm.
JD, that RCH comment was directed at you, as it gave me a side ache from laughing so hard the first time you used that measurement. Thanks.
OK, emmm, back on topic. I'm trying to understand the VTA adjustment on your implementation of the reference arm. Is the center rod is hard mounted (attached by grub screw?) to the lower tower over which the upper tower slides? Which is then adjusted by an internal long allen set screw which pushes down on the rod from threads on the upper tower? I see that you also have included a keyway in your design that was mentioned as missing in a different thread from the original design. Is that correct? If so, good idea! It was mentioned that adjusting the VTA may change the overhang on Franks commercial product, your inclusion of the keyway would prevent that. If I see it correctly.
Does the arm lifting device provide enough vertical travel? I'm looking at one on FleaBay for $50. Jelco JL-45. JELCO JL-45 CUEING DEVICE(LIFT/LOWER) - eBay (item 300414166685 end time May-03-10 21:00:45 PDT)
Thanks again for all of your photographs, they have helped tremendously!
Westend, I'm glad you too are starting this project, we can flounder together! Figuratively of course. I'm using 1/2" aluminum tubing, wall thickness .05" , that doesn't leave a lot of meat left for the grub screw threads which support the arm tube. I think I'll use some loctite when it comes time for the final assembly.
This project looks simple and easy, it is far from that in reality. Lots of fun and I'm enjoying this immensely.
AuroraB, you are correct, it has been my experience that it is indeed a larger unit of measure than say, a BCH. 😱 Which I prefer. YMMV.
Frank, I presume your still watching your students here on this thread,
Thank you soooo much for allowing us to mimic (at best) your years of hard work and very successful accomplishments in the field of tonearm design. (Mr. Schroder) BTW, I've seen Frank's last name spelled with and without the e after the o, sorry, no umlats on my keyboard. 😀
Attachments
Last edited:
Hi guys,
Yup, the central hard brass shaft or post has a V-shaped groove running from its top down to slightly below the point where the upper grub screw is sitting when the base is fully "down". When you unscrew this grub screw, you can raise or lower the upper part of the base(the "gallows") via the cylinder head Allen screw in the central shaft, accessible through the top "gallows" plate(JD described the principle very well). After unscrewing the grub screw you could turn the gallows ever so slightly, but once tightened again, the overhang setting is restored. As with nearly all tonearms(the Eminent ETII is a rare exception) one needs to reset overhang after altering VTA by more than 3mm (typically).
In some of the early prototypes, I was using a polished guide pin(connecting top and bottom base cylinders) to allow for VTA "on the fly" adjustment(not recommended with the configuration above), but that complicated the manufacturing, doesn't sound any better and is prone to be screwed up by those customers who feel they need to disassemble every piece of audio gear they can get their hands on.
Try drilling the hole for the magnet in a lathe... much easier to get it centered perfectly !
Have fun,
Frank
Frank,
May I post a low res cut-a-way drawing?
Jeff
May I post a low res cut-a-way drawing?
Jeff
Hi guys,
Yup, the central hard brass shaft or post has a V-shaped groove running from its top down to slightly below the point where the upper grub screw is sitting when the base is fully "down". When you unscrew this grub screw, you can raise or lower the upper part of the base(the "gallows") via the cylinder head Allen screw in the central shaft, accessible through the top "gallows" plate(JD described the principle very well). After unscrewing the grub screw you could turn the gallows ever so slightly, but once tightened again, the overhang setting is restored. As with nearly all tonearms(the Eminent ETII is a rare exception) one needs to reset overhang after altering VTA by more than 3mm (typically).
In some of the early prototypes, I was using a polished guide pin(connecting top and bottom base cylinders) to allow for VTA "on the fly" adjustment(not recommended with the configuration above), but that complicated the manufacturing, doesn't sound any better and is prone to be screwed up by those customers who feel they need to disassemble every piece of audio gear they can get their hands on.
Try drilling the hole for the magnet in a lathe... much easier to get it centered perfectly !
Have fun,
Frank
Attachments
Last edited:
Hi Ron,SKR,
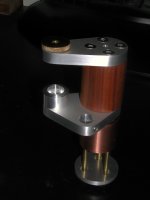
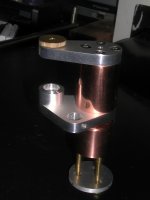
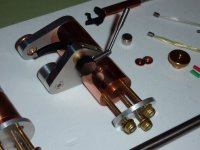
It is essentially a cable burner / capacitor burner, I"m thinking with a resistor in series it could be used for the minute tonearm wire burn in as well. (for those of us who believe in this black magic / snake oil stuff) 😉 Here's a photo or 2.
It gets the AC from an old (garage) receiver's "B" set speaker outputs. That way it can be left on all night and the "A" speakers could be set to mute. I set it to a FM music station. The 9V DC power supplies the higher Voltage to help "condition" the caps / cables. The cap is there to prevent DC from returning to the receiver. Upper bar is connected to the +DC and through a cap the +AC from the receiver, the lower bar is both -DC and AC. The pics should make it self explanatory.
Ron
Thanks for the idea. I hope to try this out too.
SKR
Frank and Jeff,
YOU GUYS ROCK!!!
Frank,
Thank you for allowing Jeff to share those wonderful cut-aways with the rest of us DIYers. Your years of trial and error, not to mention the $$$ you've invested in prototypes and advertising are truly appreciated by those of us who can only afford the DIY route. Thank you for helping us with the technical aspects of your design and the complexity of it's details. If I had a lathe I would use it
You do realize that you are in danger of being given a nick-name by this group. ie; Nelson Pass isPapa, much respected/loved I dare say. :ee
Jeff,
I wanted to thank you earlier in the week for asking permission from Frank and then posting that detail drawing of the post / VTA, but I've been working weird and late hours this week. Thank you now. Very helpful explanation of the VTA, I would not have come up with something as elegant or simple on my own. I do like the keyway idea, perfect grub screw application. I'll post some more pics as I progress. (we all like pics!)
Ron
Hi Ron,
Thanks for the kind words 🙂 Btw, I never placed a single ad in any printed or internet magazine.
And Nelson Pass is a great guy indeed!
Cheers,
Frank
Thanks for the kind words 🙂 Btw, I never placed a single ad in any printed or internet magazine.
And Nelson Pass is a great guy indeed!
Cheers,
Frank
Hi Ron,
Thanks for the kind words 🙂 Btw, I never placed a single ad in any printed or internet magazine.
And Nelson Pass is a great guy indeed!
Cheers,
Frank
As noted by the time difference between placing an order for a "Schroeder Tone Arm" and it's anticipated delivery date, a great product will "sell itself".
Frank, what's the proper spelling of Schroeder? Schroder? I've seen it both ways.
Any chance of you making it to our "Burning Amp" DIY fest in October? San Francisco / Sausalito on the water, great people too!
I'll buy you a beer.........

Yep, Papa is pretty cool.😎 pretty funny too.
Ron
Hi again,
The proper spelling is with an o-Umlaut(Schröder), not oe. But since most people outside of Germany don't have that letter on their keyboard, I'm fine with o or oe. Just don't cut out the c in Sch...
The Burning amp festival has been on my list for quite some time(Dave Slagle and Jeffrey Jackson strongly suggested it too) but it either coincides or interferes with the RMAF,which is my favorite (commercial)show. Nevertheless, I'll keep the BA on my radar.
And we'll meet some day... Maybe someone should organize a DIY AUDIO FEST !
Good night,
Frank
- Home
- Source & Line
- Analogue Source
- DIY Schroeder Tonearm?