


Hello Everyone
Here is the latest version up and running. I've gone back to 10mm glass tube. It looks black as it has an inner 'tube' to damp it-carbon fibre. One word describes it- FANTASTIC!!
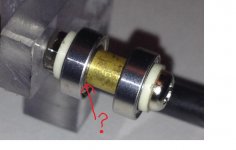
Tube termination
Looks nice! It looks like you've just glued or friction fit the glass tube into the end caps correct? The two aluminum rods at the top look like they will keep the whole assembly very rigid.
Looks nice! It looks like you've just glued or friction fit the glass tube into the end caps correct? The two aluminum rods at the top look like they will keep the whole assembly very rigid.
Hi
The glass tube is a friction fit. The aluminium tubes are glued and screwed to make the whole assembly very rigid indeed. This I believe not only helps with tracking but also with bass-listening to 'A Remark You Made' by Weather Report really showcased Jaco's bass playing. Need to do a few adjustments at the weekend-but if this is anything to go buy-we all have a real winner here!
The glass tube is a friction fit. The aluminium tubes are glued and screwed to make the whole assembly very rigid indeed. This I believe not only helps with tracking but also with bass-listening to 'A Remark You Made' by Weather Report really showcased Jaco's bass playing. Need to do a few adjustments at the weekend-but if this is anything to go buy-we all have a real winner here!
Nice build ChrisG139. Looks great but how did you align your arm? I imagined that the stylus would trace a line that would pass thru the spindle and run parallel with the arm's direction of travel. It might be an artifact of your photo-taking method but it looks to me like the stylus is well beyond such a line. I'm sure I could be wrong here.
Great work Chris!,
The extra bracing is beneficial for rigidity, I used a single 3/4" hollow Alu tube with a threaded rod for simplicity and the ability to change a potential broken tube if need be. This expansion also brings the resonant frequency down for the rail assembly which means further out of the critical audio band. Of course as ive seen you have done, is dampen the tube which is very simple and rubber o rings are very effective in this area since we don't want ringing getting back into the carriage. When all is said and done, you should be able to tap the glass lightly with your fingernail with music playing and not hear anything through the pickup other than maybe a slight low thud, a very damped quiet thud.
Colin
You are absolutely correct. I'm an old hand at parallel trackers-had a Cantus and a Clearaudio Tangent. The stylus in in perfect line -must be the angle of the camera!
Speaking of perfect line,
I must wholly reiterate how important a linear is to being setup correctly, fail this and you'll be wanting, achieve this and you will be surrounded by glorious music and tracking. In this design the goal is keeping the whole carriage cartridge included under 30g, mine with cart is 28.8g, which is fine if you keep the mass center of gravity low as a whole.
Colin


Hello Everyone
After proving flawless performance with my last version, I remembered someone mentioned the rod out of a printer-the one the ink carriage runs on. At lunchtime today, I noticed a printer which we were going to throw out in the corner of of the office. Hey presto-ten minutes later I had one highly polished metal rod!
Got home after a two and a half hour drive (M6 on a Friday is not to be recommended). After cutting to size, I mounted the rod on my original carrier (see pictures) and was immediately impressed at how much smoother the carriage rode the rod compared to glass. Early days but it again operated flawlessly, but also detail seemed a degree or two more real and bass was also a step up on previously. Has anyone else actually tried this?
Watch this space-things are getting interesting.
Chris
Is there any gain to hope by making a groove in V or U shape around the external part of the bearings to have 2 contact points per bearing ?
That is to say only two bearings instead of four.
I can do it with a lathe and a grinder.
That is to say only two bearings instead of four.
I can do it with a lathe and a grinder.
hallo to all !
thanks for the interesting read in this thread !
question to all :
I got a 12MM pyrex tube here ( other than the suggested 10MM ) ....
can anyone estimate the optimum space between the roller bearings ?
other than suggested 5MM when using a 10MM tube .
TIA
Great project !! will follow soon
thanks for the interesting read in this thread !
question to all :
I got a 12MM pyrex tube here ( other than the suggested 10MM ) ....
can anyone estimate the optimum space between the roller bearings ?
other than suggested 5MM when using a 10MM tube .
TIA
Great project !! will follow soon
Is there any gain to hope by making a groove in V or U shape around the external part of the bearings to have 2 contact points per bearing ?
That is to say only two bearings instead of four.
I can do it with a lathe and a grinder.
you can also buy them, search " concave Yo Yo bearings "
weight saving
would think that nylon machine screw and nut would save some weight perhaps even a plastic spacer tube. Just a thought. Best regards Moray James.
would think that nylon machine screw and nut would save some weight perhaps even a plastic spacer tube. Just a thought. Best regards Moray James.
one more Q :
I'm realy wondering how tide , or loose the bearing should slide across the bras rod . perhaps the maker of this arm design can chime in here ?
Thanks A Lot !!
Paul
Chris: is the metal rod larger or smaller diameter than your glass tube? Best regards Moray James.
Early days but it again operated flawlessly, but also detail seemed a degree or two more real and bass was also a step up on previously. Has anyone else actually tried this?
Watch this space-things are getting interesting.
Chris[/QUOTE]
Early days but it again operated flawlessly, but also detail seemed a degree or two more real and bass was also a step up on previously. Has anyone else actually tried this?
Watch this space-things are getting interesting.
Chris[/QUOTE]
Beautifully done Chris...
Moray pointed out that you had made a linear tracker and provided a link. Very nice, and of course very well executed.
Moray pointed out that you had made a linear tracker and provided a link. Very nice, and of course very well executed.
I remembered someone mentioned the rod out of a printer-the one the ink carriage runs on.
Chris
😉
Glad it worked out for you - all I knew was that the rods are straight and round have a good surface finish
For dimensions,
The 12mm tube will require a 5-6mm bearing spacing, a 10mm tube is 4-5mm. Bearings should be loose enough to slide easily across the shim when not riding the tube.
Colin
The 12mm tube will require a 5-6mm bearing spacing, a 10mm tube is 4-5mm. Bearings should be loose enough to slide easily across the shim when not riding the tube.
Colin
Chris,
Keep us posted on your printer rod trials, at this point the fact I like best about you doing this is you have recycled 🙂, maybe nex goal should be a green arm based on 100 percent recycled materials?, 😀
Keep us posted on your printer rod trials, at this point the fact I like best about you doing this is you have recycled 🙂, maybe nex goal should be a green arm based on 100 percent recycled materials?, 😀
- Home
- Source & Line
- Analogue Source
- DIY linear tonearm