Sorry vdi_nenna, I was joking but figured from your post that the joke was too much of an insider joke.
There is as Mark stated good reason for heat treating cast metal, you saw the cracks in the casts the guy from sweden made, those were a consequence of lack of heat treatment and bad mold construction.
The point of the joke was that there is no point in heat treating a heatsink, since a heatsink should be extruded 🙄
Magura 🙂
Forget about that heatsink now.It is history anyway, just a first attempt that costed 0 money.I have learned alot since then.
Well, the idea about casting stuff is not all bad, you just gotta apply it to one piece boxes instead. I did that a while ago.
http://www.briangt.com/gallery/magura-casting
A lot of work to machine the parts, but sure worth the trouble.
Magura 🙂
http://www.briangt.com/gallery/magura-casting
A lot of work to machine the parts, but sure worth the trouble.
Magura 🙂
Magura,
Having had alot of alumnium castings made up and also having machined alot of them I just don't see the point of casting a chassis, especially out of alumnium unless one wanted some particuluar odd shape that can't be created by CNC machining.... and there isn't much that can't be CNC machined. UNless of course you wanted the experience of doing some casting as it is an interesting process. Non-ferous castings excepting copper, unless they are done as spin castings end up with too many internal imperfections(air pockets) and inpurities and are not necessarily good conductors of electricitity because of that..... Copper castings on the other hand don't have the same problem as alumnium castings because of the structure of the metal itself. Also alumnium castings need to be heat treated to at least a T-6 temper to have decent machinability........ If they are not heat treated the alumnium tends to shave off like sand particles leaving a rough finish instead of normal curley cue type or long spiral chips comming off and leaving a nice shiny finish.
Mark
In this particular project, the aim was to avoid machining the box from a solid block in order to save something like 1500 to 2000 USD.
Heat treatment sure is a must, I gave theese a T6. Impurities have not been much of an issue, neither have imperfections. As far as I remember, I had 1 air pocket in one of them, and it was easily fixed by TIG welding it.
As Mark wrote, the process was interesting. My comment about them being a PITA to machine was based on the size and tolerances, rather than the material itself.
Magura 🙂
Heat treatment is always a good practice as we all know but it can also be done without it as I have experienced.
The clue to this was using a 356 alloy. After a couple of test we got very good results with almost no voids and machining the sinks was done with no problems and easy. These sinks were masive, arround 10Kg each and fins were left rough
We started with scrap from pistons and alloy wheels which are usualy a 356 alloy.
Resurrect this old thread.
I'm getting ready to make a couple of fairly large heatsinks for a six channel amp that I'm doing.
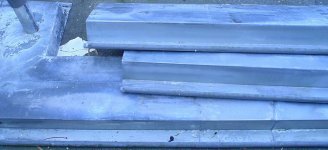
I have access to lots of scrap aluminum, some in very useful shapes. The material I'll be using is from door thresholds. I have been saving for a while and now I think I have enough.
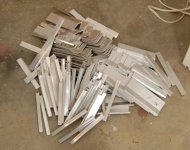
As pictured, the thresholds cut into usable strips. These are 3 feet long and the aluminum is ~4mm thick. Roughly 25 or 30 pounds of aluminum here. About 3 hours work so far and not much to show.
I'm getting ready to make a couple of fairly large heatsinks for a six channel amp that I'm doing.
I have access to lots of scrap aluminum, some in very useful shapes. The material I'll be using is from door thresholds. I have been saving for a while and now I think I have enough.
As pictured, the thresholds cut into usable strips. These are 3 feet long and the aluminum is ~4mm thick. Roughly 25 or 30 pounds of aluminum here. About 3 hours work so far and not much to show.
Attachments

I have done this before, the most successful in my K10A amp that is not finished yet.
It's hard to justify how much work (and risk) is involved. Only the fact that I get this material for nothing allows me to do this without feeling like a complete fool.
It's hard to justify how much work (and risk) is involved. Only the fact that I get this material for nothing allows me to do this without feeling like a complete fool.
Attachments
That looks outstanding John! Did you have access to a brake or did you get someone to bend and cut your chassis sheets?
I've got a couple of homemade chassis, but they are much more generic.
Nice work,
David
I've got a couple of homemade chassis, but they are much more generic.
Nice work,
David
MJL21193 said:I have done this before, the most successful in my K10A amp that is not finished yet.
It's hard to justify how much work (and risk) is involved. Only the fact that I get this material for nothing allows me to do this without feeling like a complete fool.
Hey, real DIY, I just love that when I see it 😎
Magura 🙂
Oops! Didn't notice this is Passlabs forum...
Hi David,
Thanks, I have been procrastinating on that one - I need a dual secondary 30VAC transformer to finish it. Low on funds, as I had to settle up with wife #X after the messy break in order to keep this house. $$$$$$ 🙂
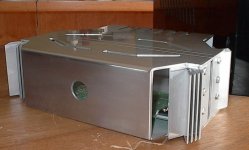
The entire chassis is made from scraps that I pulled from the bin at a job, other than the threshold parts (those parts on the ends that look like an actual heatsink) that I already had.
The aluminum plate already had that nice bend in it. I don't have a brake capable of bending that thickness.
All the cuts are mine though - just started with the raw material. Used a router to cut the slots in the top.
Thanks Magura,
That's an example of my craziness.
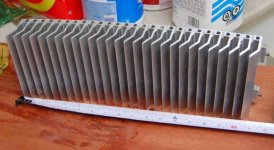
These ones though, are pure lunacy. 6 inches high, 16 inches long and fins that are 2 1/2 inches spaced a half inch apart (metric - 150mm, 400mm, 62mm).
I would like to have a thermally conductive glue to use, but I'm too impatient, too broke and besides, I want to drill 400 holes in this aluminum.
I'll use 1/4" threaded rod to bolt these pieces all together. I don't have a mountain of thermal grease though. I thought that maybe petroleum jelly (vasoline) would work as well? Better than nothing, I guess.
Here are all of the parts, cut to length and ready to drill...
gtforme00 said:Did you have access to a brake or did you get someone to bend and cut your chassis sheets?
Hi David,
Thanks, I have been procrastinating on that one - I need a dual secondary 30VAC transformer to finish it. Low on funds, as I had to settle up with wife #X after the messy break in order to keep this house. $$$$$$ 🙂
The entire chassis is made from scraps that I pulled from the bin at a job, other than the threshold parts (those parts on the ends that look like an actual heatsink) that I already had.
The aluminum plate already had that nice bend in it. I don't have a brake capable of bending that thickness.
All the cuts are mine though - just started with the raw material. Used a router to cut the slots in the top.
Magura said:
Hey, real DIY, I just love that when I see it 😎
Thanks Magura,
That's an example of my craziness.
These ones though, are pure lunacy. 6 inches high, 16 inches long and fins that are 2 1/2 inches spaced a half inch apart (metric - 150mm, 400mm, 62mm).
I would like to have a thermally conductive glue to use, but I'm too impatient, too broke and besides, I want to drill 400 holes in this aluminum.
I'll use 1/4" threaded rod to bolt these pieces all together. I don't have a mountain of thermal grease though. I thought that maybe petroleum jelly (vasoline) would work as well? Better than nothing, I guess.
Here are all of the parts, cut to length and ready to drill...
Attachments
Aluminium solder is the best solution thermally, IMHO, and probably also the least expensive (if you consider how much thermal grease or metal filled epoxy costs).
Patrick
Patrick
Re: Oops! Didn't notice this is Passlabs forum...
A rotating heatsink wheel would be nice.
MJL21193 said:an example of my craziness.
A rotating heatsink wheel would be nice.
Re: Re: Oops! Didn't notice this is Passlabs forum...
What happened to your boom amp project?
Magura 🙂
jacco vermeulen said:
A rotating heatsink wheel would be nice.
What happened to your boom amp project?
Magura 🙂
Re: Re: Oops! Didn't notice this is Passlabs forum...
I hadn't heard of aluminum solder before. I looked it up - neat! I'll have to look around for a local supply.
I have a Lincoln mig welder that I use for sheet metal and medium gauge steel. It uses flux core wire so I don't need shielding gas. If I were to get a bottle of argon, I'd be set to weld aluminum...
Didn't someone else do that here? Or no, I don't think it actually turned, just looked like a fan.
Interesting idea to combine fan and heatsink in one unit. How to attach the MJL21193's to a moving target? 🙂
Anyhow, number one is done. Way too many holes to drill at one time. No drill press either - they are for girls. 18 volt Makita lithium ion battery drill with a comfortable grip.
All of the parts are drilled and sanded smooth. Here a pic of the finished heatsink. It has a slight curve where some of the pieces were wider on one side than the other. I will bolt on a heavy gauge angle "spine to straighten it out.
EUVL said:Aluminium solder is the best solution thermally, IMHO, and probably also the least expensive (if you consider how much thermal grease or metal filled epoxy costs).
Patrick
I hadn't heard of aluminum solder before. I looked it up - neat! I'll have to look around for a local supply.
I have a Lincoln mig welder that I use for sheet metal and medium gauge steel. It uses flux core wire so I don't need shielding gas. If I were to get a bottle of argon, I'd be set to weld aluminum...
jacco vermeulen said:
A rotating heatsink wheel would be nice.
Didn't someone else do that here? Or no, I don't think it actually turned, just looked like a fan.
Interesting idea to combine fan and heatsink in one unit. How to attach the MJL21193's to a moving target? 🙂
Anyhow, number one is done. Way too many holes to drill at one time. No drill press either - they are for girls. 18 volt Makita lithium ion battery drill with a comfortable grip.
All of the parts are drilled and sanded smooth. Here a pic of the finished heatsink. It has a slight curve where some of the pieces were wider on one side than the other. I will bolt on a heavy gauge angle "spine to straighten it out.
Attachments
- Status
- Not open for further replies.
- Home
- Amplifiers
- Pass Labs
- DIY heatsinks