Damping Acrylic
One of Cat's Squirrel's posts on his Audioqualia site lists recommended thicknesses of many materials for Plinth duty. 30mm is the suggested thickness for Acrylic. Apparently this is the best balance of mass, stiffness and Critical frequency for this material.
Acrylic on it's own has a damping factor of about 0.07 according to Cat's squirrel. I get similar results - about 0.05.
I wondered how Acrylic might work out in layers with viscous material (Ductseal) in between. Ductseal is not an adhesive. It will pull apart under force. So, I started with a single bolt holding two 1/2" layers of together and mounted an accelerometer with hot glue. The DF was pretty good - 0.2.
Then I increased the stiffness by adding moderately tightened bolts in the corners (now 5 in total). This reduced the damping factor to about 0.095. Loosening the bolts allows for more damping, but the resonance and stiffness goes down.
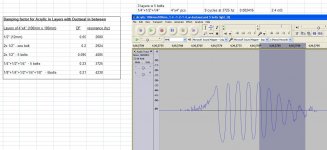
Then, I tried other combinations with more layers (and 5 bolts, trying to maintain stiffness). These are tabulated in the attached photos. A 3 Layer combo of 1/4" + 1/2" + 1/4" seems to be the best so far at DF = 0.23.
For the final 5 Layer combination I added 1/8" outer layers (pictured in photo). This did nothing for the DF, but did seem to raise the resonance and stiffness.
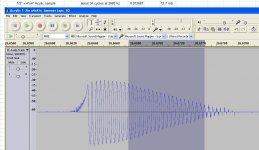
Notice that the single 1/2" x 4" x 4" sample shows visible ringing for 12.7 mS on the logarithmic scale I picked. The 3 Layer combination (1/4 + 1/2 + 1/4 inch) reduces this to 2.4 mS.
I'm thinking this could be a good method to make a plinth, Audio shelf, or even a platter. However, Cat's Squirrel did find some shortcomings when he was testing materials for CLD. So, this too may have a downside.
I would guess that the increase in damping would be effective above and below the Critical frequency Fc. I won't be, but if I was scaling this up into a plinth size , I'd likely put the bolts at 4 to 6" intervals around the perimeter and place one or two between the platter and tonearm.
Cat's Squirrel...your thoughts on all of this?
Hugh
One of Cat's Squirrel's posts on his Audioqualia site lists recommended thicknesses of many materials for Plinth duty. 30mm is the suggested thickness for Acrylic. Apparently this is the best balance of mass, stiffness and Critical frequency for this material.
Acrylic on it's own has a damping factor of about 0.07 according to Cat's squirrel. I get similar results - about 0.05.
I wondered how Acrylic might work out in layers with viscous material (Ductseal) in between. Ductseal is not an adhesive. It will pull apart under force. So, I started with a single bolt holding two 1/2" layers of together and mounted an accelerometer with hot glue. The DF was pretty good - 0.2.
Then I increased the stiffness by adding moderately tightened bolts in the corners (now 5 in total). This reduced the damping factor to about 0.095. Loosening the bolts allows for more damping, but the resonance and stiffness goes down.
Then, I tried other combinations with more layers (and 5 bolts, trying to maintain stiffness). These are tabulated in the attached photos. A 3 Layer combo of 1/4" + 1/2" + 1/4" seems to be the best so far at DF = 0.23.
For the final 5 Layer combination I added 1/8" outer layers (pictured in photo). This did nothing for the DF, but did seem to raise the resonance and stiffness.
Notice that the single 1/2" x 4" x 4" sample shows visible ringing for 12.7 mS on the logarithmic scale I picked. The 3 Layer combination (1/4 + 1/2 + 1/4 inch) reduces this to 2.4 mS.
I'm thinking this could be a good method to make a plinth, Audio shelf, or even a platter. However, Cat's Squirrel did find some shortcomings when he was testing materials for CLD. So, this too may have a downside.
I would guess that the increase in damping would be effective above and below the Critical frequency Fc. I won't be, but if I was scaling this up into a plinth size , I'd likely put the bolts at 4 to 6" intervals around the perimeter and place one or two between the platter and tonearm.
Cat's Squirrel...your thoughts on all of this?
Hugh
Attachments

I have access to a Supply of 6mm (1/4") Polycarbonate that will be redundant
Material in the not too distant future.
I could bond Two Sheets to produce a 12mm (1/2").
I also have a non drying sealant that is used in the Dry Wall Industry for sound proofing purposes when it is applied in between the boards, when used on a lamination of Dry Wall Board.
These reports on the investigations are of interest to myself as I am looking to produce a Densified Wood Plinth for the Winter and an additional plinth construction will work out quite well, especially with the free materials at hand.
Torque Settings used for the Bolts would be a great to communicate the tightness settings chosen, and align works undertaken with your own.
The compliant layer is a problem when used as a plinth material (or top plate). The bolts, although they confer a tiny amount of damping, just connect one side of the structure to the other, conveying vibrations.
I've found Gorilla Glue Clear a very effective way of bonding layers together. When fully cured it provides a joint that feels similar to a polyurethane adhesive. I'd be interested in finding out what those who know about these things think about it.
I am quite interested in producing a Plinth made from Polycarbonate as a trial only.
Using the method suggested but with 6mm (1/4") to be used as the Tiers.
The Bolts will be set so that they are not touching the Tiers directly and will be isolated at the clamping locations with a Rubber Washer Material.
I will look into recording Torque Settings to see if these are able to change the perceptions of the Performance.
I will be mainly listening as I do in any trial to see how Micro Detail and smearing of information is being managed and use a range of platter mat materials to assess the interfaces.
I am using MU25 as a Plinth Material on my go to TT, and have a good grasp on this as a material, hence the intention to bring in Densified Wood.
An intermediate Plinth Material that will be not too expensive to produce and easy to work with as a material is a interesting project.
Especially now I am 50% through cleaning out a area and producing a Workshop Space for such endeavours.
I have a question about the research found here (Materials | Free Full-Text | Mechanical Vibration Damping and Compression Properties of a Lattice Structure).
Counterintuitive to me, they present data showing higher damping with reduced mass. I needed a solution for a stiff but light part with high damping for a current project of mine.
Would a solution present itself from the data for your own investigations here?
There appears to be a design topology that might be of benefit.
I also have a non drying sealant that is used in the Dry Wall Industry for sound proofing purposes when it is applied in between the boards, when used on a lamination of Dry Wall Board.
These reports on the investigations are of interest to myself as I am looking to produce a Densified Wood Plinth for the Winter and an additional plinth construction will work out quite well, especially with the free materials at hand.
Torque Settings used for the Bolts would be a great to communicate the tightness settings chosen, and align works undertaken with your own.
Hi John,
The torque was not measured, but just a moderate hand twist on the screwdriver.
The non drying sealant you describe sounds like the "Greenglue" that Home Depot sells here. I like that better than Ductseal for something I intend to leave as is. I've had a blob sitting out in the open for almost a year. It stays sticky and pliable.
I do have a plinth ready to go. It's two layers of 8mm Panzerholz with Greenglue in between screwed together tightly with wood screws. I'll post a photo later if you like.
Hugh
I've found Gorilla Glue Clear a very effective way of bonding layers together. When fully cured it provides a joint that feels similar to a polyurethane adhesive. I'd be interested in finding out what those who know about these things think about it.
Thanks ralphcooke. I may give that a try later.
Hugh
The compliant layer is a problem when used as a plinth material (or top plate). The bolts, although they confer a tiny amount of damping, just connect one side of the structure to the other, conveying vibrations.
Thanks Cats squirrel. Good to know. I'm going to post a sketch later and ask for you to take a look to be sure I'm grasping that one.
Hugh
I have a question about the research found here (Materials | Free Full-Text | Mechanical Vibration Damping and Compression Properties of a Lattice Structure).
Counterintuitive to me, they present data showing higher damping with reduced mass. I needed a solution for a stiff but light part with high damping for a current project of mine.
Would a solution present itself from the data for your own investigations here?
There appears to be a design topology that might be of benefit.
2wice,
On a quick look, that paper looks interesting. Thanks.
Hugh
The compliant layer is a problem when used as a plinth material (or top plate). The bolts, although they confer a tiny amount of damping, just connect one side of the structure to the other, conveying vibrations.
Cat's Squirrel,
Just to be sure I'm making it clear how the platter and tonearm would be attached in this hypothetical Layered Acrylic plinth, here's a sketch. The nuts for each would compress both layers together.
Hugh
Attachments

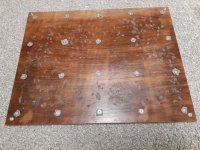
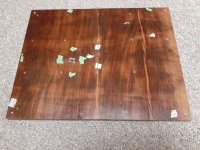
Layered Panzer
John,
Forgive the shabby appearance. Here's a top and bottom shot of the 2 Layer Panzerholz Plinth. I was actually trying to get 10mm Panzerholz, but got a great deal on the last sheet of 8mm.
The woodscrews are spaced at about 4" increments. This is mostly because the sheets are not so flat. The bit of foam under the screws was an experiment with the amount of pressure. It can be omitted.
It's Greenglue in between the layers. There's several small holes to let the excess glue bleed out. A thin layer is better than a thick one.
The panel sounds very dead when I strike it. I did get some reasonable waveforms from the hammer test. If memory serves, I think I got a DF of about 0.35.
I also tried attaching a third layer of P'holz - no better. 1/8" Vinyl floor tile - no better.
I haven't actually tried this as a TT yet, so I can't promise it's worth the extra money over other materials.
Hugh
Attachments
As a Plinth Test, I would be tempted to learn of the materials influence by trying different configurations.
I would begin by using 1 x 8mm only for the Plinth and the other as a Sub Plinth.
Once this has been evaluated over a period, I would then look at other configurations of the materials and see if the different constructions are of a benefit to the SQ and change the performance to be more suitable to my listening preferences.
My experiences undertaken to date, leads me to the place where a Plinth Evaluation is best served when carried out using a selection of platter mats that are made with different materials.
It is quite an eye opener when the assembly of the Tiers of construction under the Cartridge, are undergoing rearrangements of materials being used or exchanges of materials are incorporated.
The impaction on the SQ and the changes in information retrieval for the Cartridge is worth experiencing.
Not too long ago, I swapped out a 3mm Platter Mat to a 5mm Platter Mat produced from the same material.
The 5mm Platter Mat was a vast improvement and is now one of my Go To Mats where a choice of Three are seen as the materials that are attractors to myself.
Is this a result of the unique environment the TT is set up in, or a case of my unique preferences for a SQ ?
John,
I suspect the 8mm on it's own will be lacking in stiffness and mass.
My next step will be to construct another Linear Tracking Arm to go with this new plinth.
I also have 20mm Panzer plinth. If I can figure out a good way to move the LTA from one plinth to another in reasonable time, that's what I'm likley to do. (I.e. 20mm Panzer vs 2 x 8mm Greenglued Panzer to see if I agree with Cat's Squirrel).
It'll be a while getting there.
I agree about the mats having a big effect.
Hugh
Hello,
I need an advice abouth the plinth for my Elac Miracord...
I have a big piece of 10 mm thick acrylic. I have read this whole thread and I saw an info that for acrylic 30mm should be the best thickness. Do you think it is a good idea to glue three same pieces of 10 mm into one piece as a plinth?
I need an advice abouth the plinth for my Elac Miracord...
I have a big piece of 10 mm thick acrylic. I have read this whole thread and I saw an info that for acrylic 30mm should be the best thickness. Do you think it is a good idea to glue three same pieces of 10 mm into one piece as a plinth?
Acrylic has only got a damping factor of 0.07, I measured. This is nowhere near good enough for a plinth material, unless you want added distortion to enjoy your music (some people do!).
Acrylic has only got a damping factor of 0.07, I measured. This is nowhere near good enough for a plinth material, unless you want added distortion to enjoy your music (some people do!).
Thanks cats for the reply... So, can you propose then how to use this acrylic material I have? Maybe glued with another material? Ply, mdf, chipboard?
the only thing which may be of help is a material I tested about 12 years ago, called 'Page Lacquer', that is the name of the company who is on the label of an architectural sample given to me.
I tested it for damping properties, and found a df =0.315
The label said it was acrylic over mdf. Of course, I realize that the adhesive can make a lot of difference. I have a friend that developed an after-market kit for Linn turntables, and although he worked at an adhesive manufacturer at the time, his lab. colleagues still had to develop a suitable adhesive to work properly!
Try it and see!
- Home
- Source & Line
- Analogue Source
- DIY CLD Plinth Design--A measured Approach