Thanks skhattane,
I'm not sure what the cure time is, but I looking forward to seeing how good this turns too.
It was easy to do...
Mark
I'm not sure what the cure time is, but I looking forward to seeing how good this turns too.
It was easy to do...
Mark


Couldn't wait any longer, so I decided to pour the second (smaller) prism with what was left over in the bottles. Just the right amount to 🙂
Again I used the heat gun to de-gas the mix, and the product actually slumps a little. When it had bubbles, the product's surface tension allows the liquid to raise slightly (much the same as water does on a flat surface), then as the heat is applied, the gas escapes and the product then falls slighty.
I will revisit the other vertical pouring method when I have a Vacuum pump, but so far, this method is quick and easy. I just re-read the instructions again, and curing time is 48 hours - 2 days!!!
At least by then I will have two prisms, so I can start light and image tests almost straight away.
Exciting times all over again...
Mark
That prism looks very smooth Mark.
Thanks Foghorn17 🙂
There is a slight pattern effect when you look at it on a sharp off axis angle, letting the light reflect of the surface, but on and off to about 30 degrees, and it is very smooth and blemish free 🙂 and I am liking what I am seeing here.
There are micro bubbles, but you have to look very carefully to see them. I wonder if the compression method reduces them "smaller than the eye can see", as these are so small, they will not show up on screen at all 🙂
I can't wait to get these out of the mould. Right now the first larger prism is in a "gel" state so I dare not remove it yet. I tested a small spill with the mixing stick and it feels tacky, but is not wet or sticky to the touch with my finger. I pushed my thumb nail into the spill, and it is soft enough to mark, but hard enough not to deform...
Mark
SOLID PRISM UPDATE
OK this moring I popped them both out of the molds.
There hard (gel state) enough to use, but will require more time to reach full hardness.
I had a few problems -
1. The larger prism's mold leaked and therefore the prism is not full to the ends of the Perpex.
2. Under less than ideal light last night, it seemed that all the bubbles had been removed, but quite a few remain, hence why a vacuum chamber is required.
3. There was not quite enough resin to fill the smaller prism. I might have been able to overcome this problem by slightly titling the mold.
Anyway here are some pictures:
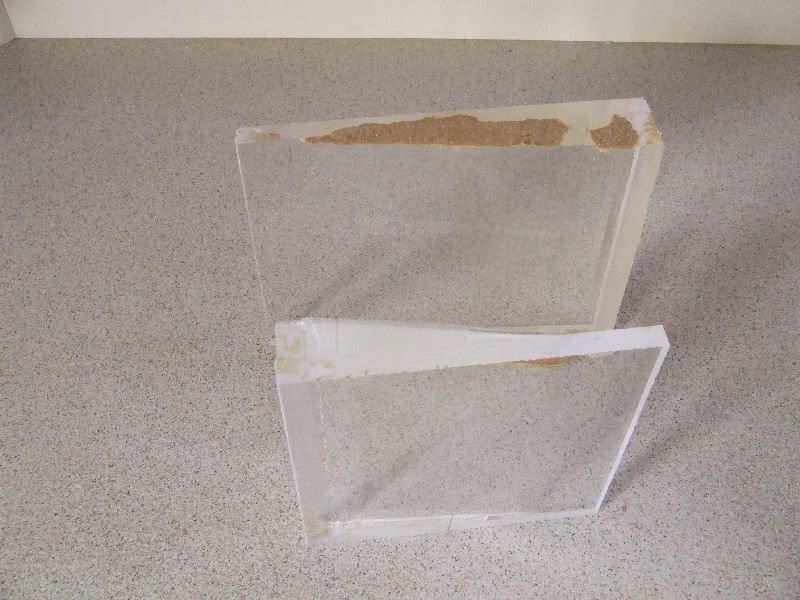
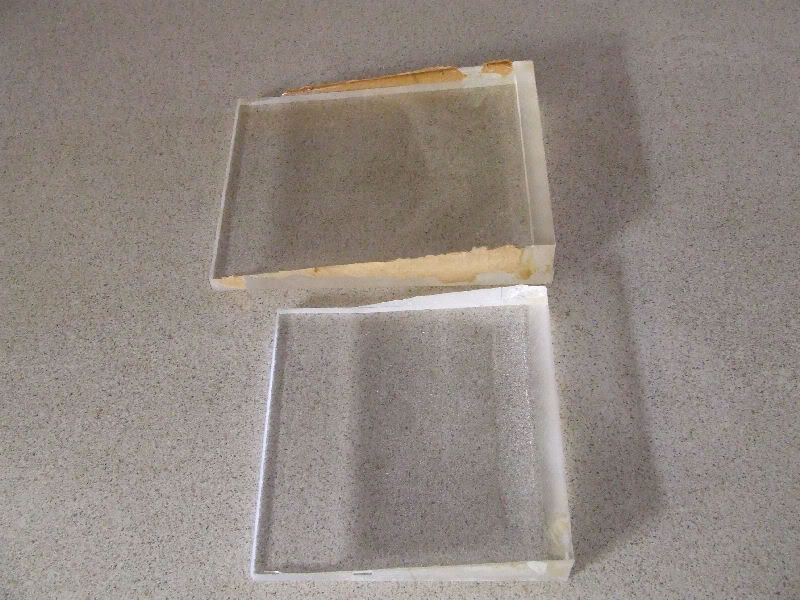
you can see on the smaller prism that the taper falls short. The angle is correct, so maybe cutting this one down to 4 x 4 might still work with a longer throw device...
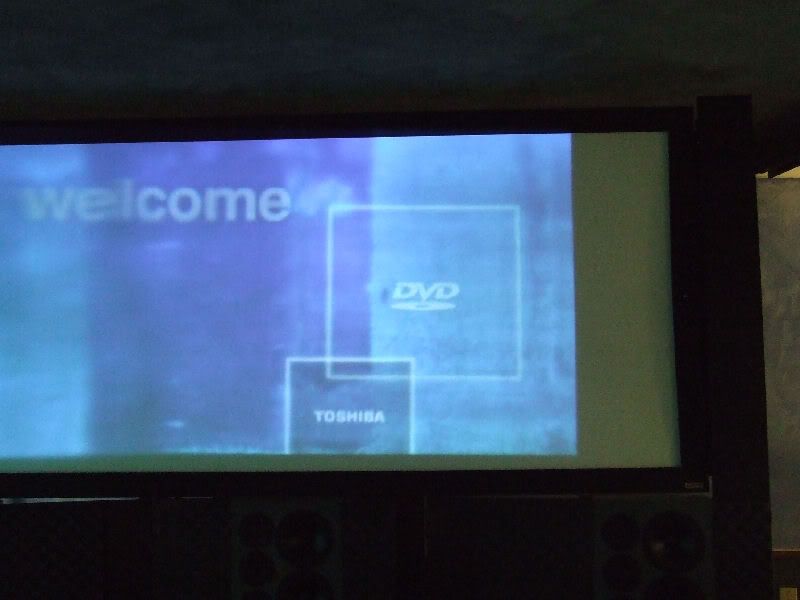
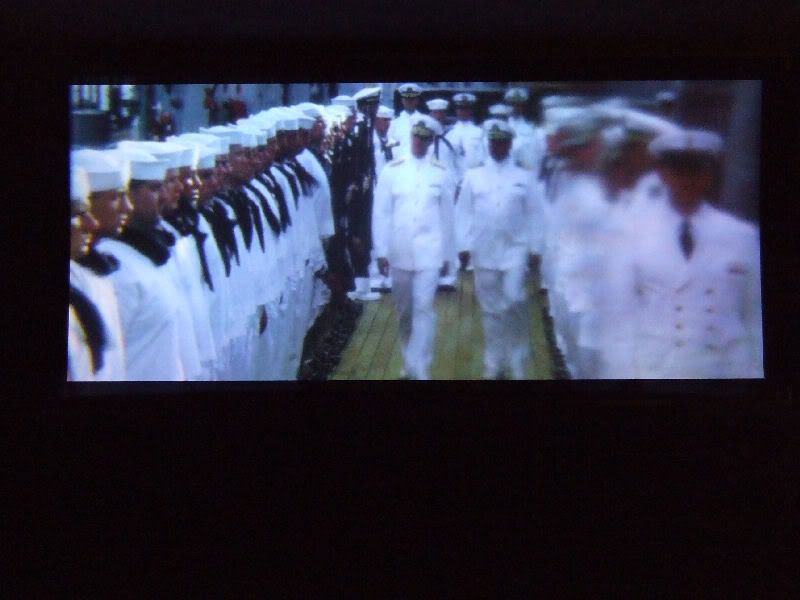
Because the prisms are both a little "short", I couldn't take a full screen shot as the left hand side is way out of focus. The DVD logo looks OK though.
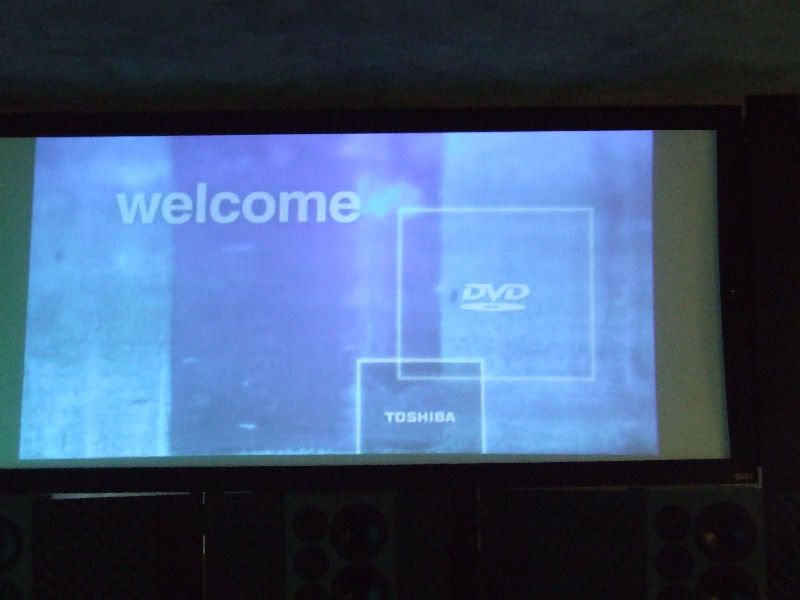
This screen shot is taken with the water prism at about half way between stretch and bypass, but again look at the DVD logo. Also note that due to the different refractive indexes, the blue is actaully better with the resin prisms...
Over all this is not a failure and with a re-think to the mold and use of the vacuum chamber, this will work out quite well...
Mark
OK this moring I popped them both out of the molds.
There hard (gel state) enough to use, but will require more time to reach full hardness.
I had a few problems -
1. The larger prism's mold leaked and therefore the prism is not full to the ends of the Perpex.
2. Under less than ideal light last night, it seemed that all the bubbles had been removed, but quite a few remain, hence why a vacuum chamber is required.
3. There was not quite enough resin to fill the smaller prism. I might have been able to overcome this problem by slightly titling the mold.
Anyway here are some pictures:
you can see on the smaller prism that the taper falls short. The angle is correct, so maybe cutting this one down to 4 x 4 might still work with a longer throw device...
Because the prisms are both a little "short", I couldn't take a full screen shot as the left hand side is way out of focus. The DVD logo looks OK though.
This screen shot is taken with the water prism at about half way between stretch and bypass, but again look at the DVD logo. Also note that due to the different refractive indexes, the blue is actaully better with the resin prisms...
Over all this is not a failure and with a re-think to the mold and use of the vacuum chamber, this will work out quite well...
Mark
OK after making a new housing that would allow me to inter-change the prisms, I was able to get a true stretch, but there seems to be a focus issue on the larger prism.
The small prism is awesome, and I thought it was going to be the problem, but as it turns out, the larger prism's surface is not flat enough to provide a uniform focused stretch.
So these prisms are just 10 degrees. I have only made one pair, so what you are looking at is an image from a standard 2 prims lens.
As I said, I have found problems with the larger prism.
If you go back 1 or 2 pages of this thread, I posted a photo of the vertical mold. Becuase I don't yet have a vacuum chamber to de-gas, I decided against this mold and built a horizontal mold instead. Originally, the plan was to flood the horizontal mold, then place a second piece of Pespex on top.
I releasized during the set up, that the gas would not be able to escape, so I opted for self leveling of the resin, which it does, but not at an optical level.
It has been brought up before, that any lens surface not 100% flat will introduce visible artifacts. This is certainly the case here. I did this becuase I was more concerned with bubbles in the resin, and as a result, one side of each prism is not 100% flat as only one side is Perspex.
For the record, there are possibly thousands of very small bubbles in the resin, but they do not show up on screen. The resin is 100% clear by the way.
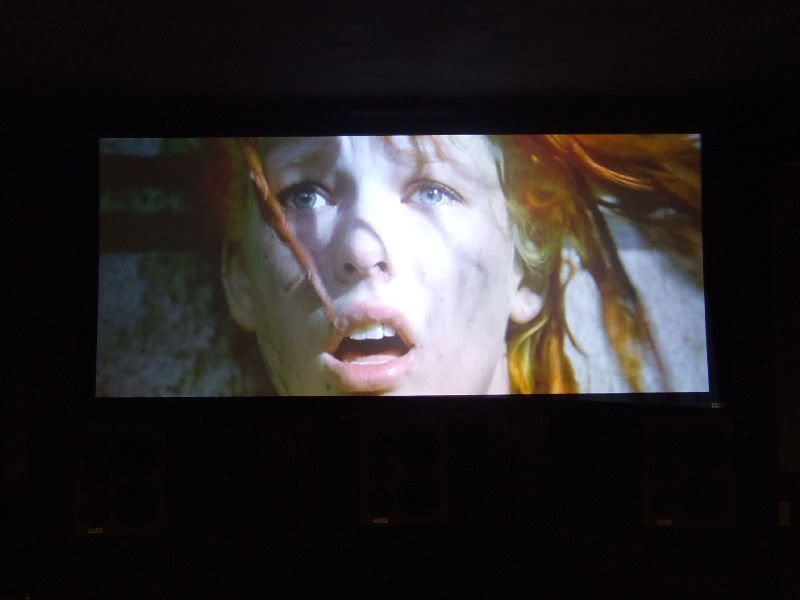
Here is a screen shot from Pearl Harbor. The image stretch is fantastic, but there is a focus issue in one area making this lens unusable. This can and will be corrected next pour. I am going to try the vertical mold and I believe that the heat gun I used can produce enough heat to still de-gas the resin, if used for a longer period of time. Because it is a heat wave, not a flame, I can use it on the sides of the Perspex in the mold as well as on the open resin top. The resin is clear enough to see the bubble disappering...
Mark
The small prism is awesome, and I thought it was going to be the problem, but as it turns out, the larger prism's surface is not flat enough to provide a uniform focused stretch.
So these prisms are just 10 degrees. I have only made one pair, so what you are looking at is an image from a standard 2 prims lens.
As I said, I have found problems with the larger prism.
If you go back 1 or 2 pages of this thread, I posted a photo of the vertical mold. Becuase I don't yet have a vacuum chamber to de-gas, I decided against this mold and built a horizontal mold instead. Originally, the plan was to flood the horizontal mold, then place a second piece of Pespex on top.
I releasized during the set up, that the gas would not be able to escape, so I opted for self leveling of the resin, which it does, but not at an optical level.
It has been brought up before, that any lens surface not 100% flat will introduce visible artifacts. This is certainly the case here. I did this becuase I was more concerned with bubbles in the resin, and as a result, one side of each prism is not 100% flat as only one side is Perspex.
For the record, there are possibly thousands of very small bubbles in the resin, but they do not show up on screen. The resin is 100% clear by the way.
Here is a screen shot from Pearl Harbor. The image stretch is fantastic, but there is a focus issue in one area making this lens unusable. This can and will be corrected next pour. I am going to try the vertical mold and I believe that the heat gun I used can produce enough heat to still de-gas the resin, if used for a longer period of time. Because it is a heat wave, not a flame, I can use it on the sides of the Perspex in the mold as well as on the open resin top. The resin is clear enough to see the bubble disappering...
Mark
Clearly (no pun intended) I'm not happy with the image quality, so today I poured a new set of prisms.
This time the large prism worked a tread, but the smaller prism (apart from only being half full as I ran out of resin) has many visible bubbles and what could only be dsescribed as a stress fracture.
I seriously need to rework my jig, as getting the prisms out is not easy. And I think I may have damaged the smaller prism. I have decided to get them out of the mold early becuase, 1 I'm impatient and 2 if they're that to get them out when the resin is still a bit soft, imaging how I woul dbe when the sesin is fully set...
To make this a little more coparible, I have used both my original 2 prism water lens and the new resin lens and taken a screen shot with each.
The water prism
Good even stretch and edge to edge focas with very little CA...
The resin prism
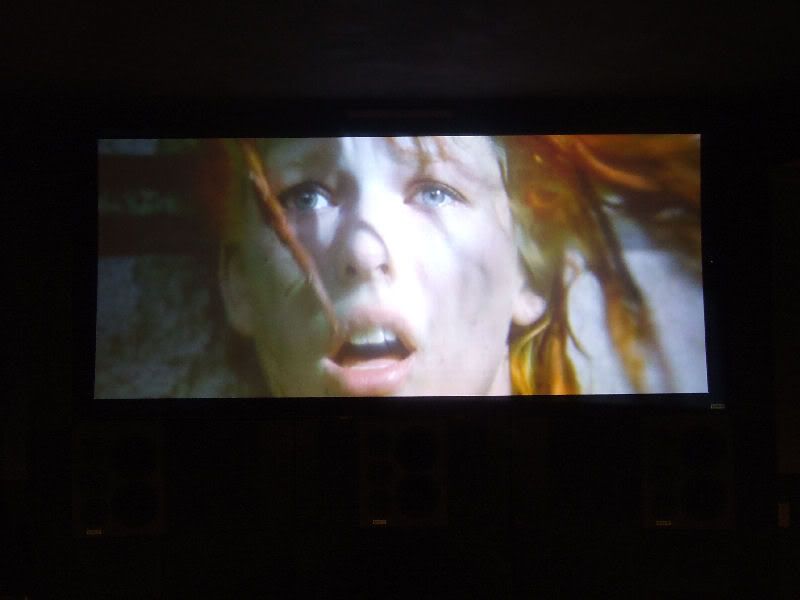
again there appears to be a defocus issue, but as it turns out, the smaller prism was at fault here this time.
So with a quick switch of the smaller prism with the other small prims, and the image looks a little better, but it appears that the frame has jumped ahead...

The whites are little brighter and due to the different refractive index of the resin verses the water, the colour and light shift is to be expected. Both sets of prisms are still based on Persex...
Oh yeah, and here is the new prisms...

Mark
This time the large prism worked a tread, but the smaller prism (apart from only being half full as I ran out of resin) has many visible bubbles and what could only be dsescribed as a stress fracture.
I seriously need to rework my jig, as getting the prisms out is not easy. And I think I may have damaged the smaller prism. I have decided to get them out of the mold early becuase, 1 I'm impatient and 2 if they're that to get them out when the resin is still a bit soft, imaging how I woul dbe when the sesin is fully set...
To make this a little more coparible, I have used both my original 2 prism water lens and the new resin lens and taken a screen shot with each.
The water prism
Good even stretch and edge to edge focas with very little CA...
The resin prism
again there appears to be a defocus issue, but as it turns out, the smaller prism was at fault here this time.
So with a quick switch of the smaller prism with the other small prims, and the image looks a little better, but it appears that the frame has jumped ahead...
The whites are little brighter and due to the different refractive index of the resin verses the water, the colour and light shift is to be expected. Both sets of prisms are still based on Persex...
Oh yeah, and here is the new prisms...
Mark
I believe the problem in using resin is the fact the 2 parts cause a exc-thermic reaction. What I have found in all four prisms is a swirling effect in the resin. Apparently a vacuum pump will not get rid of this.
The swirls are like those seen in salted water that is coming to the boil. The swirls are actually convection currents of different temperature fluid that interact. Unlike water (which remains a liquid after it has cooled), the resin retains these marks.
Curing at different temperatures might help reduce the problem, but that is further expense and quite difficult to do in a garage by a DIY enthusiast.
So what I have found is a one part gel, that is UV light re-active. In its tube, the gel remains soft and workable (about the same as super glue), but when exposed to a UV source, goes hard. It has the same clarity as both the resin and Perspex.
It costs around the same as resin, but does not need to be mixed and if pushed into a mould, should set that way as well under UV lighting...
I have found a local supplier so there is more to come on that one soon...
Mark
Getting closer, I think😉
Today I learned about the propper optical gue used in actual optics (the stuff corrective eye wear is made from), but I am not sure I can find the lab needed to produce them...
I am still going to follow up that gel idea, as to me right now anyway, it looks to be the best DIY solution around.
Hopefully by the end of the week I should be able to post a positive result...
Mark
Well keep reading and I will keep updating this thread.
I am trying an optical store tomorrow. There is guy there that supposed to know about CR39...
Mark
I am trying an optical store tomorrow. There is guy there that supposed to know about CR39...
Mark
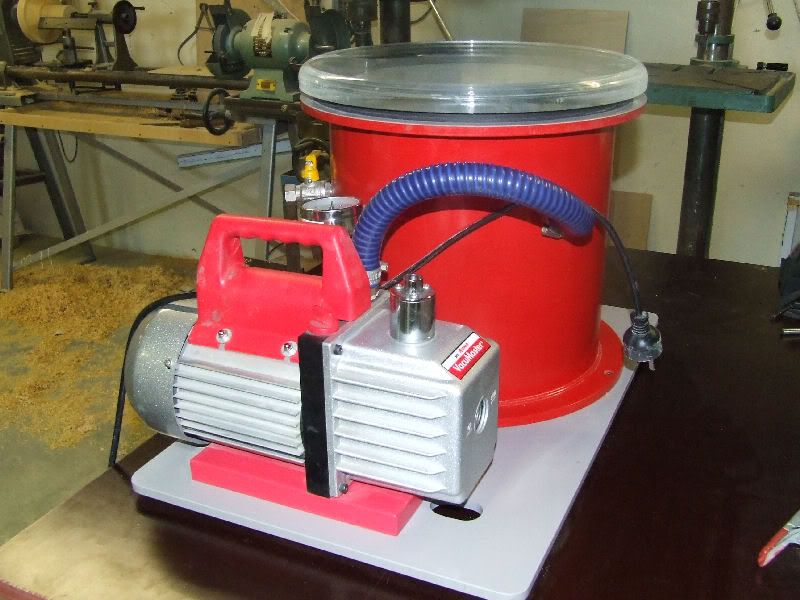
Here is a couple of photos of the vacuum system. The whole rig costs $1500 and the pump itself costs up to $800 (pending supplier), but I have got one (new) lined up for $400. The gage is about $100 and shows negative pressure upto -100PSI.
Then there are the other accessories like the chamber itself (that is a 25mm Perspex lid) which I can probably get made for around $100, and the steel reinforced hose and release valve are extra...

Mark
Then there are the other accessories like the chamber itself (that is a 25mm Perspex lid) which I can probably get made for around $100, and the steel reinforced hose and release valve are extra...
Mark
Mark, I thought you'd given up on the 2-part resin.
Does the new one part Gel still require a vaccuum chamber too?
Does the new one part Gel still require a vaccuum chamber too?
Mark,
It is good to see you keeping this DIY thread alive and thriving. Good luck with your resin prisms.
There is a type of clear polyester casting resin that uses only a small amount of liquid hardener. It is primarily one resin. It might be easier to mix without causing the swirl effect that you are seeing. It is also available in a super deep clear that is used for casting coins and things like that.
Also, while a lot of work and extra expense it is possible to polish and finish off the surface to an even flatter and better quality by hand methods. It however, raises the cost of the parts considerably by the time you get all of the stuff.
Mark, I thought you'd given up on the 2-part resin.
Does the new one part Gel still require a vaccuum chamber too?
Not quite. After speaking to the optics specialist (a guy from OPSM - did I post that yet?) who makes prisms out of CR39, I realized that all was not quite lost. He has experienced the heat swirls too, but has the right gear to ensure that the resin cures properly.
The GEL (not available until after easter) I was looking at will also bubble if poured too quick. The problem using it is reactive time. It goes off in the sun, but how long for a large mass needed for the body of the prisms is one question no-one seems to be able to answer.
Looking at the four prisms that I have made, and the best one was done from two methods (at the time I wasn't really aware of), and that is -
1. During the pour, it seems best to let the resin run down the mold, rather than pool at the bottom, and
2. I used a heat gun to draw out the surface bubbles, but I also used that heat gun on the sides of the mold. It would appear that the resin really needs a warm area to re-act in rather than the normal room temp as there are hardly any swirls in that prism.
I want to try it one more time, but use maybe two of those flood lamps (one on each side) to keep the resin hot.
Mark,
It is good to see you keeping this DIY thread alive and thriving. Good luck with your resin prisms.
There is a type of clear polyester casting resin that uses only a small amount of liquid hardener. It is primarily one resin. It might be easier to mix without causing the swirl effect that you are seeing. It is also available in a super deep clear that is used for casting coins and things like that.
Also, while a lot of work and extra expense it is possible to polish and finish off the surface to an even flatter and better quality by hand methods. It however, raises the cost of the parts considerably by the time you get all of the stuff.
Thanks Hezz for the positive feedback. The resin I have used so far is the one pictured back a few pages with two eaual parts. It is clear. The other resin cost about half as much, but it's hardner is amber. Even though you only add a very small amount, how much colour change will there be?
The reason I elected to use Perspex as the sides of the molds was to provide a clean flat surface that I didn't have to pollish. Perspex has a lower refractive index than glass anyway, so with the exception of the possible light reflections that can occur off the surface, will give better results.
The angles is also less than liquid. I used 30degrees for the water prisms, so they are physically big (thick) and that means the light has to pass through a lot of liquid. The resin prisms are just 10 degrees, and if I can pour these without the swirls will will (do) work better as there is less for the light to pass. Note that the amount of stretch is the same, but the lens can be made smaller.
I quoted lines from the early pages of this thread as there was talk about using resin for the body of the prisms instead of a liquid, but that never went anywhere, so I have decided to give it a go.
Whilst not perfect, I belive that this will work. These four prisms were the first time I had ever mixed and used resin for casting, so there is bound to be room for improvement in technique...
Mark
Thanks for the detailed reply Mark. You're still in the R&D phase here, so the final product is just a matter of refinement. Keep up the great work, we're with you all the way.
Hey thanks Bud ray 🙂
This multi pour method would work based on the very first effort (flat mold), but would not work for method 2 (vertical molding) as you would see the line between the layers as we look through the casting.
Either way, you still need to de-gass the resin, and flame and or heat will only do part of the job.
It seems resin casting is an art form...But one I want to master...
Mark
- Home
- General Interest
- Everything Else
- The Moving Image
- Optics
- DIY anamorphic lens