An externally hosted image should be here but it was not working when we last tested it.
An externally hosted image should be here but it was not working when we last tested it.
An externally hosted image should be here but it was not working when we last tested it.
An externally hosted image should be here but it was not working when we last tested it.
An externally hosted image should be here but it was not working when we last tested it.
An externally hosted image should be here but it was not working when we last tested it.
An externally hosted image should be here but it was not working when we last tested it.
An externally hosted image should be here but it was not working when we last tested it.
An externally hosted image should be here but it was not working when we last tested it.
An externally hosted image should be here but it was not working when we last tested it.
An externally hosted image should be here but it was not working when we last tested it.
An externally hosted image should be here but it was not working when we last tested it.
An externally hosted image should be here but it was not working when we last tested it.
An externally hosted image should be here but it was not working when we last tested it.
An externally hosted image should be here but it was not working when we last tested it.
An externally hosted image should be here but it was not working when we last tested it.
An externally hosted image should be here but it was not working when we last tested it.
An externally hosted image should be here but it was not working when we last tested it.
An externally hosted image should be here but it was not working when we last tested it.
An externally hosted image should be here but it was not working when we last tested it.
An externally hosted image should be here but it was not working when we last tested it.
The last photos. 😉
Hi mark, I will answer to your question on avs.
sam
Be careful discussing this at AVS. This thread was originally started here because they were not allowed to discuss the workings of the lens there. That was back in 2002, so hopefully attitudes have changed...
I like your work...
Mark
I like your work...
Mark
Ok, going over the first 38 pages (I came in at 39) once again and I could not find anyone that did solid prisms made from resin. I found a few start to discuss it, but then it was not continued…
This was probably the best idea, but why remove the glass? Isn’t that your flat lens face?
Some good ideas were tossed around, but did anyone actually do it? I understand that polishing the surfaces would be a tough job, but what about substituting the fluid for an epoxy resin that goes from a liquid to a gel to a solid. Maybe something like THIS
Face it, the fluid and glass (I used Perspex filled with water) becomes a solid (so far as light is concerned), so why not replace the liquid with a solid…I am probably flogging a dead horse, but hey if it works?
I have also built a new test jig with small wedges cut using my miter saw (power drop saw) to keep the face material (I’ll start with 6mm Perspex again) at the right and constant angles…
Mark
Your use of liquids to form the prism body is cool. Have you considered exploring those transparent epoxy packs available for use in embedding things within a plastic block? You might be able to get away with only needing one liquid device. (I'm thinking about leaks etc.)
Is it somekind of molding material? The material would have to have the right refraction index, somewhere close to turneptine. If the refraction index is different the angles need to be changed.
The stuff I was actually looking at is generally available from Home Depot in the US. It is clear, transparent, and designed for encapsulating things into table-tops, trays etc.
I was thinking of using it to make large PCX field lenses for the LCD panels instead of fresnels, but when used correctly, the fresnels weren't too bad.
You put whatever you wish to encapsulate on the surface, pour over the epoxy as if it were water, and let it set. (Of course, you must build a waterproof frame around the edges...)
I have seen this used with thicknesses up to an inch.
It would be possible to make a mould from glass. The problem would be getting the prism out of the mould, even if the mould was expendable.
This was probably the best idea, but why remove the glass? Isn’t that your flat lens face?
Does anyone know the specs for the solid versions of the prisms?
As for 2.35:1 compressionIf using glass prisms(30,60,90), the angle between the two prism is around 49 degrees.
Some good ideas were tossed around, but did anyone actually do it? I understand that polishing the surfaces would be a tough job, but what about substituting the fluid for an epoxy resin that goes from a liquid to a gel to a solid. Maybe something like THIS
Face it, the fluid and glass (I used Perspex filled with water) becomes a solid (so far as light is concerned), so why not replace the liquid with a solid…I am probably flogging a dead horse, but hey if it works?
I have also built a new test jig with small wedges cut using my miter saw (power drop saw) to keep the face material (I’ll start with 6mm Perspex again) at the right and constant angles…
Mark
On the french site can you explain what those strange angles are of 3.2 degrees and 31 degree in the yellow graphic photo here:
http://www.homecinema-fr.com/forum/viewtopic.php?t=29803723
Can you please confirm the angle of the prisms. Also the second prism is filled with what exactly?
http://www.homecinema-fr.com/forum/viewtopic.php?t=29803723
Can you please confirm the angle of the prisms. Also the second prism is filled with what exactly?
Dracul,
Both prisms in this example are 20degrees (made from glass) and both are filled with glyserine. The other angles are the prism offsets from the projector that give you the amount of stretch (actually in the case of the yellow drawing, it is squeze as that is for a VC not a HE)...Though the same angle should work for a HE...
Mark
Looking into solid prisms
I went shopping and found two different products (at two very different prices) that might do the job.
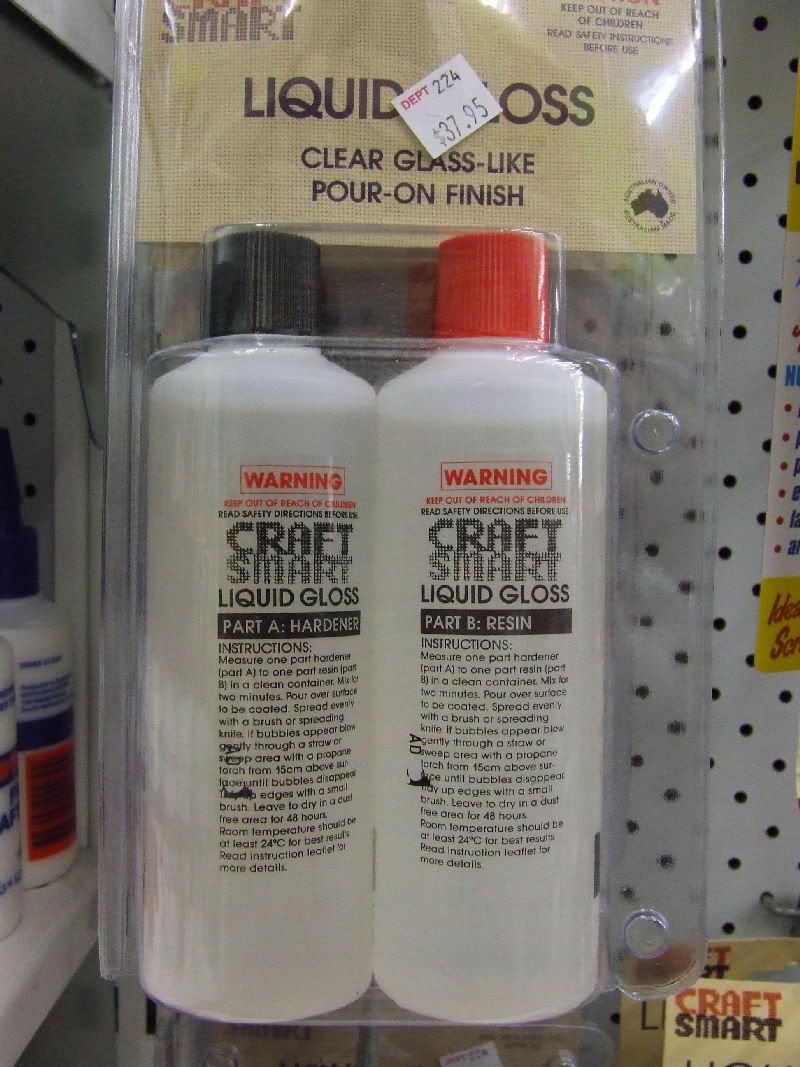
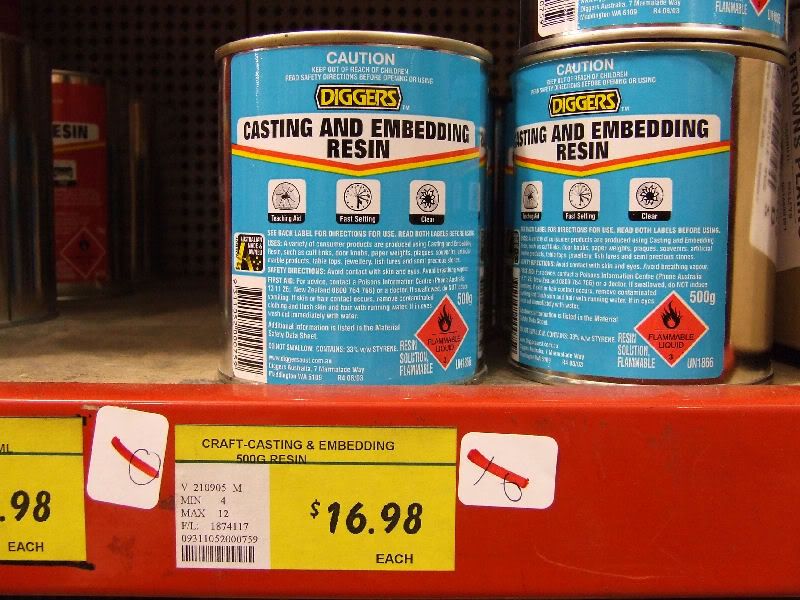
The first of these is an equal mix parts of resin and hardner and looks clear. The packaging claims "a glass like finish".
The second product is also a resin, but the harder is mixed in smaller amounts (somewhere in the order of just 3mm hardner to 100mm resin), however the hardner (not pictured) is amber, not clear. I wonder if such a small amount of amber is even going make a visible difference?
Both products are exothermic and care should be taken with mould.
My thoughts are around using 6mm (or maybe 10mm?) as both the mold front backs, but so that the persex becomes the clean smooth face of the prisms when the Resin has set. It won't be removed, so as long as there are no major bubbles, should produce a clean solid prism with a very clean, smooth faces...
Mark
The stuff I was actually looking at is generally available from Home Depot in the US. It is clear, transparent, and designed for encapsulating things into table-tops, trays etc.
I went shopping and found two different products (at two very different prices) that might do the job.
The first of these is an equal mix parts of resin and hardner and looks clear. The packaging claims "a glass like finish".
The second product is also a resin, but the harder is mixed in smaller amounts (somewhere in the order of just 3mm hardner to 100mm resin), however the hardner (not pictured) is amber, not clear. I wonder if such a small amount of amber is even going make a visible difference?
Both products are exothermic and care should be taken with mould.
My thoughts are around using 6mm (or maybe 10mm?) as both the mold front backs, but so that the persex becomes the clean smooth face of the prisms when the Resin has set. It won't be removed, so as long as there are no major bubbles, should produce a clean solid prism with a very clean, smooth faces...
Mark
Hello,
mark, very impressive job 🙂 I wait the result with impatience.
Dracul, on the yellow graphic, the first prism is in Oil of thérébentine and the second in water.
The angle are correct. Don't forget that angles are different with different refraction index.
For calculate the angle with all the material (just know the refraction index), use this applet :
http://karzeni.free.fr/pics/anamorpHCFRv3.fig
(to open the file, use a demo version of cabri plus II :
http://ns33285.ovh.net/data/install_cg2p_1_3_eval_us.exe)
sam
The BK7 solid prisms specs :
Refraction index 1.50
Antireflection coatings (450/720nm)
clear aperture : 90%
PS : I wait the sample in BK7 (refraction index 1.50 with antireflection coating) in 2 weeks. I'll give you my opinion. 😉
PS 2 : sorry but I don't understand all the questions
🙄
sam 😉
mark, very impressive job
🙂 I wait the result with impatience.Dracul, on the yellow graphic, the first prism is in Oil of thérébentine and the second in water.
The angle are correct. Don't forget that angles are different with different refraction index.
For calculate the angle with all the material (just know the refraction index), use this applet :
http://karzeni.free.fr/pics/anamorpHCFRv3.fig
(to open the file, use a demo version of cabri plus II :
http://ns33285.ovh.net/data/install_cg2p_1_3_eval_us.exe)
sam
No because I'm afraid about chromatic diffraction with this material and the impact on the beam.Have you considered exploring those transparent epoxy packs available for use in embedding things within a plastic block?
Does anyone know the specs for the solid versions of the prisms?
The BK7 solid prisms specs :
An externally hosted image should be here but it was not working when we last tested it.
Refraction index 1.50
Antireflection coatings (450/720nm)
clear aperture : 90%
PS : I wait the sample in BK7 (refraction index 1.50 with antireflection coating) in 2 weeks. I'll give you my opinion. 😉
PS 2 : sorry but I don't understand all the questions
🙄
sam 😉
Awesome! Thanks Skhattane (Sam) 🙂
I'm not sure about the Refractive Index of this resin, but its got to be worth at least a prototype...The CA should be cancelled out by the second prism...
I noticed that you got 20 degrees to work and I am thinking of bonding two 10 degrees prisms (to make the 4 prism lens)...
The main reason for making thinner prisms is the resin is exothermic as set reacts, and too thick produces allot of heat. Also I am concerned with bubbles not escaping if the resin is too thick...
Hopefully I will get some positive results soon...
Mark
Just a precision,
for dracul, on the yellow graphic the angle of the prism are not 20 degree but 24 and 30 degree. cf the previous graphe.
It was the first graphe of a german website. Now we realize prism with 20 degree with glycerol. Less chromatic diffraction and better geometry. To find angle with 20 ° use the applet or try in real, it's easy.
Now we realize prism with 20 degree with glycerol. Less chromatic diffraction and better geometry. To find angle with 20 ° use the applet or try in real, it's easy.
That is an interesting point. When I made my 4 prism lens, I tried filling just one half of each prism first (where each half was just 15 degrees) and it worked quite well. That is partly why I am going for thin (10 Degree) prisms. Two together will give 20 degrees (which works for Glyserine) and the two pairs will then give me another 4 prism lens...
The way I see it, any prism has the abilty to bend light, but the difference in image quality will be specific to what the image is made of. I am hoping that the solid prisms I am making are as clear as glass. If it is, then the image should not be affected too badly. This was my theory with two water prisms, and that did work. I bet now, that if those water prisms had been made thinner than 30 degrees each, they would work better too...
Mark
Hi
I have been watching from side what you guys are creating here.
-skhattane nice work you have done there in France with the lenses.
-Mark you really don't give up easily🙂 Once again I have great interest in hearing how your next prisms perform.
I have been mostly happy with my lens,(vertically compressing with glyserine filled prisms ,26 and 20 degrees).
Another day when gleaning the lenses from a long time,I notised that the dirt was inside the first lens (counting from the projector).The clyserine looked like clear but the glasses had some "smokey"dirt in them,specially the one facing the projector.I drained the prism ,flushed it with alcohol and this time filled it with distilled water ,cause I don't want this to happen again.
I'm not sure what has caused this,but most likely it is the glyserine reacting somehow.Or then it is the silicone.
I also adjusted the lens and projector as the picture jumped up about 1/10 screen hight,with this new prism combo.
The picture geometry appears to be better now and I think the chromatic abberation is even more redused.Maybe because the new adjustments and gleaning...difficult to tell
Hmm interesting. I never did use glycerine as to me, it just never looked clear enough and for the cost, it was too big a risk. I have had to change the water, and the aligment is strange, as sometimes it looks better than before. Right now, I am having stretch issue again. i should just learn - if it ain't broke, don't fix...
I am looking forward to making these solid prisms. I do not have the perspex for the molds yet so no point in pouring resin...
Mark
I am looking forward to making these solid prisms. I do not have the perspex for the molds yet so no point in pouring resin...
Mark
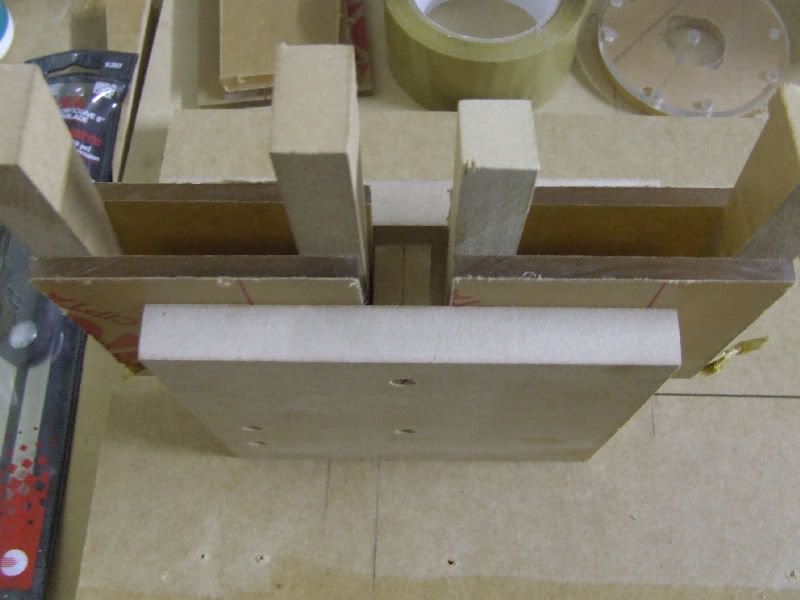
UPDATE:
The new full sized jig. The new jig is large enough to hold both the 6" x 6" and 6" x 8" Perspex plates. It is clamped together and can be used with ever wider pieces...
The only part that concerns me is the resin sticking to the jig, but I'm thinking lining the ends with baking paper should prevent that.
Stay tuned next week for the first pour...
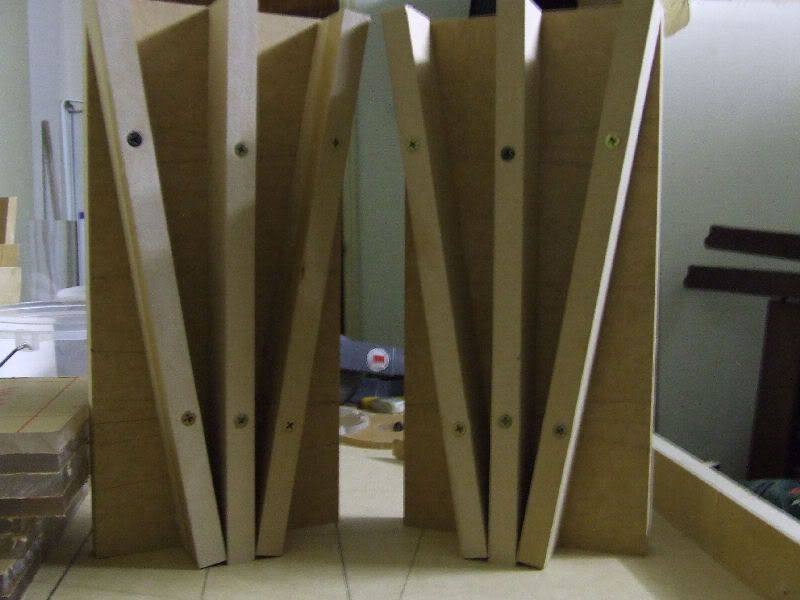
Mark
The new full sized jig. The new jig is large enough to hold both the 6" x 6" and 6" x 8" Perspex plates. It is clamped together and can be used with ever wider pieces...
The only part that concerns me is the resin sticking to the jig, but I'm thinking lining the ends with baking paper should prevent that.
Stay tuned next week for the first pour...
Mark
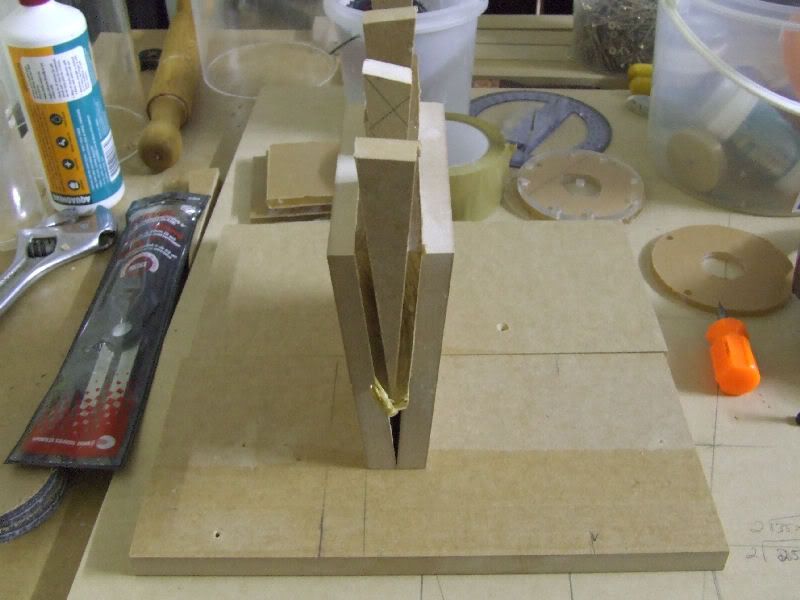
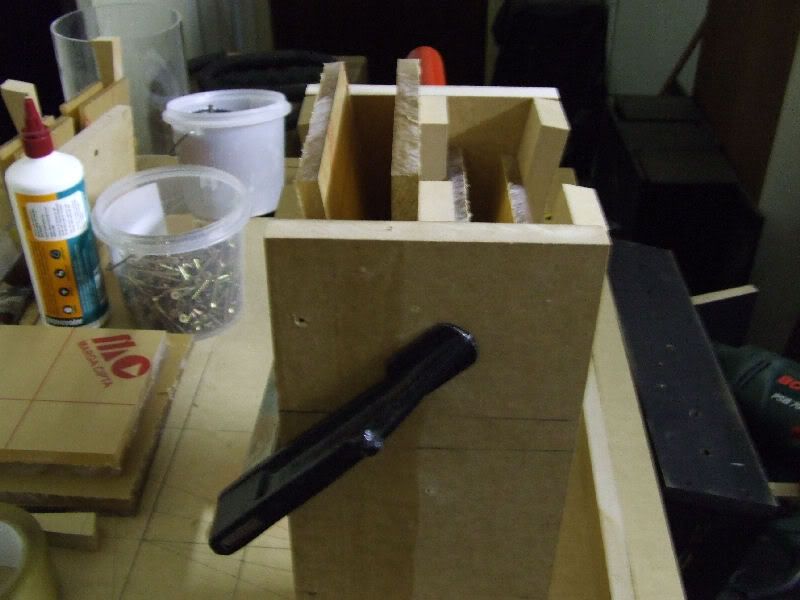
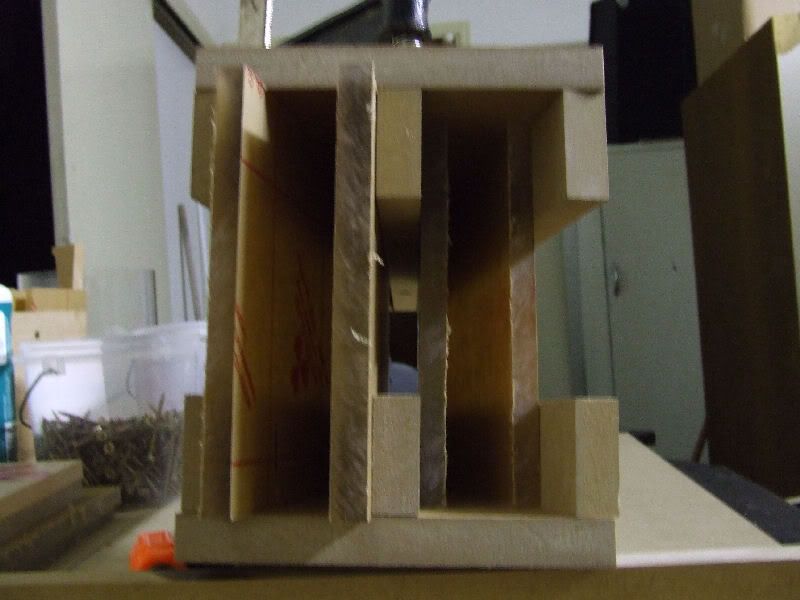
Solid Prism Update
Hopefully I will still get the first pour done this week. However speaking with several people about pouring resin, and I am led to believe that the jig I made and pictured above may not work.
The resin is a 2 part product that must be mixed correctly. To get the mix right requires a lot of stirring, and as one does so, one mixes air into the product. The air forms bubbles and they may or may not rise to the surface. Given that the jig makes a 6" x 8" prism, the chances of the bubbles rising that distance is pretty remote.
So I have made another "flat" jig to pour the resin into and then add the top layer of Perspex to.
To ensure the bubbles disappear, I have to run a butane torch over the resin. The heat from the torch causes the bubbles to rise and expand and hopefully they will all be removed before I lay the top piece of Perspex on to complete the prism. I am hoping that by slightly over filling the mold, that I won't trap more air under the top layer. I have also though about laying the top piece of Perspex from one end first, so that it pushes out the excess resin and hopefully the air as well...
The other thing that has been brought up is the use of a pressure or vacuum chamber.
The pressure chamber will (as the name suggests) increase the atmospheric pressure inside the chamber and compress the bubbles so that they are too small to see. The resin must remain under pressure until it is set or the bubbles will return once the pressure is reduced.
The vacuum method uses a vacuum pump to remove the air from the chamber. As it does so, it is supposed to suck all the bubbles out as well giving a result with 100% free of bubbles. Once the bubbles are gone, they will not come back, and the chamber can be re-pressurized to remove the mold for further production.
Out of the two, the vacuum method is supposed to be the cheaper alternative as the chamber is a large diameter of PVC pipe and two end plates made from ½” Perspex and rubber seals. The pipe has a hose attached to the side and the pump removes the air.
The pump however must be able to produce a vacuum of 30 units of suction called mercury’s(?) and a house hold vacuum cleaner produces about 1.5 units of suction, so finding such a device could prove difficult...
Mark
Its been 2 weeks and I have not had the chance to make the first pour 🙁
The good news is I found a vacuum pump 🙂, but at $400 🙁 I need to consider how many bubble free prims I can make and still keep this project cost effective.
I have also been thinking about a new version of the 4 prims lens...
Mark
The good news is I found a vacuum pump 🙂, but at $400 🙁 I need to consider how many bubble free prims I can make and still keep this project cost effective.
I have also been thinking about a new version of the 4 prims lens...
Mark
Mark, I'd be happy to contribute to the cost of the vacuum pump... after all, it's for a great cause! 
Foghorn17, YOU ROCK!
Please contact me using cavx@optusnet.com.au to discuss this further...
I look forward to your email...
Mark
Please contact me using cavx@optusnet.com.au to discuss this further...
I look forward to your email...
Mark
Vacuum pump is going to be a few weeks away. There are a few extra things to buy with that, but the good news out of today is that the supplier of the vacuum pump can also supply clear (he says like glass) resin.
Having build a few different jigs, I decided to try the 2 part resin that I posted earlier, just using the "flame" method and to see how this resin actually performs.
I set the jig and mixed equal parts A and B together. The stuff goes almost white with bubbles. By pouring down one edge rather than pooling in the middle makes some of the larger bubbles burst almost straight away. This mix is crystal clear
I used my girlfriend's heat gun to remove the rest which poped easier than I expected giving a glass like smoot finish.
And here is a picture of the first pour...
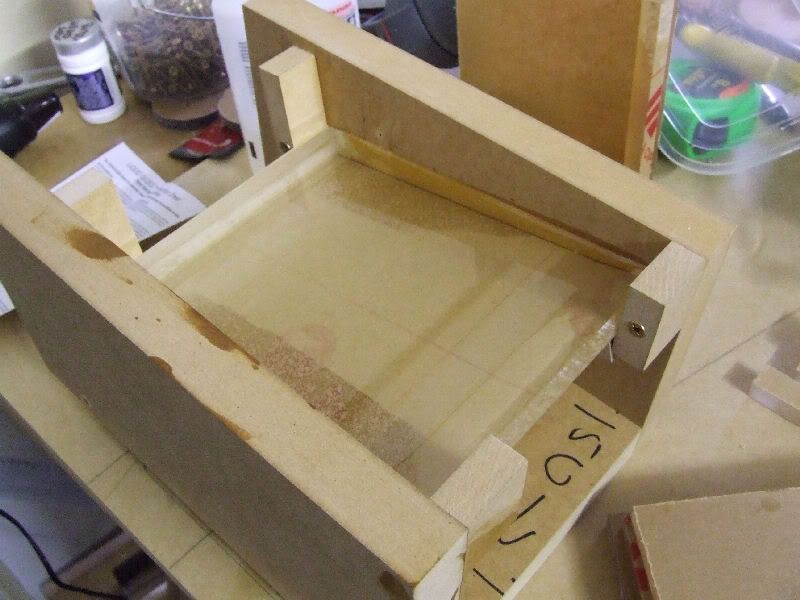
Mark
Having build a few different jigs, I decided to try the 2 part resin that I posted earlier, just using the "flame" method and to see how this resin actually performs.
I set the jig and mixed equal parts A and B together. The stuff goes almost white with bubbles. By pouring down one edge rather than pooling in the middle makes some of the larger bubbles burst almost straight away. This mix is crystal clear
I used my girlfriend's heat gun to remove the rest which poped easier than I expected giving a glass like smoot finish.
And here is a picture of the first pour...
Mark
- Home
- General Interest
- Everything Else
- The Moving Image
- Optics
- DIY anamorphic lens