Good to see some interest back into this thread 🙂
Dibblah,
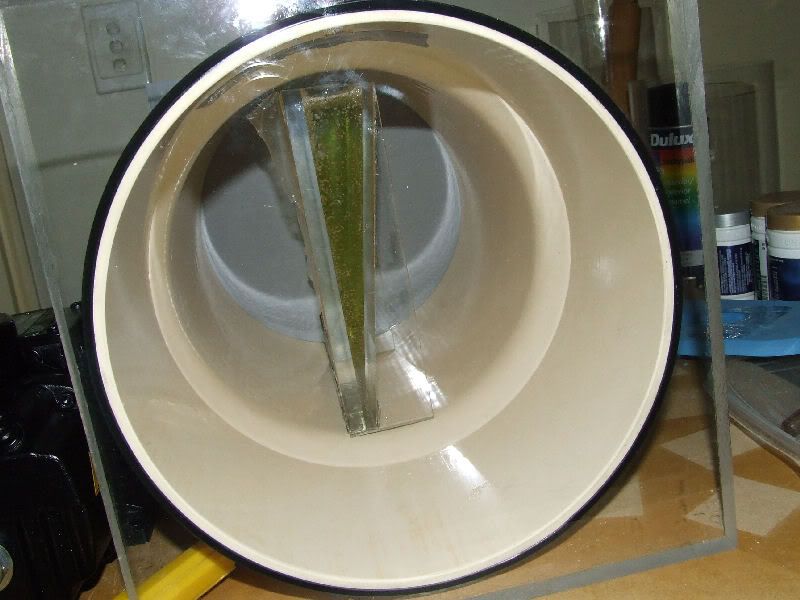
What you see in photos is from a vertical pour. The sides of the mold have been removed, hence why you can see the original "V" of the Perspex. I used a slightly different mixing and pouring method, and I believe that is why I had success this time.
The vacuum pump was also used, but this time the mold itself was the chamber and therefore I could not fill the mold to the top, but rather needed to leave expansion room for the resin as I degased.
Steve,
The major drawback with resin is time. Once mixed, you have a pot life of X minutes. I have aslo mixed the miniumum amount of hardener to slow the re-action time ans extend the pot life. I believe the trick to draw bubbles from a vertical mold is high vacuum applied very quickly. This draws bubles from the bottom as well as the top. The last thing you want (and I ended up with in one pour) is bubbles trapped half way up, as the surface starts to go from a liquid to a gel state, the bubbles can not move. Because the top of the prism is also the thickest, this part generates the most heat, and is where the fastes change will occur so time is not on your side.
This has been a huge learning curve, and unfortunately does require specalized equipment to get it right. This week end (hopefully) I will pour the remaining molds that I have made up and see if I can not finally assemble a 4 (solid resin) prism lens...
Mark
Dibblah,
What you see in photos is from a vertical pour. The sides of the mold have been removed, hence why you can see the original "V" of the Perspex. I used a slightly different mixing and pouring method, and I believe that is why I had success this time.
The vacuum pump was also used, but this time the mold itself was the chamber and therefore I could not fill the mold to the top, but rather needed to leave expansion room for the resin as I degased.
Steve,
The major drawback with resin is time. Once mixed, you have a pot life of X minutes. I have aslo mixed the miniumum amount of hardener to slow the re-action time ans extend the pot life. I believe the trick to draw bubbles from a vertical mold is high vacuum applied very quickly. This draws bubles from the bottom as well as the top. The last thing you want (and I ended up with in one pour) is bubbles trapped half way up, as the surface starts to go from a liquid to a gel state, the bubbles can not move. Because the top of the prism is also the thickest, this part generates the most heat, and is where the fastes change will occur so time is not on your side.
This has been a huge learning curve, and unfortunately does require specalized equipment to get it right. This week end (hopefully) I will pour the remaining molds that I have made up and see if I can not finally assemble a 4 (solid resin) prism lens...
Mark
The Resin Lens
I poured another resin lens this afternoon (I'm still waiting for it to set) but the result will not be as good as I had hoped as during the vacuum process, the sides leaked. It doesn't look like to much resin leaked out, but I could pull the required vacuum as air was coming in.
Any way I got most of the bubbles out, but there are still quite a few in there. Tomorrow, I can remove the paper and see what happened...
Tonight I decided to have a play with the prisms that I have made already. Obviously I'm keen to get a bubble free pair to make a lens, and decided to use both the bubble free prism and one that failed the other day. The result is not too bad at all.
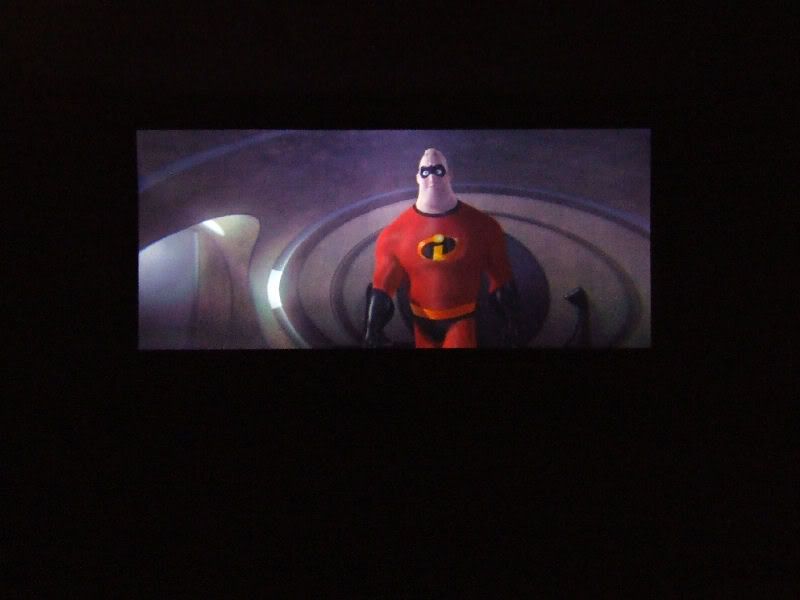
Given the amount of bubbles in the larger prism, I am surprised that it works at all. The edges came much straighter than the water prisms and I even had to remove the side wedges that curve my screen vertically (Torus screens are curved both vertical as well as horizontal)...
So tomoorrow will be intersting because if this bubble riddled prisms can work, then the one I poured this afternoon can only perform better...
Mark
I poured another resin lens this afternoon (I'm still waiting for it to set) but the result will not be as good as I had hoped as during the vacuum process, the sides leaked. It doesn't look like to much resin leaked out, but I could pull the required vacuum as air was coming in.
Any way I got most of the bubbles out, but there are still quite a few in there. Tomorrow, I can remove the paper and see what happened...
Tonight I decided to have a play with the prisms that I have made already. Obviously I'm keen to get a bubble free pair to make a lens, and decided to use both the bubble free prism and one that failed the other day. The result is not too bad at all.
Given the amount of bubbles in the larger prism, I am surprised that it works at all. The edges came much straighter than the water prisms and I even had to remove the side wedges that curve my screen vertically (Torus screens are curved both vertical as well as horizontal)...
So tomoorrow will be intersting because if this bubble riddled prisms can work, then the one I poured this afternoon can only perform better...
Mark
This is looking very promising Mark. I can't wait to see how good it is when you have two good prisms.

great work with the prisms!
I was just wonderin whether you had tried setting the moulds at higher/lower tempratures to slow down the curing time?
Does the resin set quicker in a cold or warm environment?
I was just wonderin whether you had tried setting the moulds at higher/lower tempratures to slow down the curing time?
Does the resin set quicker in a cold or warm environment?
Wow, Mark, great results, even with a prism riddled with bubbles. I wonder if you will see much of a difference with the prism that has fewer bubbles. Could be that the bubbles really won't affect much. Interesting...
I spoke to my father about this, and he works with resins (sealants, coatings, etc.) all the time. I asked him if he ever had to de-gas resins, and what did he use. He said he does all the time, and uses a vacuum set at 27 inches Hg.
So it looks like from one chemistry professional, you are on the right track. If you can get the solid state prisms to work right, this would be huge, I think, Not only are the prisms smaller, but have to be lighter, and easier to work with, right? Fantastic work, Mark.
Thanks for responses...
Yeah me too 🙂
Yes I have. Hotter temps make the resin go off faster. The earlier resins I worked with had straitions (thermal waves) that set into the resin and were visible to the point that the image would focus. This was not helped by the fact that I used a heating gun as well. I have found that cooler temps seem to set the resin slower, but more smoother. That is why I poured the last few late afternoon. The nights are getting much cooler here now...
There is a slight degree of visible effect, but not so much as to make the image poor or unwatchable. The bubbles will cause some reflections with in the prism, but I too am surprised how well it works. The prism I poured late yesteray should be set today, and becuase I did manage to vacuum some bubbles out, should look better than this one...
Mark
This is looking very promising Mark. I can't wait to see how good it is when you have two good prisms.
Yeah me too 🙂
great work with the prisms!
I was just wonderin whether you had tried setting the moulds at higher/lower tempratures to slow down the curing time?
Does the resin set quicker in a cold or warm environment?
Yes I have. Hotter temps make the resin go off faster. The earlier resins I worked with had straitions (thermal waves) that set into the resin and were visible to the point that the image would focus. This was not helped by the fact that I used a heating gun as well. I have found that cooler temps seem to set the resin slower, but more smoother. That is why I poured the last few late afternoon. The nights are getting much cooler here now...
Wow, Mark, great results, even with a prism riddled with bubbles. I wonder if you will see much of a difference with the prism that has fewer bubbles. Could be that the bubbles really won't affect much. Interesting...
There is a slight degree of visible effect, but not so much as to make the image poor or unwatchable. The bubbles will cause some reflections with in the prism, but I too am surprised how well it works. The prism I poured late yesteray should be set today, and becuase I did manage to vacuum some bubbles out, should look better than this one...
Mark
I've poured another prisms, but it is not 100% bubble free as the mold leaked during the vacuum process and I could pull the full 27inHg needed to remove the bubbles. It looks nice and clear though, so when I get some spare time, I'll test it with the other "good" prism...
Mark
Mark
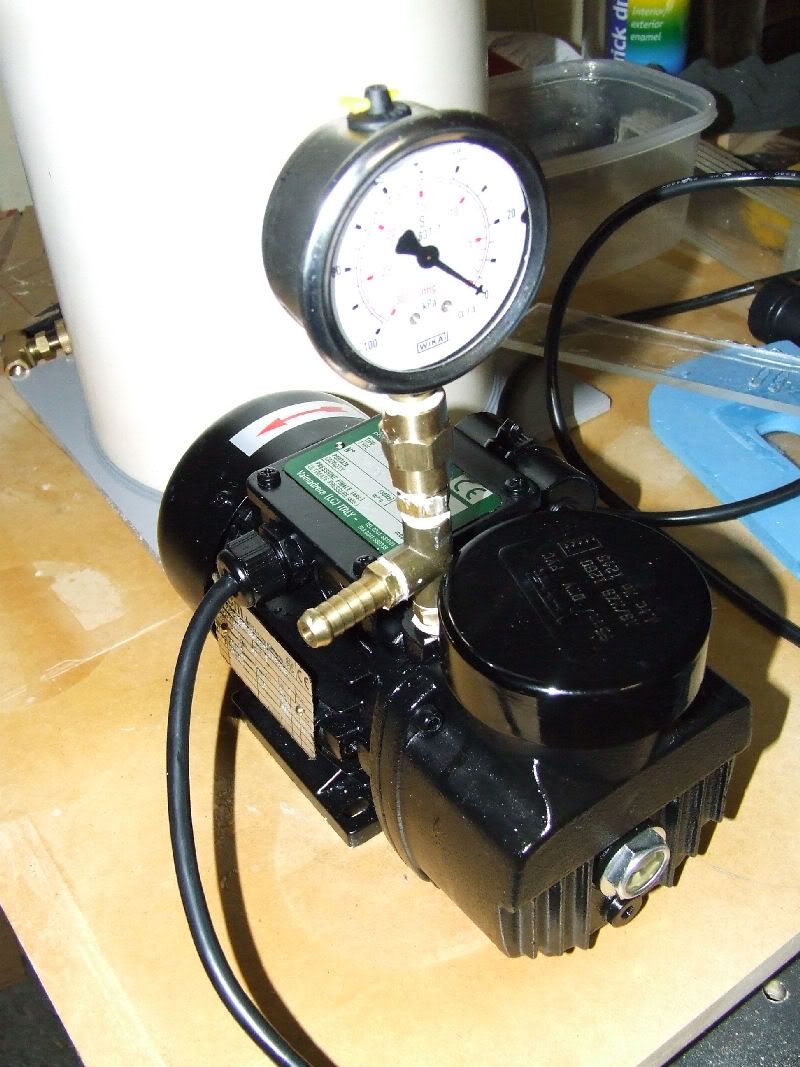
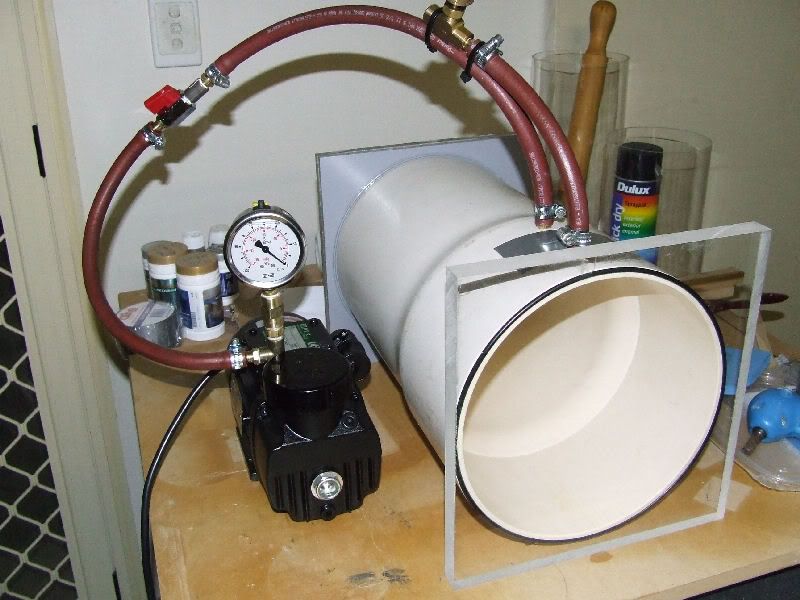
I pick up my electric vacuum pump tomorrow...
It is supplied with a gage and hose. I wonder what fittings I'll need before I can use it?
Mark
It is supplied with a gage and hose. I wonder what fittings I'll need before I can use it?
Mark
propylene glycol is used in the coatings industry for differng purposes, but..one of them is it's translucency and lack of color shifting..when used in any given mixure of pigments. Also, it works well when it comes to 'wetting out' a given particle mix of differing electical potentials. (surface tension and how well it deals with other different particles and their issues)
With the right surface treatment ('rain-x' kinda thingie) it can cut surface refration/tension/etc.
Buying coated high grade (optical grade) plexi is not uncommon or difficult. Optical or medical grade proplyene glycol, I have. In 500 gallon totes, or larger (coatings factory).
Access to the catalouges for the right plexi, well, we all have that. Just go looking for it.
But I also have access to a guy who is an incredible mould maker and plastics (resin mixing etc) manufacturer. I'll have to ask Carter the next time I see him. Likey Tuesday, as he has been around the factory as of late....
Anyway, with the optically coated plexi, or glass, and the propylene Glycol, you have a well respected and well known lens (commerically sucessful), right there.
The key reason I want to shift from liquid filled prisms is to remove the possibility of leaks...Also some gylserols react to bright light...propylene glycol is used in the coatings industry for differng purposes, but..one of them is it's translucency and lack of color shifting...
Rain X is a good product on a windscreen. Would this work as a anti reflection agent too?With the right surface treatment ('rain-x' kinda thingie) it can cut surface refration/tension/etc.
I've not bought the Plexi yet, but will ask about an optically coated product. I have to buy the entire 8 x 4 sheet anyway, so might as well get the best I can...Buying coated high grade (optical grade) plexi is not uncommon or difficult.
I'm fairly new to the resin casting and mould making thing. It seems to be a trade that the experts are not willing to share their knowledge about, so any help is welcome...But I also have access to a guy who is an incredible mould maker and plastics (resin mixing etc) manufacturer. I'll have to ask Carter the next time I see him. Likey Tuesday, as he has been around the factory as of late....
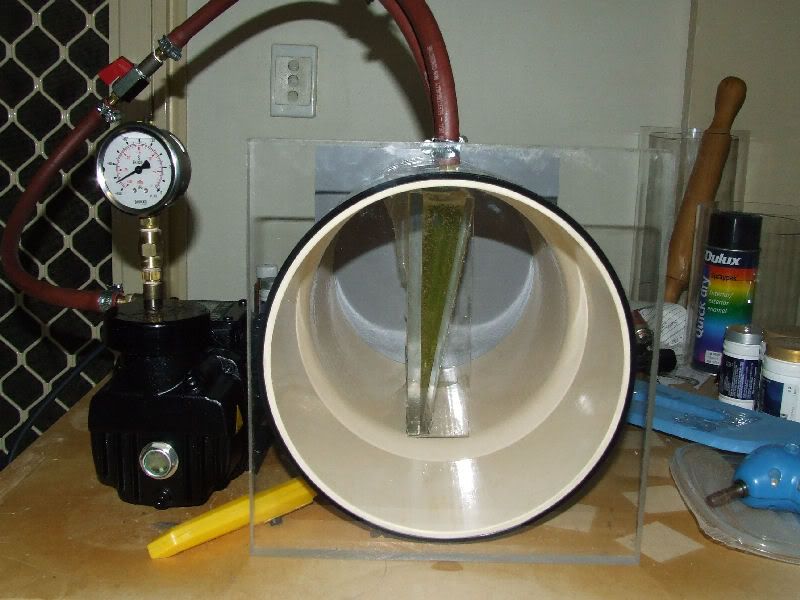
Anyway here is the vacuum system now that it is fully assembled...
Mark
Couldn't wait any longer and had to see what would happen...
I had two molds left over from the last batch I made, so I decided to experiment with yet another tin of resin - all to a good cause in the end 🙂
As I have said, I am not an expert in resin casting and mold making, and had no idea how this product would perform under high vacuum. The hand pump could pull 27.5inHg, but not 29.5inHg.
I mixed the resin in a container and then poured it into the mold. Straight away there were more bubble than you could poke a stick at, so into the vacuum chamber it went.
The last time I had a real successful cast, I used 27.5inHg and the bubbles all came out, but today they didn't seem to be moving real fast, so I let the pump take the vacuum to the full 29.5inHg.
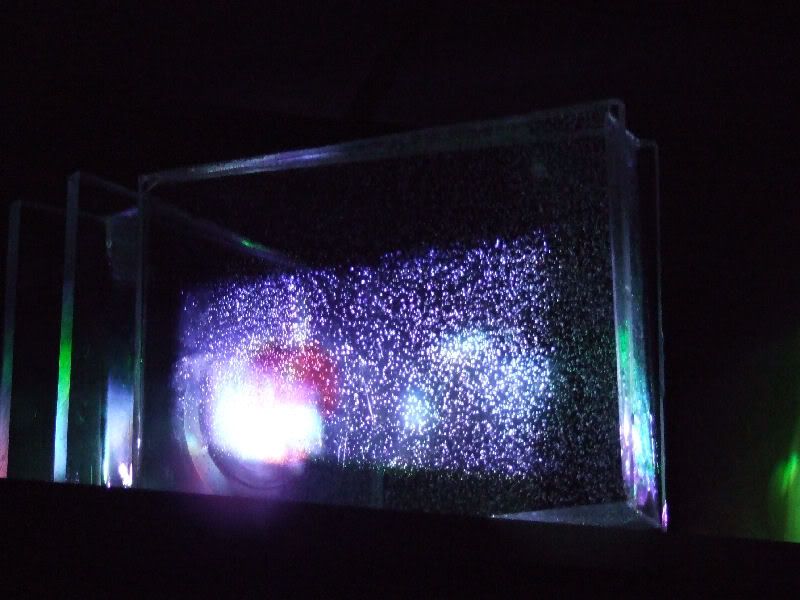
When the bubbles are in a vacuum, they expand, then raise. The bubbles are said to increase in size by up to 6 times, and it was pretty amazing to see just that. There was some "foaming" at the top (image 3) of the mold, but the resin did not "rise and then slump" like my research suggested...
It took a long time and I forgot to actually time the process with a stop watch, but checking my wrist watch, the resin was in a vacuum for over 10 minutes, and research tonight suggested anywhere from 2 to 10 minutes is normal. Also the fact that I am casting vertical adds to the time as the bubbles have much further to travel...
But the bubbles did not seem to disappear, but rather new bubbles forming at the bottom, and I can only assume that I had too much vacuum, and that the resin was starting to burn off...
Anyway, something very interesting (later confirmed on the net) was that when the chamber is re-pressurized, the bubbles that did not escape can be crushed by the sudden change in pressure, and this is pretty much what happend here...
So overall, a pretty good result. I will know exactly how well it turned out in the morning when I can remove the paper...
Here are a few images...
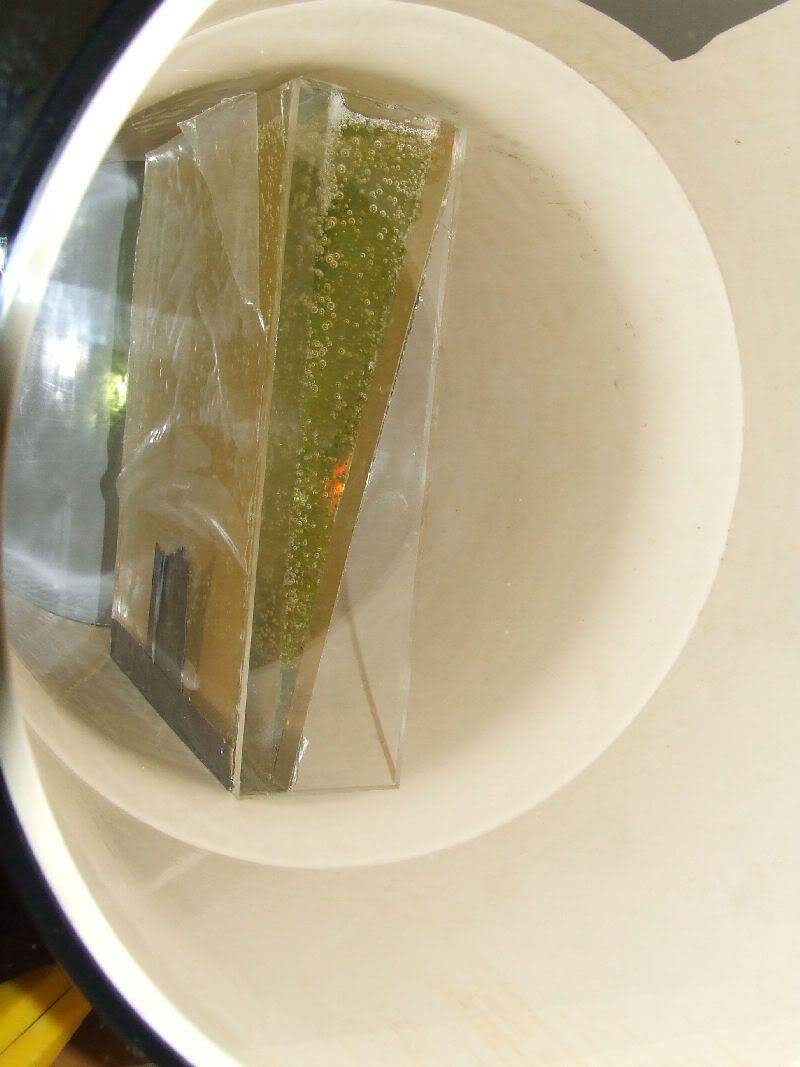
Note the colour change. The resin is slightly offocolour before theit is mixed, then turns green as it goes to a gel state, then goes clear when it has set. I have just quickly checked it and it has already gone clear...
Mark
I had two molds left over from the last batch I made, so I decided to experiment with yet another tin of resin - all to a good cause in the end 🙂
As I have said, I am not an expert in resin casting and mold making, and had no idea how this product would perform under high vacuum. The hand pump could pull 27.5inHg, but not 29.5inHg.
I mixed the resin in a container and then poured it into the mold. Straight away there were more bubble than you could poke a stick at, so into the vacuum chamber it went.
The last time I had a real successful cast, I used 27.5inHg and the bubbles all came out, but today they didn't seem to be moving real fast, so I let the pump take the vacuum to the full 29.5inHg.
When the bubbles are in a vacuum, they expand, then raise. The bubbles are said to increase in size by up to 6 times, and it was pretty amazing to see just that. There was some "foaming" at the top (image 3) of the mold, but the resin did not "rise and then slump" like my research suggested...
It took a long time and I forgot to actually time the process with a stop watch, but checking my wrist watch, the resin was in a vacuum for over 10 minutes, and research tonight suggested anywhere from 2 to 10 minutes is normal. Also the fact that I am casting vertical adds to the time as the bubbles have much further to travel...
But the bubbles did not seem to disappear, but rather new bubbles forming at the bottom, and I can only assume that I had too much vacuum, and that the resin was starting to burn off...
Anyway, something very interesting (later confirmed on the net) was that when the chamber is re-pressurized, the bubbles that did not escape can be crushed by the sudden change in pressure, and this is pretty much what happend here...
So overall, a pretty good result. I will know exactly how well it turned out in the morning when I can remove the paper...
Here are a few images...
Note the colour change. The resin is slightly offocolour before theit is mixed, then turns green as it goes to a gel state, then goes clear when it has set. I have just quickly checked it and it has already gone clear...
Mark
as for the rain x, I'm just thinking something added to the gycol like a surfactant, to reduce surface tension, and create a better molecular bonding to the coated plexi. I threw the rain x thing out there as it is designed to make sure the water does not cause issue. It my be the exact opposite direction you want to go. I'd have to go back and read the backside of a rain x container to figure that out. A surfactant will cut refraction at the surface and thus cut the colorshift, and increase CR.
I'll ask the lab guy. he knows everything. 😀
As for the optically coated plexi, that is possible, but it will easily double the cost of the plexi, I suspect. When you think about the optically coupled issue, you quicky come to the realization that the issue is the inner surfaces of the prism/fluid interface, the outer ones are doing exactly what they are supposed to do. It is also possble to do a folded one with coated mirrors (two) with a full vertical offset, like a WWI trench viewfinder.... with verniers, for anamorphic adjustment of height.
I've largely been down all the roads (half in thought experiment only) you are travelling now. I have still yet to run into Carter, who said he's getting a new celll phone....
Reading your response about the Rain -EX, sounds like your suggesting a replacment for a mold release agent. I want to have the resin bond hard to the Perspex or Plexiglas, not come away.
The idea is that the surface is flat and smooth and doen not require any pollishing. If you removed the mold, I doubt that the resin would be as clear...
The resin simply replaces the liquid with a solid...
Mark
The idea is that the surface is flat and smooth and doen not require any pollishing. If you removed the mold, I doubt that the resin would be as clear...
The resin simply replaces the liquid with a solid...
Mark
Carter has agreed to help you, but I can't send you an email. He happened to stop into the office a few minutes ago, and..I actually remembered to ask!
The information, as you surmised, is how he makes money. So the information will not be public. If you are willing to respect that, he'll help you. I showed him this thread, and he knows exactly how to solve all your issues. He even told me exactly what to do, in a few sentances. But it's not my right to share that. To give you and idea, Carter can cast acrylic shapes like giagantic ice sculptures - with zero bubbles, perfectly clear. Carter was the guy who cast the weapons for the last few star wars films, IIRC.
Send me an email, and I can send you his Cell number.
If you make the call at your expense, you'll find out exactly how to get this done the way you want it to be.
Thanks KBK,
I'll try and call today...
I was hoping for email contact so that I can send him a piture of the lastest efforts - as they say, a picture is word a thousand words after all...
Oh BTW, Perspex is not good for this as it crazy cracks, where Plexiglas does not. I made a prism with one side of each material to test...
The hot glue gun works a treat though 🙂
Mark
- Home
- General Interest
- Everything Else
- The Moving Image
- Optics
- DIY anamorphic lens