Re: stoked
Hmm: It seems that the scan lines disappeared because you compressed them, and then couldn't see them anymore?
It seems to me that you get more versatility expanding (especially moving to a 2.35:1 screen for constant height), but I would think you can get the same result by compressing the image, then zooming, if you can zoom that far. If you are doing constant height, then you have to make the extra step.
But all in all, optically, it should work out the same, I would think...
JudeBarnes said:Well I'm stoked now, I'll be studying all that you've written here Mark and will be building my own if I'm able. Have any other folks out there tried following your plans and made one of their own?
Here's a general question to throw out there on the table that I was kind of curious about, which I'm sure is available through searches at avscience... As far as picture quality and artifacts, are there disadvantages to expanding your image horizontally vs. compressing it vertically, or is the final image basically the same, just stretching it a different direction? The example that comes to mind were some "scanline" effects I saw on my old projector, when I compressed the 4:3 image into 16:9 the scanlines "went away" from my seating distance.

Hmm: It seems that the scan lines disappeared because you compressed them, and then couldn't see them anymore?
It seems to me that you get more versatility expanding (especially moving to a 2.35:1 screen for constant height), but I would think you can get the same result by compressing the image, then zooming, if you can zoom that far. If you are doing constant height, then you have to make the extra step.
But all in all, optically, it should work out the same, I would think...
It depends on who you talk to. Panamorph (Shawn) will state that there are more benifits from using a VC and they now discontinued their UH50 which was a basic 2 element HE lens. It worked well, but there was those that did complain about the CA at the edges of the image. Optic distortions are a part of bending light (both compression and expansion), so are to be expected with an entry level product...
HE lens will tend to exhibit more artifacs due to the fact that your are stretching the light over a larger area. Is CA always visible? Well it depends. I even built a 4 prism lens to try and reduce the bit that I have and it worked. Prismasonic make both 2 and 4 prism lenses, and I can say that their 4 prism lens (and a long throw projector) does not exhibit any CA at all...
The clarity of their glass is also something we must take into consideration. Their prims lenses cost as much as they do becuase the optic glass is not cheap. I had a quote for large prisms to be made from BK7, and the quote came back at $10500 😱 I can buy an ISCO III for that!!!
Today I am going to visit a glassier that has just released a brand new product to their line - anti reflective laminated glass. Hopefully it won't be too expensive, but this is the sort of product needed for the prism surfaces...
As for the resin, it will bepend on the type (surf borad resin is said to be the best)and the conditions that it is mixed, poured, and cured in.
I need to build a "hot box" to maintain a constant 24 degrees C for the curing process. Hopefully this will improve things as well...
Mark
Mark Techer said:I need to build a "hot box" to maintain a constant 24 degrees C for the curing process. Hopefully this will improve things as well...
Mark
Use a portable 12V cooler, with the reverse 'heater' hook up, wired with a cheap $20 digital thermostat.
It has been suggested that a 100w light bulb will generate suffient heat, and that monitoring with a thermometer should work...
Mark
Mark
Despite what the research suggests about RTV Rubber, the supplier of the resin claims that silicon is still the best. They have a liquid that is a one part, pour and set. It is fairly cheap too, so tomorrow I will pick some up...
Mark
Mark
Some one got their wires crossed. The Silicon I bought today is a two part mix not one part...and is not cheap at over $50/Ltr.
They do have a latex rubber (that is the one part mix) but I was advised that the mold will not last very long and that I am better off using the 2 part Silicon rubber...
Off to make a mold...
Mark
They do have a latex rubber (that is the one part mix) but I was advised that the mold will not last very long and that I am better off using the 2 part Silicon rubber...
Off to make a mold...
Mark
I would suggest making the mold in a box or shape that is similar to the part needed (long flat areas) and use that same box when pouring into that mold. This should aid in maintaining a hold on flex or deformation, during the pour and during the curing. Does that make sense to you?
Yes. The molds I have seen (same place where I took the photos of the red vacuum chamber) were large, thick walled, as if poured in a much larger container than the actual part.
It would appear the benifit of doing this is that -
1. The mold will stand on its own
2. The mold should last longer being made from thinker material.
Calculating the volume I need at least 5 ltrs of rubber less the volume of the original part to be copied.
Maybe something like this bitmap I have attached...
Mark
Attachments
http://www.mcp-group.com/alloys/lmpa_moulds.html
Resin dip-cast shells.
There are lower temp alloys out there. Ones you could get to a decent uniformity (from the lower melt temp). I don't think that polishing would be that big of a deal.
Ah, just a thought.
Resin dip-cast shells.
There are lower temp alloys out there. Ones you could get to a decent uniformity (from the lower melt temp). I don't think that polishing would be that big of a deal.
Ah, just a thought.
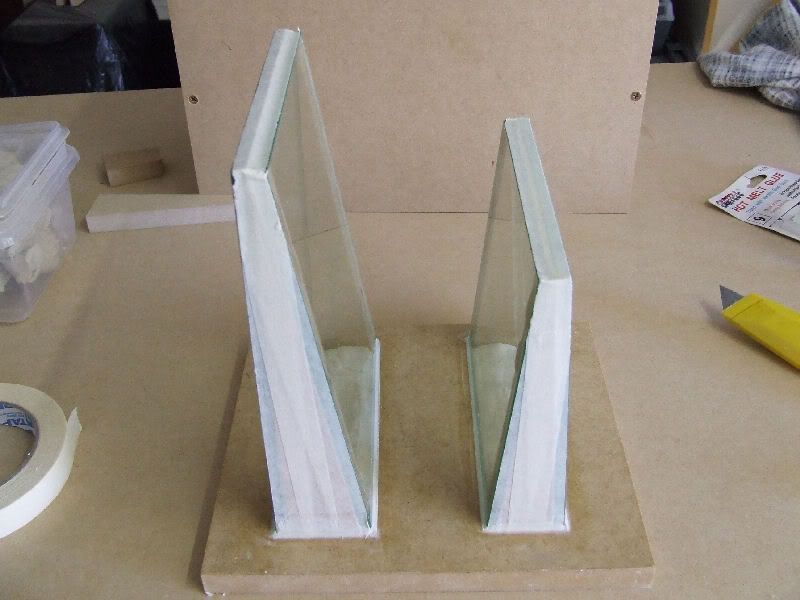
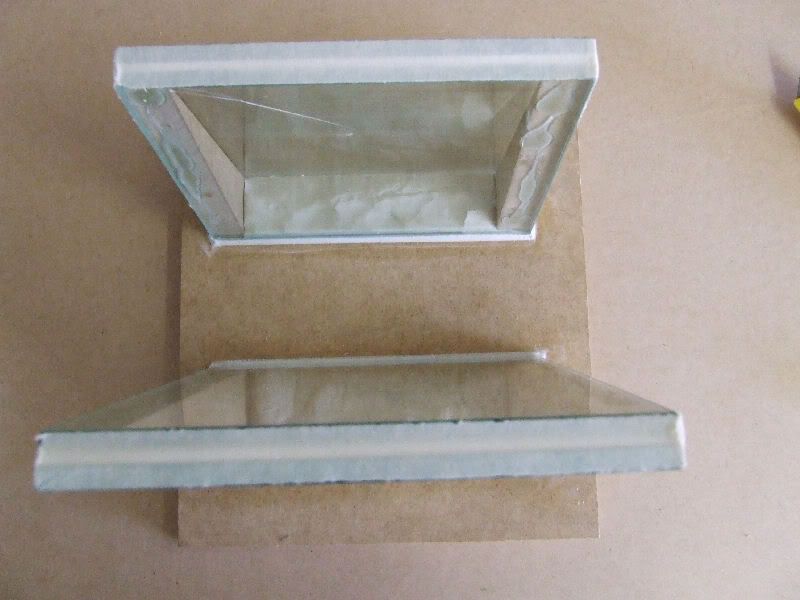
Here is the latest in the resin prism casting. I am in the process of making a mold that will allow me to cast two prisms at a time - one 6" x 6" and the other 8" x 6".
I will use silicon rubber to make the mold, but in order to make a mold, you must have an "original" to mold from.
My "original" is made from four pieces of 6mm glass that have been cut to size by a local glazier, then formed into the prisms using a combination of hot glue, modeling clay (that came from the resin place), MDF wedges and tape.
The idea is to build (or find) a container large enough to hold the "original" and then pour the rubber and let it set around it. It will use a lot of rubber, but the mold should be good for many casts 🙂
I've been advided to make sure that the surfaces are perfectly clean, or the rubber will replicate the fine details including my finger prints!
So here are todays shots 🙂

Mark
I will use silicon rubber to make the mold, but in order to make a mold, you must have an "original" to mold from.
My "original" is made from four pieces of 6mm glass that have been cut to size by a local glazier, then formed into the prisms using a combination of hot glue, modeling clay (that came from the resin place), MDF wedges and tape.
The idea is to build (or find) a container large enough to hold the "original" and then pour the rubber and let it set around it. It will use a lot of rubber, but the mold should be good for many casts 🙂
I've been advided to make sure that the surfaces are perfectly clean, or the rubber will replicate the fine details including my finger prints!
So here are todays shots 🙂
Mark
I would suggest that the mold body be of a nature where the sidewalls basically conform to the dimensions of the desired wedges? This, because the differing masses of the rubber (Thickness of walls) may deform or flex under the load of the resin's mass.
What you may want to do, is think of exactly how the mass of the resin will deform the rubber mold under the filling and curing situation. That's a quite a heavy mass of resin to go into these puppies! I'd VERY much suspect the resin will cause the mold to flex, unless this consideration has taken place during the creation of the mold itself.
ie, varying the thickness of the mold walls appropriately in the given areas to preven the mold flexture. Then design the side walls of the mold box supprt system to accomodate that aspect. Not just sidewall density or thickness, or distance from the resin wedge flats..but the HEIGHT of the mold taken into account as well.
As a quick estimate on the possibilities, you might look up the mold 'pressure loading deflection levels', then compare that to the mass of the resin across one given laterally calculated sectional area. Toward the bottom of the resin mass,and the thicker area, for example, it may cause the mold to flex enough that the surface of the resin cast piece will 'bulge' at that point. Then you'll have to learn to polish it flat.
I very much suspect that you'll have to polish it in the best of cases/results, but it is best to avoid the possible issue of mold flexture, which is why I provided the link for the soft low temp alloys for a posible mold.
One very good potential way to take care of this, is to be sure to mold with the thin edge of the resin cast pointing downward....and the sidewalls of the mold being exactly paralell to one another. This will to the larger part, keep pressures --potentially-- even (I've not thought it fully through, I could be VERY wrong here). The proper way, may be exactly opposite to that.
Ie, thinner mold walls at the bottom, to deal with the pressure increase on the mold walls...meaning the thickest part of the cast resin at the bottom of the mold, where the possibility of the mold to flex has been decreased in a linear fashion as you move down through the density of the molded resin...due to the thinner mold sidewall. Thinnest mold sidewalls at the bottom, of course, least capacity for deflection.
Does that make sense? Definitely, overall, an issue to consider. It's not the most complex calculation in the world by any means, but I feel it needs consideration in this particular application. The only way around this issue IMHO, is to use the low temperature alloy for casting. And even then, I still feel that some polishing will be in order.
If you look at the cost involved around the molding rubbers, it might be nearly as high as the cost of the alloys, if you can find the alloys at a reduced price level. Ie, used, flebay, etc. Do a bit of searching. Find some, er..hehheh....'off casts'! (get it! 😛 )
What I am doing, is I'm tossing my two cents in here, living vicariously/experimenting though your efforts....helping when I have an idea..and letting you do all the hard stuff...generally blowing crap up. When the dust settles, I'll reach in, maybe, and make one or two in the method that looks like it will produce the best results. 🙂 The usual story. I have time to contribute mentally, but not physically.
The usual story. I have time to contribute mentally, but not physically.
And I appreciate the input KBK 🙂
I am using glass because of the clean surface, and resistance to scratching when use repeatedly. The pro molds that I have seen had walls of up to 3" think, so they supported themselves on the bench.
I am going back to vertical pours as the reserch I did suggests that a taper or wedge will be easier to remove, even though the rubber does not stick to anything but itself, a tapered shape is suppoed to POP out of the mold.
Since the photos were taken, I have calculated the amount of rubber needed, and as that amount was over 13LTRs, I have decided to "slim" it down a touch to just under 10LTRs. The wall thinkness will still at least 40mm (approx 3.5"), so I am hoping NOT to have mold flex, but I understand exactly where you are coming from. This rubber costs around $50 per LTR (cheaper when bought in bulk), so is not the sort thing I want to waste money on, and a mold that flexes is a huge waste for what I am doing...
Right now I am thinking about a double VEE mold, but might end up making two different size molds...
This project has moved well beyong "your childs allowance" 😀
Mark
As a quick estimate on the possibilities, you might look up the mold 'pressure loading deflection levels', then compare that to the mass of the resin across one given laterally calculated sectional area. Toward the bottom of the resin mass,and the thicker area, for example, it may cause the mold to flex enough that the surface of the resin cast piece will 'bulge' at that point. Then you'll have to learn to polish it flat.
This part scares me a bit KBK, so what if I used the non reflective glass inside the mold with one side only treated with release agent - IE the out side faces of the prism. Laying the glass into the VEE of the mold will not seal the edges, so some resin would creep around the face. But with a release agent applied to that face, the resin should not stick, and should be able to be cut away without incident.
The glass won't flex, and even if the mold did you would still have the perfect flat plain to work back to...
Mark
Sorry--not contributing to this thread in any way (sorry--have nothing to contribute!)
But I am waiting with baited breath to hear the results!
Thanks for all the hard work, Mark.
But I am waiting with baited breath to hear the results!
Thanks for all the hard work, Mark.
Mark Techer said:surf board resin is said to be the best
NOTE - DO NOT USE Surfboard Resin - Pour great, sets fast (almost bubble free 🙂), but it is NOT clear 🙁
Mark
The Surfboard resin (whilst not any good for this project) came away from the glass without any problems or any release agent...The faces are smooth, though I am not sure if they could be called "optical" quality. There is some striations, but over all the prism came out well...
So I have made another mold using the recycled glass and will see how clear casting resin goes this time round...
I am still experimenting with the silicon rubber...
Mark
So I have made another mold using the recycled glass and will see how clear casting resin goes this time round...
I am still experimenting with the silicon rubber...
Mark
I removed the rubber mold tonight and whilst the silicon rubber is a useful product, I doubt it will be useful here.
Back to the drawing board for mold making...
Mark
Back to the drawing board for mold making...
Mark
- Home
- General Interest
- Everything Else
- The Moving Image
- Optics
- DIY anamorphic lens