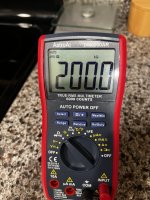
Well I turned P1 a few times and checked that the resistance reading changed as I changed the pot. Turned the amp on and I could bias the channel that wasn’t working before. So I guess I am ready to hook it up and see how it sounds. 🙂

Sometimes the circuit wants a little attention....

A tad more information on the ticking combination of the ACA Mini and my RPi players.
I bought a different DAC (Ustars R38), with the same ES9038T2Q chip, wondering if this would solve the problem. No, it did not. Today, with the new DAC, ticking is a little softer, and the right channel has so little I had to unplug the left speaker to hear it. Just for fun, I tried turning off all the CFL and LED lighting in the room--no difference.
Thinking it might be a ground loop, I plugged a Jensen ISO-MAX transformer isolator between the DAC and the ACA. To my complete surprise, I heard a somewhat loud humming like an engine revving, settling into a steady-state hum. This isolator is working fine, because I've been using it to address a ground loop between my work computer and the stereo in my office.
I'm not super-worried about this, because I'm finishing up one of NP's FR equalizers, and I'm hoping that putting it in-between source and amp will fix the problem, and ultimately will be going through a BA Linestage I completed earlier. But given what happened with the ISO-MAX, now I'm not so sure. And of course things like this just make us DIYers nuts. Anyone have any clues as to the meaning of this and how it might be addressed?
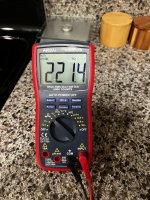
I need some assistance with R2 and R3. I have a pair that read 221k, just the same way that is listed on the bom. however, the BOM specifies 4 resistors two for R2 and two for R3. No matter how much I try, I cant get close to the 221k ohms. I have a pair that reads 200k, and one that is 22, but I dont know which one is correct. I also seem to be missing 2 6.8k ohms, I one have one and I assume that it is for R0. Please let me know. Thanks!
- Jose
- Jose
Attachments


The BOM has been revised since the original article. Please see post #2103:
https://www.diyaudio.com/community/threads/diy-aca-mini.379037/page-106#post-7373835
https://www.diyaudio.com/community/threads/diy-aca-mini.379037/page-106#post-7373835
Thanks Dennis,The BOM has been revised since the original article. Please see post #2103:
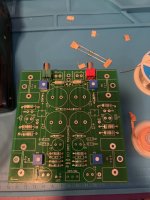
I was a little over eager to keep things moving, soldered r3 into r2!!! trying this cheap desoldering wick, but its not working for me.

I may need to order some more because that thing is not budging!
Murphy will always show up!!!
Solder wick is a waste of time and dangerous when working with small components.
Buy a solder sucker with a Teflon tip, they are not expensive and will serve you for years.
Apply fresh solder to the solder pad and at the same time engage the sucker.
With 0.25 to 0.5w resistors being cheap the easiest way is to sacrifice them. Cut their legs near the pad then turn the PCB over and apply the technique that I mentioned above.
Will do! Here is tonights progress!!!Solder wick is a waste of time and dangerous when working with small components.
Buy a solder sucker with a Teflon tip, they are not expensive and will serve you for years.
Apply fresh solder to the solder pad and at the same time engage the sucker.
With 0.25 to 0.5w resistors being cheap the easiest way is to sacrifice them. Cut their legs near the pad then turn the PCB over and apply the technique that I mentioned above.
Attachments
Solder wick works best if flux is applied to the wick, wet the solder iron tip with solder, then place the wick on the solder joint, and place the wetted solder iron tip on the solder wick. Press down and when the heat reaches the solder joint, the flux on the wick should draw the solder from the joint. The solder should then be visible on the wick. It works for me. 🙂
I wont. I should have waited for a reply or searched the forum. I guess I have to make mistakes to work my problem solving skills. Definitely will have a desoldering gun on my wish list, since I doubt this will be the last time this happens to me!Don't give up @Jacruzer787 .
I believe you will like the results. 😍
Kind regards,
Drew
Did you leave enough of the lead on the resistors you desoldered to solder the old one back on, or too short now? Just make sure the power rating is adequate for the circuit. Your kit there appears to have 1/4W resistors. I'll let someone with more experience chime in on what that value is for R3 and R2.
Here's the solder sucker(s) I got. Bigger volume means more suck. I made the mistake of buying a compact one and it's night and day between what works and what doesn't.

Here's the solder sucker(s) I got. Bigger volume means more suck. I made the mistake of buying a compact one and it's night and day between what works and what doesn't.
Last edited:
I have one of those! I used it several time, and the wick with no success. I didn't cut the leads. No matter how much I tried, i could not remove the solder to pull them out. I might give it another go soon.Did you leave enough of the lead on the resistors you desoldered to solder the old one back on, or too short now? Just make sure the power rating is adequate for the circuit. Your kit there appears to have 1/4W resistors. I'll let someone with more experience chime in on what that value is for R3 and R2.
Here's the solder sucker(s) I got. Bigger volume means more suck. I made the mistake of buying a compact one and it's night and day between what works and what doesn't.
For the solder sucker pump to work best, make sure to add a normal amount of fresh solder where you want to remove the solder from..it may seem counter productive but trying to suck a tiny bit of solder is much harder than a normal quantity. Once you get the hang of it you will love that tool.
Those big blue solder suckers are a pain to use. One would need three hands to heat the solder joint, apply extra solder and trigger the sucker. I use a smaller one occasionally when there is a large fillet of solder to be removed.
Proper self-cleaning solder wick works quite well. It contains flux already.
Proper self-cleaning solder wick works quite well. It contains flux already.
I use flux on wick for small solder joints and it works great, and use a big blue sucker for large joints. What I do is wet the soldering iron tip with solder, hold the soldering iron in one hand and put it against the joint. At the same time hold the sucker in the other hand with a finger on the trigger, and put the sucker tip over the soldering iron tip and solder joint. Make sure that the sucker tip is over the solder joint. When the solder in the joint is molten, quickly remove the iron, press the sucker tip down against the PCB and trigger the sucker.
I've used a large blue 1, currently using a more compact unit that has a silicone tip that is pretty nice.
Yeah, there's a lot of ways that work to desolder, so it's great we are all sharing what works for each of us. I wish videos were a little easier to upload. Trying to share tricks and techniques via text description is tough for folks who have little experience with the various options. Everything said so far makes sense to me, although I've never had issues with the big solder sucker, but I dont typically add solder, so only need two hands. Tremendous improvement in "suck" over the small volume one I have.
Last edited:
^ 
As a reasonable rule of thumb... I find that other really helpful people and/or manufacturers have already gone to the trouble of making the vids... and I'm lazy. Here's a great example from a product I like. The only thing I don't see mentioned too often that works for me... is that I tend to add both solder and a bit of flux along with using a slightly higher temp for desoldering. Again... YMMV.
Here's a decent video from a "top 3 search results" that I'd never seen before.
As a reasonable rule of thumb... I find that other really helpful people and/or manufacturers have already gone to the trouble of making the vids... and I'm lazy.
Here's a great example from a product I like. The only thing I don't see mentioned too often that works for me... is that I tend to add both solder and a bit of flux along with using a slightly higher temp for desoldering. Again... YMMV.Here's a decent video from a "top 3 search results" that I'd never seen before.
- Home
- Amplifiers
- Pass Labs
- DIY ACA mini