BrianDonegan said:Another tip for builders, since just about no one will have a proper crimping tool, is after you crimp the wires with pliers, gently add a (very small) drop of solder to the wire-pin connection to make it stronger and cleaner.
Good thing you threw in the "just about" in front of no one....
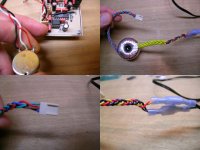
BrianDonegan said:So, the pot is pretty easy. Hold the pot as shown in the attached pic, with the pins on the bottom. Wires are straight to the pin header. I'll post another pic with wiring for the trafo...
Now if I'm not mistaken the pot is a voltage adjusting device converted to a digital signal correct? If so wire "type" doesn't matter.. Correct assumption?
rabstg said:
Now if I'm not mistaken the pot is a voltage adjusting device converted to a digital signal correct? If so wire "type" doesn't matter.. Correct assumption?
Correct troy, the pot only supplies a variable voltage to the ADC on the PIC, so just about anything will work fine as far as wire goes. No audio signal to the pot at all.
Cheers!
Russ
A bit off topic! As I said earlier, Russ is a man for the future😀Correct troy, the pot only supplies a variable voltage to the ADC on the PIC, so just about anything will work fine as far as wire goes. No audio signal to the pot at all.
Remember Russ'ie-boy?
Sorry about being OT😀 😀 Sorry, could'nt help it😀
Steen😎
Hey Steenoe, stop it man. All this is partly your fault after all. 😉
Thanks for everything.

cheers!
Russ
Thanks for everything.
cheers!
Russ
Beta Update
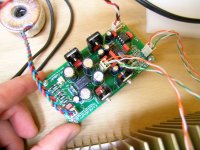
Have all the parts mounted to the board and will start testing once I get some cabling put together.
A heads up. Brian's labeling almost put me to sleep, it is so good. But the part labeled 7812 turned out to be a 7912. I hope this is a one time oops, but I did catch it before I soldered it in.
Other than that, remembering which places are not populated with caps caused a bit of frustration moving the electros, but all else went on board very easily.
I'll check the rest of my labeled stock right away. Everyone else, please check your kits. Hopefully it was a fluke of a 7912 falling into the 7812 bin.
Hey, do you need me to send you another?
Hey, do you need me to send you another?
Beta Running
OK, I had some spare time and threw together some jumpers and the amp runs great.
I must have read the pot hookup on post 158 wrong because it worked backwards. One more reminder why we always try it out first on cheap speakers.
First impressions are that it is hard to tell much difference in the my_Ref with or without it. Maybe a bit smoother with it in. No loss in the great imaging of the main amp.
Don't have time for pictures tonight but will see about later in the weekend.
Craig
Brian,
We have them hooked up the same. I just did not interpret your drawing correctly. I took it that we were looking from the bottom of the pot, not the back.
We have them hooked up the same. I just did not interpret your drawing correctly. I took it that we were looking from the bottom of the pot, not the back.
Well I know have a working Kookaburra.😀 Hook up went smooth the pics helped alot. Works good with my BrianGT kit.
bender460 said:Well I know have a working Kookaburra.😀 Hook up went smooth the pics helped alot. Works good with my BrianGT kit.
Excellent! 🙂 Any PICs? I hope you like it.
Member
Joined 2002
Hi Jason,
The cost is largely depndant on the opamps. Final kit price is not set yet. If you use just one AD8620 it will cost right around $60. Add another 10-12 bucks if you want one for the input buffer. If you opt for two of the OPA2227 for the input/output buffers the cost is down in the fifties or so.
Add to the that the trafo and various connectors/switches/fuses/case and you have your price.
Cheers!
Russ
Member
Joined 2002
Russ White said:Hi Jason,
TRhe cost is largely depndant on the opamps. If you use just one AD8620 it will cost right around $60. Ad anout 10-12 bucks if you want one for the input buffer. If you opt for two of the OPA2227 for the input/output buffers the cost is down in the fifties or so.
Add to the that the trafo and various connectors/switches/fuses/case and you have your price.
Cheers!
Russ
Id be interested in one to play with.. what is the totall cost with tranny and stuff.. ? im really loking for one that is remote with lcd that has
Input selector
Lcd read out
Remote
Volume selector Up/ Down
Power on off
I have the digi01 Volume pot using relays and love it.. Now to get one with a lcd and these functions.
The digi01 Pot.
Attachments

- Status
- Not open for further replies.
- Home
- Amplifiers
- Headphone Systems
- Digitally controlled preamp/headphone amp