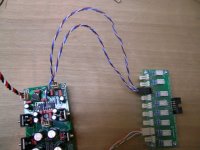
I succeded at building a Kookaburra pre+ Darwin source selector+Ampslab active crossover for my active system.
(It is too "dirty" to be shown, though)
It ended as a very versatile unit that can work as active CX + preamp or as preamp only, thanks to the dual output.
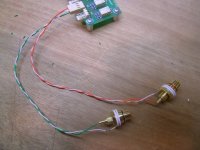
I choose point to point soldering instead of the little connectors.
I was adviced to use only one ground "bar" for all the connectors (input and output) and that bar connected to the active units at one point, to avoid ground loops. I can say noise level is very low with my highly efficient speakers (>100db)
Regards.
M
(It is too "dirty" to be shown, though)
It ended as a very versatile unit that can work as active CX + preamp or as preamp only, thanks to the dual output.
I choose point to point soldering instead of the little connectors.
I was adviced to use only one ground "bar" for all the connectors (input and output) and that bar connected to the active units at one point, to avoid ground loops. I can say noise level is very low with my highly efficient speakers (>100db)
Regards.
M
maxlorenz said:I succeded at building a Kookaburra pre+ Darwin source selector+Ampslab active crossover for my active system.
(It is too "dirty" to be shown, though)
It ended as a very versatile unit that can work as active CX + preamp or as preamp only, thanks to the dual output.
I choose point to point soldering instead of the little connectors.
I was adviced to use only one ground "bar" for all the connectors (input and output) and that bar connected to the active units at one point, to avoid ground loops. I can say noise level is very low with my highly efficient speakers (>100db)
Regards.
M
This what I'm trying to do. Put an active crossover in with the pre and have switch wired in so I can switch the crossover in and out.
Great! What crossover?
If I recall well:
signal->darwin inputs 1, 2 ,3...->darwin's loop output->kookaburra input-->kook output->Darwin's loop input-> darwin outs: 1 for crossover's signal input and 2 for direct preamp out, choosing with darwin's own output selector.
Just follow the signal.
If anyone knows a simpler way to do it, I'm all ears...I mean eyes.
Good luck.
M
PS: wouldn't it be great to have a twisteadpearaudio active crossover? 😀
So... i did try the PGA2310
Some folks here are curious as i was about the upgrading the PGA2311 digital potentiometer. Initially, i thought i had to rework the boards for the -+15 analogue side, but upon closer reading of the datasheet, they will work on +-5 that the kook has.
I also changed the 47uf caps to a lower profile 22uf BG Pk types to allow easier access for using browndogs, 0.33uf between the -+ of the opamps, a pair of 1000uf FM's before the regulators and 0.47uf film cap between the live and neutral on the mains. I use the AD8620 and LM6172 op amps. I wish i had pics but my digicams are broken.
To the gist of the post, despite the specs, the PGA2310 gives a better sound to me. The bass is more sumptuous, there are more details apparent, both as headphone amp and preamp. To use an analogy, probably like moving up the price scale of the OPA opamps. You get more of the opa627 type of sound. Its awesome for my headphones HD575 which are tonaly light and bright, i get bass massages in my ear canal, which i once thought unachieveable with my underachieving cans.
As a preamp, some might like this warmer BB sound which is very easy to relax to. I think the kooka achieves what the designers wanted and some more. In its base form its already more than adequate. But for those with itchy fingers and like to tinker abit you might want to try this. My next upgrade would be to improve on the diodes and regulators when i finalise my order from digikey.
Hope this gives some direction to those who were curious abt the pga 2310.
Chuck.
Almost finished my new preamp based on the Kookaburra and Darwin 😀
Layout:
I still need to get the aluminium finished as its just raw at the moment, but here it is when powered up:
And some Bling!
Big thanks to Russ and Brian but supplying such wickid kits 😉 🙂
Layout:
An externally hosted image should be here but it was not working when we last tested it.
An externally hosted image should be here but it was not working when we last tested it.
An externally hosted image should be here but it was not working when we last tested it.
I still need to get the aluminium finished as its just raw at the moment, but here it is when powered up:
An externally hosted image should be here but it was not working when we last tested it.
An externally hosted image should be here but it was not working when we last tested it.
And some Bling!
An externally hosted image should be here but it was not working when we last tested it.
Big thanks to Russ and Brian but supplying such wickid kits 😉 🙂
Nice. I like how you mounted the pot/switches. Might try that approach myself. Is there any echo in that case? 😉
Cheers. Yeah they don't exactly fill the space. I was thinking of replacing the Kook with a tube stage and a Joshua Tree but I don't know if I have time to build thatBrianDonegan said:Nice. I like how you mounted the pot/switches. Might try that approach myself. Is there any echo in that case? 😉
 😉
😉Max, that thing looks sweeeeeet! 🙂 Good work!
If you really feel up to it, later you could keep the kookaburra in there for headphone use, and add a JT + Twisted Sibling preamp. 😀 There is certainly plenty of room in the case. The beauty of that is you could have both singled ended and balanced outputs.
Cheers!
Russ
If you really feel up to it, later you could keep the kookaburra in there for headphone use, and add a JT + Twisted Sibling preamp. 😀 There is certainly plenty of room in the case.
The beauty of that is you could have both singled ended and balanced outputs.Cheers!
Russ
Congratulations, maxw 🙂
Very good looking!
I wish I had access to better machines to get that kind of exactness to the cuts...
Tips that worked for me, soundwise:
* direct solder wire to PCB and avoid these tinny connectors.
* make one "ground bar" to connect all ins/outs connectors and then from there, only one connection to PCB ground. That avoided hum on my crossover+preamp (>100dB efficient speakers 😎 )
To be tried:
* R-core transformers.
* Replace all Panasonic FCs for Rubicon ZL/ZA in all twisteadpearaudio roducts; Farnell asks me 26GBP, only for shipment
(definitelly, I can't get used to Pana's sound 🙁 )
Cheers,
M
Very good looking!
I wish I had access to better machines to get that kind of exactness to the cuts...
Tips that worked for me, soundwise:
* direct solder wire to PCB and avoid these tinny connectors.
* make one "ground bar" to connect all ins/outs connectors and then from there, only one connection to PCB ground. That avoided hum on my crossover+preamp (>100dB efficient speakers 😎 )
To be tried:
* R-core transformers.
* Replace all Panasonic FCs for Rubicon ZL/ZA in all twisteadpearaudio roducts; Farnell asks me 26GBP, only for shipment
(definitelly, I can't get used to Pana's sound 🙁 )
Or...you could put your reserve of beer there 😀Yeah they don't exactly fill the space.
Cheers,
M
* make one "ground bar" to connect all ins/outs connectors and then from there, only one connection to PCB ground. That avoided hum on my crossover+preamp
Interesting that that helped. It is essentially what the Darwin ground scheme does (single ground buss for all input/output connectors). Glad the hum is gone though, whatever it takes...
Russ White said:Max, that thing looks sweeeeeet! 🙂 Good work!
If you really feel up to it, later you could keep the kookaburra in there for headphone use, and add a JT + Twisted Sibling preamp. 😀 There is certainly plenty of room in the case.
Cheers!
Russ
Well, I can't do that until it's released now can I? 😉
maxlorenz said:Congratulations, maxw 🙂
Very good looking!
I wish I had access to better machines to get that kind of exactness to the cuts...
Tips that worked for me, soundwise:
* direct solder wire to PCB and avoid these tinny connectors.
* make one "ground bar" to connect all ins/outs connectors and then from there, only one connection to PCB ground. That avoided hum on my crossover+preamp (>100dB efficient speakers 😎 )
To be tried:
* R-core transformers.
* Replace all Panasonic FCs for Rubicon ZL/ZA in all twisteadpearaudio roducts; Farnell asks me 26GBP, only for shipment
(definitelly, I can't get used to Pana's sound 🙁 )
Or...you could put your reserve of beer there 😀
Cheers,
M
Thanks Max! (good name you have!)
I don't get any hum at all but I'll probably solder all the connections once its finished 😉
Thanks Max! (good name you have!)
As nobody never asks, I have to say that this is not my real name but the name of my favorite wagnerian "helden tenor" 😎
wich can be seen on the avatar (if this the name the photo has)
All the best,
Mauricio
maxw,
That's cool enclosure. A lot of room for add ons 🙂
Right now I'm also trying to make three separate
aluminium enclosures:
- power amp
- pre-amp + DAC
- micro-ATX computer
They should have the same form-factor (stack on each
other) and cost not more than $100-$150 each.
I think everyone agrees that enclosure takes about
80% of time/efforts/money in a finished product 🙂
Some questions:
- Did you cut aluminium yourself or you just buy pre-cut
sheets? Could you share the source?
- Did you make round holes in the front-panel yourself?
- Where did you buy so nice illuminated controls?
Thanks in advance!
KOHTOPA said:Some questions:
- Did you cut aluminium yourself or you just buy pre-cut
sheets? Could you share the source?
I bought the sides as flatbar which you buy by the meter, then asked them to cut it to my requirements. You pay a cutting fee per cut they make for you.
The top and bottom were bought from a sheet metal shop who cut it to size with a guilotine.
The sources are shops in New Zealand so probably not much use. Just find a place that sells metal locally and ask them if they can cut it accurately for you.
KOHTOPA said:- Did you make round holes in the front-panel yourself?
Nope, they were too big for a hole saw so I got an engineer to do it with a machine. It cost about $20USD to get the holes for the volume and source selector made.
KOHTOPA said:- Where did you buy so nice illuminated controls?
The knobs are from http://www.thlaudio.com/indexE.htm
The pot and rotary switch are mounted on a transparent plastic panel behind the alu front with some LEDs behind it so that it iluminates around the knobs. So, I made the illumination my self 😉
>Nope, they were too big for a hole saw so I got an engineer to do it
>with a machine. It cost about $20USD to get the holes for the volume
>and source selector made.
Hmm, that 's almost the price of the front panel here:
http://frontpanelexpress.com/
but still cheaper 🙂
>The pot and rotary switch are mounted on a transparent plastic
>panel behind the alu front with some LEDs behind it so that it
>iluminates around the knobs. So, I made the illumination my self
Thanks for the tip! Very simple and good looking.
Great job!
No worries.
My panels are 10mm thick and frontpanelexpress only go to 4mm. You could probably do it your self with a decent hole saw but a good one is expensive and you still don't get any size you want.
I did all the drilling a thread tapping my self which takes far longer than any other part of building these enclosures 😉
- Status
- Not open for further replies.
- Home
- Amplifiers
- Headphone Systems
- Digitally controlled preamp/headphone amp