paddy nice work! Love the concept of having the whole rig in two boxes.
I tried to reroute my wiring today and lunched my main DAC board... so I too am still perpetually in the build phase.
I tried to reroute my wiring today and lunched my main DAC board... so I too am still perpetually in the build phase.
Ouch! I haven't killed a DAC yet but have wasted 3 of the Academy volume controls. Lenny warns that the Muses chip is very sensitive to voltage. I got away with homebrew power to one but have switched over to using his power supply after losing the controller on my dad's setup. The other two were my own fault, we all know not to screw with stuff with the power on and I did it anyway. Twice (OK, more, but twice with $100 consequences).
Don't think of it as perpetually building, just adopt a concept from software: this packaging is the result of a couple of years of refactoring.
Mrs PG really, really hates dangly wires, so most of my refactoring happens in the closet behind a relatively clean facade. Out of sight, out of mind.

Don't think of it as perpetually building, just adopt a concept from software: this packaging is the result of a couple of years of refactoring.
Mrs PG really, really hates dangly wires, so most of my refactoring happens in the closet behind a relatively clean facade. Out of sight, out of mind.
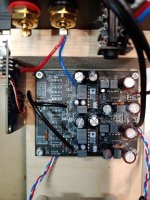
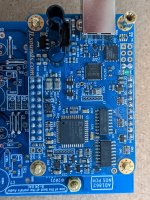
I´ve built the DAC with a JLsoundlab for USB conversion in front.
Everything I get out with headphone after DAC is a scratchy noice without music.
I would be very grateful for any hints
Everything I get out with headphone after DAC is a scratchy noice without music.
I would be very grateful for any hints
Attachments


Yeah I burned off one of the traces for a jumper in the center of the board where I can't get clean access -- like right in the middle of everything. I'm keeping it, later this year I'll go back and fix it for a second unit.
Not a big deal, I have like 6 extra PCBs and assembly is no big thing. My 100uf electrolytics were the wrong lead spacing anyway. I love getting time with my solder iron, no complaints
The parts I always have the worst time with are IEC inlets and power switches. If your iron is on those pins for a moment too long you've got a floppy plastic mess. I started tinkering by working with old Fender amps, and that old turret board construction is much more forgiving 🙂
Did you buy it new?
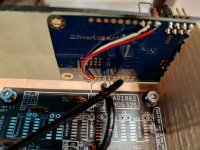
I don't have a schematic for the JL sounds board, but it seems like it should probably have all of its parts...
I wonder if I could convince you to use the mounted PCB too. Then the only thing you need to adjust on the USB board is bridging pin 4
I don't have a schematic for the JL sounds board, but it seems like it should probably have all of its parts...
I wonder if I could convince you to use the mounted PCB too. Then the only thing you need to adjust on the USB board is bridging pin 4
Attachments
Looks very cool Paddy. I like the old rendu of aluminium like the Pioneer amps of the 70s.
How did you put the words on the metal front cases please ? Made on demands in a factory? Printed screen ?
I'm looking for q simple but clean way for wood panel...maybe with transparent a acrylic panels? Any idea ?
How did you put the words on the metal front cases please ? Made on demands in a factory? Printed screen ?
I'm looking for q simple but clean way for wood panel...maybe with transparent a acrylic panels? Any idea ?
Thank you. The panels are anodized aluminum with paint-filled engraving from frontpanelexpress.com. Same service in Europe by Schaeffer AG (https://www.schaeffer-ag.de).
They aren't cheap but I am vain and lazy, and the combination of decent design software, good material and finish choices, and pushbutton ordering is too hard to resist.
I have seen very good results using paint to fill in laser engraved plastic. If I hadn't fallen down the FPE rabbit hole I might have tried edge-lit transparent plastic, it's easy to find people to engrave plastic.
Hi, friends! Wondering if I could have help answering a few questions initially before choosing to proceed or not. Sorry for not reading all posts in the thread yet.
1: How good does this sound? Is it warm, analog, transparent, extended, or all the above?
2: Has anyone tried using the Zen I/V converter for this project?
3: Had anyobe tried a tube output stage and or output transformers?
4: Are there any active GB’s with boards left?
5: Are there parts not possible to get any longer that must be sourced elsewhere (Paddy??)?
I like NOS and R2R. Thinking about Audio Note, but this is more tempting as I wanna do it myself 🙂
Regards,
Andy
Take a peek at Post #1 and click on Electrodac.
I think you'll find valuable information your looking for.....
I think you'll find valuable information your looking for.....
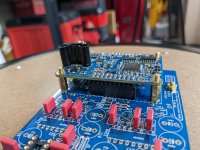
It took long time.finally almost finished.
I am not confident with ground connection
so I would like to ask someone to check.
+-12V,+-5V is ok.
Rcore SCN connected to chaiss.
230V wire cut.
Star ground - cl60 - chaiss.
PSU2 center ground to star ground.
DAC 3 ground to star ground.
I am not confident with ground connection
so I would like to ask someone to check.
+-12V,+-5V is ok.
Rcore SCN connected to chaiss.
230V wire cut.
Star ground - cl60 - chaiss.
PSU2 center ground to star ground.
DAC 3 ground to star ground.
Attachments
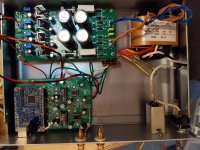
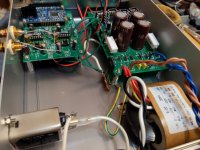
Tamra, a couple of thoughts:
- It looks like your power supply board is not grounded. Is that the case?
- I believe all of the grounds on the DAC board are connected, so you should be fine with just one wire to ground from that board. I don't feel qualified to say definitively, but from what I understand running multiple wires like you've got could introduce ground loop noise
- you may consider installing a fuse on the primary side of the power transformer. as it stands, if your secondaries shorted to ground there would not be a fuse to stop that flow -- just an idea.
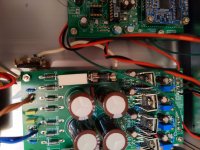
5V and 12V grounds are shared on both PSU1 and PSU2, and also on the DAC, so that is fine.
Audio ground is also shared with power. I am absolutely not an expert on ground loops but have fought them a lot on this journey and the best result so far has been in my last build as shown above: only the switch mode supply and R-core ground to the case, everything audio-related floats and there's not a sound to be heard.
Audio ground is also shared with power. I am absolutely not an expert on ground loops but have fought them a lot on this journey and the best result so far has been in my last build as shown above: only the switch mode supply and R-core ground to the case, everything audio-related floats and there's not a sound to be heard.
I would be very grateful for any hints
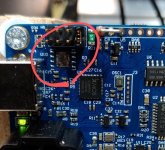
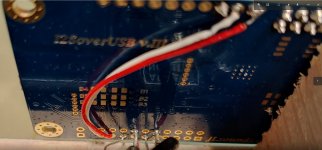
You appear to have connected dirty USB power to what is supposed to be clean +5v power. Why?
Also, what output protocol are you expecting from I2SoverUSB? I don't see the usual programming I need to use at the B1-B5 SMD pads.
Attachments
- Home
- Source & Line
- Digital Line Level
- DAC AD1862: Almost THT, I2S input, NOS, R-2R