stevodude said:
should they be built with the sides complete top to bottom, or to the top/bottom/back and fit the sides within? if you know what I mean...
Greets!
From a structural engineering POV the sides should be full height, depth with the top, bottom inset full depth and the back inset all sides with a few glue blocks spanning all the seams and spaced away from the corners.
That said, HIFI vented cabs don't generate enough pressure or repeatedly man handled like a prosound cab, so do whatever looks the most pleasing and/or easy to build to you and you can skip the glue blocks if 3/4" (19 mm) no void ply or similar strength material is used.
GM
OzMikeH said:
Has anyone looked at using something fancy like a Lowther or AER MK1 in these cabinets?
Greets!
Like any vented alignment, it would have to be designed for the driver for decent performance, so unless the specs calc a similar T/S max flat alignment as whatever driver it's designed for, then response shaping EQ will be required.
GM
As Greg says, the fancy drivers would need a specifically designed cabinet to get the best out of them. However, as far as I can tell from a quick look, the Lowther PM6C can be used in Chang to fairly decent effect -just remove the internal panels that lengthen the slot-vents, so each is simply 19mm long -the thickness of the build material, & use a high-ish resistance speaker cable. A cabinet designed specifically for them would obviously reap rewards of course.
Given the nature of the cabinet & the limitations of the MathCad worksheets, these graphs should be taken with a pinch of salt, but they do at least give a good basis & the response appears decent, with excursion nicely controlled.
Given the nature of the cabinet & the limitations of the MathCad worksheets, these graphs should be taken with a pinch of salt, but they do at least give a good basis & the response appears decent, with excursion nicely controlled.
Attachments
OzMikeH said:Has anyone looked at using something fancy like a Lowther or AER MK1 in these cabinets?
OzMikeH said:However, as far as I can tell from a quick look, the Lowther PM6C can be used in Chang to fairly decent effect
The PM6C sounds more like it (i.e. "Frugal")
While I've been looking (and even asking) several times for a "fancy driver"-optimized version of several designs, I would very much like to hear how promising they sound with "normal" drivers first before that.
My top fav in that respect was (and still is...) Ron's Austin, but Ron kindly explained why there's (and pro'lly never be) no Austin version for e.g. Lowthers (even though we do have MJK's accurate T/S measurements for the Lowthers).
So, I woild first like to "hear" if the Curvey Chang BVR can deliver -- not least on the subtelty front -- before going fancy.
... Although if they do: Queue me up !! I've been salivating over and over and over again at Dave's SketchUp pic of the CurvyChang + ShadowSD12

Florian
Hi All.
build going OK, some problems with such large panels but fun!
I've used dowels to help align all the panels together, this has allowed me to dry fit everything together so things can be checked. It will also allow for quick alignment of the panels when glueing up. I use polyurethene glue as it expands and fills the gaps (!) nicely, trouble is you only have a minuite to get everything clamped up, so dowels seemed the solution. It has worked well.
Got the tweeter rear mounted as per Dave's earlier suggestion. I am using 4 x M5 bolts through the front and a ply ring with inserts
to sandwich the tweeter in. This will allow easy removel etc through the main driver hole if required.
One last domestic issue, and I'm hoping Planet10 can help (please), as I'm finishing the CC's in black, my other half wants the drivers to be black, could you do a pair of FE207's coloured like the blue ones you did for Scott.
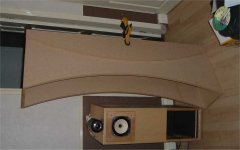
I have done the sides like on the picture posted on GYChangs thread on his build, they add strength and break up the squareness of the cabinet, with an hour glass shape.
build going OK, some problems with such large panels but fun!
I've used dowels to help align all the panels together, this has allowed me to dry fit everything together so things can be checked. It will also allow for quick alignment of the panels when glueing up. I use polyurethene glue as it expands and fills the gaps (!) nicely, trouble is you only have a minuite to get everything clamped up, so dowels seemed the solution. It has worked well.
Got the tweeter rear mounted as per Dave's earlier suggestion. I am using 4 x M5 bolts through the front and a ply ring with inserts
to sandwich the tweeter in. This will allow easy removel etc through the main driver hole if required.
One last domestic issue, and I'm hoping Planet10 can help (please), as I'm finishing the CC's in black, my other half wants the drivers to be black, could you do a pair of FE207's coloured like the blue ones you did for Scott.
I have done the sides like on the picture posted on GYChangs thread on his build, they add strength and break up the squareness of the cabinet, with an hour glass shape.
I reckon a black pair of 207s would look rather impressive -I can't see the colour being a problem. Remember to get the phase-plugs fitted at the same time. Saves doing it later. 😉
Don't forget bracing in the back chamber -it's a big old box & could do with some to stop the panels singing away. Especially with MDF as a build material.
Don't forget bracing in the back chamber -it's a big old box & could do with some to stop the panels singing away. Especially with MDF as a build material.
marce said:Hi All.
build going OK
I have done the sides like on the picture posted on GYChangs thread on his build, they add strength and break up the squareness of the cabinet, with an hour glass shape.
marce:
English is my 2nd language and I am a visual guy, would appreciate pictures as u build the masterpiece if possible.
thanks,
gychang
Scottmoose said:I reckon a black pair of 207s would look rather impressive -I can't see the colour being a problem. Remember to get the phase-plugs fitted at the same time. Saves doing it later. 😉
And i reckon you'd be an EnABLE guinea pig too (no extra charge -- we need to get some out so people can experience 1st hand what this does)
Even with shipping & mods should come in close to Wilmslow's price.
dave
Ron's Austin, but Ron kindly explained why there's (and pro'lly never be) no Austin version for e.g. Lowthers (even though we do have MJK's accurate T/S measurements for the Lowthers).
Well not really. I just find it hard to spend the time on a design that few will build due to the cost of the Lowthers. Now i have worked a bit on the Austin programming for the 206/208 and that could be a reality.
The A166 was right on the fine line of needing internal structure support. With the 8" Fostex there is more actual pressure avaliable at low levels due to increased displacement which makes internal stringers necessary when calculated for the ductlility and wider panels of laminated ply. Unless you want it to ring like a bell.
One thing i have seen while running dynamic sims is that if you run the vertical stringers on the outside of the front baffle on the basic Austin design there is very little need to run internal ones.
However the WAF would drop due to the industural look. I mean it already looks like a prop in a second rate SI FI movie.
But anyone who perfers higher performance over appearence ( some may even like this approach due to uncoventional looks," Billy Bob what the HELL is that? Its a speaker, not a fusion device")
ron
ronc said:I mean it already looks like a prop in a second rate SI FI movie.
1st rate ...
dave
planet10 said:
And i reckon you'd be an EnABLE guinea pig too (no extra charge -- we need to get some out so people can experience 1st hand what this does)
I first read that as "And I reckon you'd enable a guinea pig too"
Poor little creature. At least he isn't being used to plug a bass reflex port.
Hi
back in the real world after a enjoyable holiday "playing with wood" and visiting relatives. I've got a few phhoto's there just to big to upload, so I'm going to work out how to shrink them and then I'll post them. Sent some direct to Scott so he can see the real Curvey Chang as opposed to a virtual one.
Having dropped a panel on my (now broken) big toe, I am a bit worried about panel resonance.
Soon as I get chance I'll document the build so far.
Managed to do tweeter like Dave's earlier sketch, it does look neater.
marce said:Hi
Having dropped a panel on my (now broken) big toe, I am a bit worried about panel resonance.
Soon as I get chance I'll document the build so far.
Managed to do tweeter like Dave's earlier sketch, it does look neater.
Hope the big toe is OK, will be looking forward to seeing serial #001, Curvey Chang.
gychang
Don't forget the 45 degree panels on the inside! or are you doing the steps thing?
Looks great with the offcut on the sides.
Looks great with the offcut on the sides.
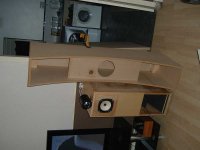
marce said:most recent view, almost ready for final glue up.
PS Sorry forgot to rotate image.
Looks great, make sure u use the speaker vertically... 😉
gychang
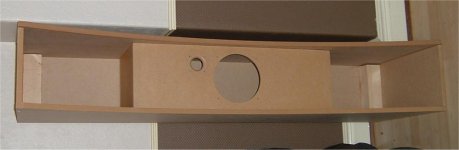
I'm going with the 45deg panels, they are cut, I havn't got round to dry fitting them yet.
For the tweeter rear I used a coving router bit to get the basic fit, then used some 2 part Wood repair (an epoxy based product) in the hole that was left, covered a tweeter with cling film them pressed it into the gunge to create a tight fit of the right shape, a bit of sanding and its done.
Thinking of using either 2mm bitumen or 6mm butyl rubber to help damp the panels, any advice please, cos I've got a bit neurotic over the size of them after reading other threads.
On the subject of bracing, would radial hardwood braces around the large driver help, I was thinking different sizes so the was no fixed pattern.
marce said:On the subject of bracing, would radial hardwood braces around the large driver help, I was thinking different sizes so the was no fixed pattern.
I did this to brace the front and back panel, used "liquid nail" to glue them tightly.
http://picasaweb.google.co.kr/gychang00/Hobby/photo#5105397263308310866
gychang
- Status
- Not open for further replies.
- Home
- Loudspeakers
- Full Range
- Curvy Chang thread