Andy Graddon said:curved laminated faces,
drain pipe for ports,
series x-o.
sounds like something I might build. 😎
you is learning, friend !!! 😀
What's the saying? Great minds think alike...😀
Hi,
Don't mind me asking dummy woodworking questions. How do you removed dried wood glue? I scrape mine of but that removed parts of the MDF specially those at the edge and make it look crooked.
I also found that surface touch by the wood glue tent to have different colour when I use polyurethane the surface. How do I get around the glue stain?
zlazar said:this is the coolest diy speaker ever saw.
great job!
Thanks. 🙂
SamL said:Hi,
Don't mind me asking dummy woodworking questions. How do you removed dried wood glue? I scrape mine of but that removed parts of the MDF specially those at the edge and make it look crooked.
I also found that surface touch by the wood glue tent to have different colour when I use polyurethane the surface. How do I get around the glue stain?
The best way to deal with glue clean up is to have a wet cloth handy to wipe it up before it dries. Scrub the area a bit until you're sure all of the glue is gone.
"The builder awoke at dawn...he put his boots on..."
Well, dawn at this time of the year here is ~7:00 AM, so I'm no hero.
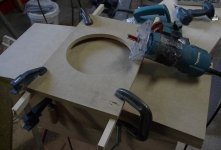
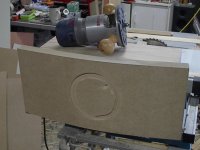
I took the clamps off the baffle and lined up my template for cutting the driver recess. I made this template yesterday with my circle cutting jig and a scrap of 1/2" MDF. This is necessary to cut the recess flat in the curved baffle. The wood strips underneath let the template sit flat and give some space for the router bit, with fine adjustments on the tool itself.
A bearing follower bit in the trim router is guided by the template. A couple of passes to cut the recess to the right depth.
Attachments
All goes well with the driver recess. I cut the hole itself with the jigsaw. Many builders use the router for this but I prefer to use the jigsaw as it's quicker and creates a lot less dust.
Besides, I don't need to burn out my expensive router bits.
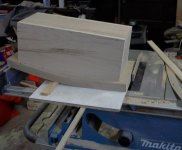
Time to trim the edges of the laminated baffle. I made it bigger for this purpose, it's nearly impossible to line these layers up perfectly. The top and the bottom are easy enough using the saws fence, but the sides are a bit tricky. I used my panel cutting jig (white board it's on) to slide the speaker through the blade. Notice the wood strip raises the baffle so it will lay flat near the blade.
Besides, I don't need to burn out my expensive router bits.
Time to trim the edges of the laminated baffle. I made it bigger for this purpose, it's nearly impossible to line these layers up perfectly. The top and the bottom are easy enough using the saws fence, but the sides are a bit tricky. I used my panel cutting jig (white board it's on) to slide the speaker through the blade. Notice the wood strip raises the baffle so it will lay flat near the blade.
Attachments
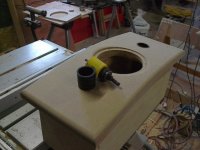
Round over the edges, and some basic rough sanding with the random orbit sander. Time to put in the ports.
The outside diameter of the 1 1/2" drain pipe is about 1 7/8". I use that size hole saw and the pipe will almost go. A small amount of sanding inside each hole with the drill mounted drum sander and it's a snug fit.
To glue in the ports, I cut two shallow grooves around each pipe. These are spaced 1/2" and 1" from the end that will be in the baffle. These groves will fill with epoxy and help anchor the ports in place. I also run a bead of polyurethane caulking around the outside of the port where it meets the back of the baffle.
Attachments
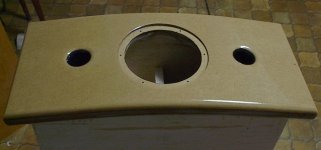
When the epoxy sets up on the ports, I route the mouth with a round over cutter. Looks very good!
Sanding the entire baffle is critical to a smooth finish. I sanded with a fine (320 grit) disk on the random orbit sander, paying special attention to the edges. The face gets sanded too - even though it feels smooth, it can be improved.
When you think it's smooth enough and you've sanded it enough, sand again, just to be sure. 🙂
The baffle will get 2 coats of solvent based clear polyurethane. This is to seal the MDF. The black paint that will be used to finish the baffle is waterbased urethane paint (seen earlier in this thread). I am going to try a different approach this time - apply multiple layers with a foam roller, instead of spraying.
There are a couple good reasons to try it this way: 1 - It's winter and my workshop is not heated, so spraying is not an option. 2 - This baffle is small and I want to know if I can end up with the same polished result doing it this way.
Here it is before the first coat of urethane.
Attachments

F1 FAN said:SWEEEEET,fabulous and professional looking work John.
Thanks F1. I've been planning this one in my head for a long time. It's nice to see it coming out the way I pictured it.
I was getting ready to build the xover, but I see that Solen has sent me a .27mH coil instead of the .47 that I ordered. Poking around in my parts heap. I found a .5mH and I'll take a few turns off to get it in the ball park.
I could have driven this active, I still have 3 amp boards and a couple LM3886, but I thought I'd go passive, and drive this with one of my patchwork amps.
I have put the second coat of urethane sealer on. Time to dry overnight and I'll sand it smooth tomorrow,then it will be ready for paint.
Attachments
MJL21193 said:The baffle will get 2 coats of solvent based clear polyurethane. This is to seal the MDF. The black paint that will be used to finish the baffle is waterbased urethane paint (seen earlier in this thread). I am going to try a different approach this time - apply multiple layers with a foam roller, instead of spraying.
There are a couple good reasons to try it this way: 1 - It's winter and my workshop is not heated, so spraying is not an option. 2 - This baffle is small and I want to know if I can end up with the same polished result doing it this way.
I'll be interested to hear how that pans outs. I had an email asking about getting gloss black finish this way and I said forget it without a crazy amount of work. Of course, I know you'll now go and prove me wrong. 😀
Looks like a very polished job so far John. 🙂
ShinOBIWAN said:
I'll be interested to hear how that pans outs.
Looks like a very polished job so far John. 🙂
Thanks Ant,
I figure I have nothing to lose, the paint won't go to waste - at the very least it'll be a good base for a sprayed finish. Using my previous method with the solvent based urethane paint would take weeks before the final finish, so time is not an issue.
Throw in the fact that I really don't have a location for this speaker yet.
I figure 4 prime coats, sand flat then 4-6 finish coats. We'll see.
I'm keeping my fingers crossed.
I've been trying to show some of the construction details that I didn't include in the first of this thread. Here's a shot of the baffle just after the recess was routed. Notice the pencil line drawn for the driver cutout. I used my compass set to the width of the flange to mark it.
Router on top with 1/2" roundover bit installed, ready to shape the edge.
Attachments
Likewise I have a couple of stuffed LM3785 boards collecting dust.I opted for a Bryston 2B LP to drive my active center.Originally posted by MJL21193
I could have driven this active, I still have 3 amp boards and a couple LM3886,
By the looks of the graphs and the desription of the design it appears that that series network was designed with care and skill and should sound good.but I thought I'd go passive,
F1 FAN said:
By the looks of the graphs and the desription of the design it appears that that series network was designed with care and skill and should sound good.
I can't say I've had the best luck with crossovers in the past. I've tried every combination possible on one pair I built a while back, finally getting it right after more than 20 changes.
I've been meaning to try one of Tony's designs "right out of the box" so that I might give one of his crossovers a go. My expectations are high.
Hi Ray,
Yes I used a roller and then a brush wet with urethane to break the little bubbles created by the roller. It came out fairly smooth.
These bubbles won't be a problem for the paint though - it's really thick and I expect it to go on fairly flat.
Yes I used a roller and then a brush wet with urethane to break the little bubbles created by the roller. It came out fairly smooth.
These bubbles won't be a problem for the paint though - it's really thick and I expect it to go on fairly flat.
Ray Collins said:Is it a sponge roller or a low nap or ???
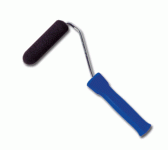
It's a foam (sponge) roller. I would never use a nap roller for anything other than to paint a wall. They give off too much lint, no matter how broke in they are.
Normally I use a foam roller with a velvet cover for polyurethane, but I'd just bought a 4-pack of the regular ones, so I used that. These are small 4" rollers.
Look like this, except the refill is white:
Attachments
I have 5 rolled coats of paint on the baffle now. This stuff dries so fast - 30 minutes between coats. It looks pretty rough, but that was to be expected. It should sand flat without any problem, I'll just need to let it dry completely, probably overnight.
Spent some time building the crossover. Using Speaker Workshop to measure, I unwound that coil to get it at .47mH. This is straight from Tony Gee's USB project, so I don't anticipate any problems.
Made it all neat and tidy on a piece of 1/8" hardboard painted black. Wiring is 20 gauge stranded, which will be fine for the short lengths involved.
Attachments

ShinOBIWAN said:
I'll be interested to hear how that pans outs. I had an email asking about getting gloss black finish this way and I said forget it without a crazy amount of work. Of course, I know you'll now go and prove me wrong. 😀
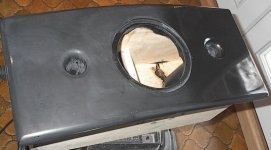
Well, I won't be proving you wrong this time Ant. The roller idea is a bust.
A few good reasons: By the time you pile on enough layers of paint (without letting it completely dry between coats) the surface is so rough it takes an enormous amount of sanding to get it flat. By then, you have sanded off 90-100% of the paint - nothing left to work with. Also, the film build is not as homogeneous, there are visible layers once it's been sanded. Finally, it takes too long to roll on each coat, wait a while and roll on the next, and the next, and the next, etc.
I will wait for warmer weather (another month and a half) and spray it. Who know, I might have another project to paint by then also.😀
In the meantime, I'll give it a quick coat of black from a spray can to make it look OK, finish the body, mount the driver and use it.
Here's how it looked after I sanded it and gave one side a quick polish. Wasted effort. Another lesson learned. 🙂
Attachments
MJL21193 said:Here's how it looked after I sanded it and gave one side a quick polish. Wasted effort. Another lesson learned. 🙂
Ah well, never mind John. If you'd come back and said it worked, well I'd have been tempted to have a go myself as I have the some problem as you - poor weather this time of year. I'm still waiting to finish up the spray job on the last LGT.
At least we can lecture folks on "good things come to those who wait" 😀
- Status
- Not open for further replies.
- Home
- Loudspeakers
- Multi-Way
- Construction journey-Active 3-way