I discovered this product a couple years ago. It is my go to solution in 90% of all my adhesive and sealing tasks. It's clear, stable in a short time, remains semi flexable but still has the strength of two-part epoxy products,
AG Marine Adhesive Product Information
AG Marine Adhesive Product Information
Last edited:
I'm going to have this enclosure on end for a while (limited space in my current room) & I want to 'glue' the filter capacitors to the stripboard before I do, because atm they are only held on by their solder connections. What is the best material for this? Silicone sealant? I assume hot glue is a bad idea because it will damage the caps?
Hot melt glue is fine in my opinion for aluminum electrolytics. I use it for building crossovers.
For epoxy, I prefer G Flex by West Systems.
@fabricated:
That's very industrial looking.. cool!
From the thumbnail I first thought you used some motorbike oil coolers on the side...😀
That's very industrial looking.. cool!
From the thumbnail I first thought you used some motorbike oil coolers on the side...😀
Hadn't thought of epoxy - would a few dabs of Araldite be okay or would the chemicals melt the capacitors or something disastrous?For epoxy, I prefer G Flex by West Systems.
Silicone sealant?
Cheapest you can find, provided it has silicone written on it.
(more reliable adhesive , better damping, easier to remove if required. the real nutcase goes for Sika-291)
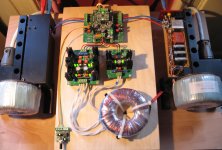
Well i guess i can throw my hat in the ring for my firt 3886 build. Never done anything like this and it not quit done.
Gorgeous! Nice work! Can we have a look inside?
Hey thanks man!@fabricated:
That's very industrial looking.. cool!
From the thumbnail I first thought you used some motorbike oil coolers on the side...😀
ss007---- it's in pieces as of right now but, I'll have pics of my organized mess *** soon as possible......thanks for the comments!

LM3886 bridged
These are my LM3886 monoblocks with bridged setup. Capacitors are Panasonic and russian oil-paper in the PSU. The resistors are Beyschlag 1W.
The Buffalo II dac is in the middle, with Volumite volume controller.
This is a very useful construction, because it is suitable for parallel or bridged or biamping setup.
Drawings are available for free.
Attachments

dual mono, 50W, 40000x50V, STK-404-140, VU meter
View attachment 259943
View attachment 259944
View attachment 259945
View attachment 259946
That's a nice looking amp you built! I'm sure it sounds as good as it looks. It looks very similar to the one I built over a year ago except I used blue LED's in my VU meter to match the power switch. You can see the amp I built in the link below.
http://www.diyaudio.com/forums/chip-amps/79303-chip-amp-photo-gallery-155.html#post2327505
offtopThat's a nice looking amp you built! I'm sure it sounds as good as it looks. It looks very similar to the one I built over a year ago except I used blue LED's in my VU meter to match the power switch. You can see the amp I built in the link below.
Yes, thank you for the idea of design 🙂
The whole design, I took on this thread
That's a nice looking amp you built! I'm sure it sounds as good as it looks. It looks very similar to the one I built over a year ago except I used blue LED's in my VU meter to match the power switch. You can see the amp I built in the link below.
http://www.diyaudio.com/forums/chip-amps/79303-chip-amp-photo-gallery-155.html#post2327505
Wondering if you did any "mods" to the NAD pre??
Heatsinks on ankers, the creative decision =) Nice case!dual mono, 50W, 40000x50V, STK-404-140, VU meter
View attachment 259943
View attachment 259944
View attachment 259945
View attachment 259946
offtop
Yes, thank you for the idea of design 🙂
The whole design, I took on this thread
Well I'm glad my amp design inspired you to make something similar! I wanted to do something different from all the ones I've seen in the gallery. Then I remembered how I liked the look of vintage amps with the VU meters so that's how I came up with my design.
Wondering if you did any "mods" to the NAD pre??
I haven't done any mods to the NAD. I wasn't aware of any mods that could be done that would improve it. It works and sounds great as it is so I'll probably just leave it.
Last edited:
Nice work Professor. There's a lot in there. How about a simple listing of all the components?
... I haven't done any mods to the NAD. I wasn't aware of any mods that could be done that would improve it. It works and sounds great as it is so I'll probably just leave it.
"Sounds great" is great! Probably, no mods are needed. NAD is generally good stuff.
Some of us like to twiddle with the parts, even when there is "no problem found". I add extra plastic caps to all my equipment power supplies, often whether they need it or not. Sometimes "improvements" just show up on the 'scope ... sometimes not. 😱
Occasionally "improvements" to one gadget will show up as an improvement on another in the audio chain. Sometimes not. Sometimes it just makes for a good story ...
That's a very nice amp in any case, Dawg ...
----
Yes! Very nice work, Professor.
Last edited:
My point to point bridged LM3886 GC's. The case was a very large UPS power supply, whcih I cut in half length ways and then re-attached the rear panel. There is a speaker protection circuit added.
An externally hosted image should be here but it was not working when we last tested it.
An externally hosted image should be here but it was not working when we last tested it.
An externally hosted image should be here but it was not working when we last tested it.
Have you just built this?
No, these were built in my frantic gainclone days. I thought it was a couple of years ago, checking on here I see that it was in fact 4 years ago. I built them, tested them, and never used them as the power supplies were laid out on wood and not very safe.
The speaker protection module is very sensitive to any interference with either the speaker connections or signal in interruption, which is nice.
I tidied up the PS by using some generic rectifier boards bought from PFM.
The speaker protection module is very sensitive to any interference with either the speaker connections or signal in interruption, which is nice.
I tidied up the PS by using some generic rectifier boards bought from PFM.
No, these were built in my frantic gainclone days. I thought it was a couple of years ago, checking on here I see that it was in fact 4 years ago. I built them, tested them, and never used them as the power supplies were laid out on wood and not very safe.
The speaker protection module is very sensitive to any interference with either the speaker connections or signal in interruption, which is nice.
I tidied up the PS by using some generic rectifier boards bought from PFM.
How do they sound in your new room?
- Home
- Amplifiers
- Chip Amps
- Chip Amp Photo Gallery