
No, but maybe I have one to spare. Let me check and I will report back.
Will you commit to build your Aleph, before I check?
Will you commit to build your Aleph, before I check?
Good.
Then let me take care of some family business and I will be back to you (here and PM).
Then let me take care of some family business and I will be back to you (here and PM).

Peppe - if you can’t find a power board I’ll chip in one.
I will supply matched input and output MOSFETs if this will get built.
I will supply matched input and output MOSFETs if this will get built.
Thanks @rhthatcher. I have already packed Jeff Young PCB you gifted me during latest @codyt SJEP giveaway with snubbers and CL-60 + main cap PCBs. I have more PCB of your design for myself.
@TheSoundMann, in the pictures below is what you will receive at the address you gave me (small blue PCBs are for front panel LEDs if you wish). FETs seems will land on your laps thanks to Randy. Find heatsinks and toroid and you have hit the point of no return.
Keep in mind that if you do not build it you will end up in the audiophile hell, where all amplification is class B!
The OP is too cheap to buy a concert ticket, too cheap to buy an official tee shirt but wants advise on which pickup truck he should purchase a bootleg from, scoffing at any suggestion he should not buy a bootleg and the communities response? Here’s the parts to build your own, don’t buy bootlegs.
TheSoundMann, you lucky dog 😀👍 This hobby is a black hole but don't be afraid to jump in. This will be mostly a paint by numbers project aside from a few details.
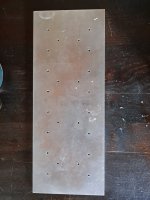
It is hard to drill heatsinks. bottom tapping etc If you are going to do your own, a good way to go about it is drill and tap a piece of 3/8" aluminum stock with through holes, tap them and then attach the aluminum piece to your heatsink. M3 holes or 6-32 holes will work for the IRFP240 mosfets. You can drill through holes for the heat spreader to heatsink bolts between the heatsink fins that way.. The aluminum also acts as a heatspreader which is a big plus. Also you can remove it and drill a new pattern etc.
With the PCBs that you have coming to you, if you drill holes for the mosfets being soldered directly to the PCB, the mosfet leads will be more than strong enough to hold the PCB boards. There is no need to drill holes for the PCB mounting holes. Just use a spacer or something to hold the PCB up while you solder the leads to the board.
Here is a great company for buying metal scraps (no custom sizes available):
https://www.ebay.com/str/usametalonline
Another way to go is to purchase a DIY audio store 4U chassis and attach your mosfets to your heatsinks with short wires. One thing that I have learned is that the 4U chassis is an economical solution being that heatsinks by themselves (of a large enough size) are pretty darned expensive. Also, the 4U chassis is predrilled to accept other designs available from the DIYaudio store. Same with the power supply that you are going to build.
You are going to need a 2x18 300va or larger transformer like this one:
https://www.antekinc.com/as-3218-300va-18v-transformer/
Mouser.com and Digikey.com are two places where you can order parts to populate the boards. Randy's UMS page has BOM's which you can use to cross reference to your build. The part location titles will probably be different but will give you an idea. Like R1 R2 C1 C2 etc but the parts in the BOM are a good selection and should help you fill your cart.
If you don't have a solder gun, the Hakko FX888D is a terrific unit. There are cheaper ones as well.
For attaching the mosfets to the heatsink spreader, you can use Keratherm without thermal paste or Mica pads with thermal paste. the DIYaudio store has Keratherm. Also, their fireball solder is excellent and enough for a few projects.
I would assume you are going to have questions. Ask as many as you want!
First picture is a heatspreader with holes drilled and tapped. 2nd picture is wire leads being used to make existing holes work.
Attachments

HiYes, absolutely.
You also created a thread in the Solid State section about fixing your broken Accuphase, have you decided to fix your Accuphase first and then build the Aleph 30..? Just curious.
Good luck with both amps
Parts to rebuild my Accuphase may be unattainable. So I will build the Pass first.
Are the boards that you are sending me all I need to build a clone of the Aleph 30?
This version will work best for me.
Are the boards that you are sending me all I need to build a clone of the Aleph 30?
This version will work best for me.
The OP is too cheap to buy a concert ticket, too cheap to buy an official tee shirt but wants advise on which pickup truck he should purchase a bootleg from, scoffing at any suggestion he should not buy a bootleg and the communities response? Here’s the parts to build your own, don’t buy bootlegs.
Concert tickets are way too expensive these day's!
I will supply matched input and output MOSFETs if this will get built.
I will take it all. Thanks
Find heatsinks and toroid and you have hit the point of no return.
I may need a little help in finding the proper heatsinks as I don't know what to look for.
TheSoundMann, you lucky dog 😀👍 This hobby is a black hole but don't be afraid to jump in. This will be mostly a paint by numbers project aside from a few details.
Thanks for your help as well Mike.
I may have found a suitable enclosure already (ample heatsinks).
https://m.aliexpress.us/item/325680...lgo_pvid=9c7c229b-4224-4d16-b883-bca220ecf097
https://m.aliexpress.us/item/325680...lgo_pvid=9c7c229b-4224-4d16-b883-bca220ecf097
- Home
- Amplifiers
- Pass Labs
- Chinese Pass amp clone