ETA for the 2U Slimline chassis? I check everyday, and have signed up for alerts...just wondering.
Thanks!
Thanks!
FWIW, I never had any luck getting an ETA out of anyone. I ended up going direct to the manufacturer HiFi2000. You can ask for the diyaudio chassis and they will match the pricing and shipping isn't bad at all. I ordered two 2U Pesante and a Galaxy 183 and the total with shipping was the same had I ordered from the diyaudio store.
FWIW, I never had any luck getting an ETA out of anyone. I ended up going direct to the manufacturer HiFi2000. You can ask for the diyaudio chassis and they will match the pricing and shipping isn't bad at all. I ordered two 2U Pesante and a Galaxy 183 and the total with shipping was the same had I ordered from the diyaudio store.
Thanks for the reply and insight, I have been holding off going that route I just assumed it was more expensive, but holding my breathe and waiting I'm starting to turn blue. 😉
I'm off to HiFi2000 to price out my order...
Would it be possible to buy a unmachined 4U faceplate? I have a salvaged 4u enclosure I've gutted that fits my needs. I'm using a different heatsink configuration that rules out using the enclosures you sell, but I still need a faceplate as the faceplate of the previous "inhabitant" of my enclosure isn't something I could retrofit to work. If not, if anyone knows where I could source a similar faceplate I'm interested - I've found others, but thinner, I like the thicker material and being able to have blind mounting holes.
Thanks!
Thanks!
Would it be possible to buy a unmachined 4U faceplate? I have a salvaged 4u enclosure I've gutted that fits my needs. I'm using a different heatsink configuration that rules out using the enclosures you sell, but I still need a faceplate as the faceplate of the previous "inhabitant" of my enclosure isn't something I could retrofit to work. If not, if anyone knows where I could source a similar faceplate I'm interested - I've found others, but thinner, I like the thicker material and being able to have blind mounting holes.
Thanks!
HiFi2000 sells the individual parts & pieces: https://www.modushop.biz/site/
Folks:
I understand that the back panel on the Deluxe chassis has been revised and now sports holes for XLR connectors, not the 3/8" / 9.53mm holes for the RCA connectors that are currently listed on the "Deluxe Chassis Back Panel Specification" (see the link on the store page). It would be helpful if a link to the revised back panel specification was available. In the meantime, can someone confirm that a Neutrik NF2D-B-2 will properly fit the new hole?
Thank you,
Scott
Yes, that Neutrik will fit... That's the part that is supplied with the new back panel kits. 🙂
I'll see if there's a drawing of the new back panels somewhere. I don't have one, I'll have to ask.
I'll see if there's a drawing of the new back panels somewhere. I don't have one, I'll have to ask.
Back panel kits, don't suppose they include the back panel 🙂
...additionally,
I am in the market for the rails which hole the heatsinks to top / bottom covers, front and rear panels on a 4U 300mm chassis. Need them for two chassis.
Originally I was planning on building my own out of Al bar stock.
If anyone has any info or pics of their own DIY part for these pieces, please pass it along. Something close to prints of the original ones would be useful. The sheet metal brake I have access to is limited to short pieces of 16 gauge mild steel, but have done 18 gauge stainless with it in the past.
Hi guys,
Can someone point me in a the right direction for a mechanical drawing for the complete heatsink with holes for the 4U and 5U amp all alu chassis?
I need to know the placement of holes with respect to edges of heatsink so I can work out where to place connectors.
Thanks
\\\Jens
Can someone point me in a the right direction for a mechanical drawing for the complete heatsink with holes for the 4U and 5U amp all alu chassis?
I need to know the placement of holes with respect to edges of heatsink so I can work out where to place connectors.
Thanks
\\\Jens
Not entirely sure that information exists...
The UMS info is here - http://www.diyaudio.com/forums/imag...sal/universal-mounting-specification-v2.1.pdf You might be able to discern something from that.
The UMS info is here - http://www.diyaudio.com/forums/imag...sal/universal-mounting-specification-v2.1.pdf You might be able to discern something from that.
Hi guys,
Can someone point me in a the right direction for a mechanical drawing for the complete heatsink with holes for the 4U and 5U amp all alu chassis?
I need to know the placement of holes with respect to edges of heatsink so I can work out where to place connectors.
Thanks
\\\Jens
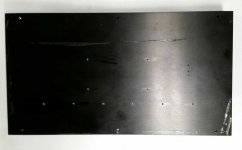
If you ordered your heatsinks from the same source where the store had purchased for the 4U chassis in the past - there are six mounting holes per heatsink to which I am fairly certain the mounting brackets and covers attach. This is a horrible picture, and I don't have anything to accurately measure the distance today.
A shame that I didn't ask for the plotting numbers used by the shop that drilled the F4 mounting patterns for me at a cost of 375ml of calvados.
The heatsinks aren't as ugly as they appear, mostly leftover tapping fluid, tape residue and bad light reflection but the anodizing mark form the (um, is it anode or cathode?) clamp on the back is real. This is the ugly one of the group - the one of four which arrived a little scratched up, but that will be on the bottom and out of view.
I'm considering just buying the parts I need to complete the chassis instead of making them myself. Another lesson in buying a car one bolt at a time... not that is ever an issue with DIY 😛
Attachments
If you ordered your heatsinks from the same source where the store had purchased for the 4U chassis in the past - there are six mounting holes per heatsink to which I am fairly certain the mounting brackets and covers attach. This is a horrible picture, and I don't have anything to accurately measure the distance today.
A shame that I didn't ask for the plotting numbers used by the shop that drilled the F4 mounting patterns for me at a cost of 375ml of calvados.

The heatsinks aren't as ugly as they appear, mostly leftover tapping fluid, tape residue and bad light reflection but the anodizing mark form the (um, is it anode or cathode?) clamp on the back is real. This is the ugly one of the group - the one of four which arrived a little scratched up, but that will be on the bottom and out of view.
I'm considering just buying the parts I need to complete the chassis instead of making them myself. Another lesson in buying a car one bolt at a time... not that is ever an issue with DIY 😛
Thanks for your effort!
I have not ordered yet, since everything is out of stock... and still no European warehouse.
\\\Jens
The holes on the end are 20mm on center from the ends of the heatsink.
They are approximately 6.5mm on center from the top / bottom of the heatsink.
The center of the holes is... on center, but that's 130mm between the other two.
They are approximately 6.5mm on center from the top / bottom of the heatsink.
The center of the holes is... on center, but that's 130mm between the other two.
In case (pun) your in a hurry after all that decision making you've been through.
The HiFi2000 group ( and probably a majority of other Italians ) are on summer vacation ..........................its just the way they do it.
HiFi2000 is gone till the 24th. 🙄
The HiFi2000 group ( and probably a majority of other Italians ) are on summer vacation ..........................its just the way they do it.
HiFi2000 is gone till the 24th. 🙄
In case (pun) your in a hurry after all that decision making you've been through.
The HiFi2000 group ( and probably a majority of other Italians ) are on summer vacation ..........................its just the way they do it.
HiFi2000 is gone till the 24th. 🙄
I envy them! They know how to balance their lives with relaxation.
Folks:
Can someone confirm that the F6 boards will mount in a Deluxe 4U chassis without the need to drill and tap additional holes? There have been a few posts that suggest the F6 boards (or maybe the output transistors) require additional drilling and tapping to fit in a 4U box.
It would be helpful if the UMS spec was updated to show mounting options for the F6.
Regards,
Scott
I'll happily confirm that there is no additional drilling required.
The F6 in the build guide was constructed in a 4U deluxe. The F6 PCB were designed from day one to interface directly with the UMS.
The F6 in the build guide was constructed in a 4U deluxe. The F6 PCB were designed from day one to interface directly with the UMS.
Jim:
Thanks! Now all we need is for the store to replenish its supplies.
Regards,
Scott
YUP! Built my BA-3 with a deluxe 5U. I drilled very few hole, tapped nothing.
4 holes for some "fancy" feet I used, and a few more for ground bolts and the like. It makes assembly a breeze.
Russellc
- Home
- The diyAudio Store
- Chassis Discussion