For me it all started with this thread: http://www.diyaudio.com/forums/showthread.php?s=&threadid=21547&highlight=
I got the main boards, but if it wasn't for Algar_emi, who up came with display boards (he made a layout and the boards), I would propably still not complete my unit")
I got the main boards, but if it wasn't for Algar_emi, who up came with display boards (he made a layout and the boards), I would propably still not complete my unit
Attachments
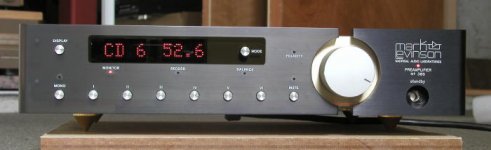
The biggest challenge was actually the chassis. I made the front panel yesterday and I am extremaly happy with a result. The board came with a small front panel piece (the one on the right, with ML logo), as this was from field upgrade so the new designation applies: 38 to 38S and panels had also to be replaced.
So the aim was to make the left front panel to match the existing one. The additional difficulty was the display window, which had to be inserted somehow in front panel.
One possibility was to order complete panel from some shop, but this is diy and we prefer to make things with our own hands
Few days ago an idea emerged, when I decided to use smoke acrylic. Initially I was intending to use acrylic as is, so the panel would be "see through".
But when I started working with it, I noticed than when brushed it looks almost like brushed and anodized aluminum, looking almost like the original panel.
I placed a piece of masking tape on a panel (cut to the shape of dispaly window) and brushed acrylic with Scotch Brite pads. It came up very well. When tape was removed, the perfect dispay window appeared. That is actually a very good technique to make front panels.
Again, printing was done using dry transfer lettering. They didn't have Arabic numbers, so I had to use Roman.
Attachments
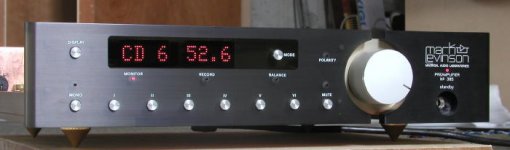
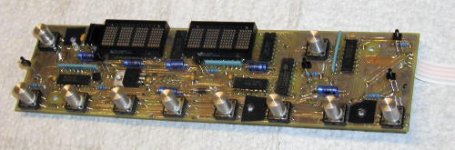
That's the display board made by Algar_emi. The most expensive part was dsplay units, but those are extremally nice.
I attached buttons directly to the switches with double sided tape, works very well this way. After adding front panel I extended the buttons by adding another piece on top. Those are slightly smaller than original, but it doesn't bothe rme.
Also the knob is only temporary and I plan to make the one that will be closer to the original ML stanard
Attachments
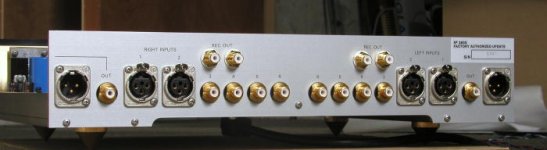
Here's the rear panel. I made it out of 1/8 copper plate and added 40mil brushed and anodized aluminum sheet. The lettering is done again, with dry transfer (I think it's Letraset) . I made it slightly different than the original ML38, and closer to ML32, with additional bars on bottom. The upgrade sticker came with one of the boards
Attachments
Here's the underneath look. I made bottom platform also out of 1/8 copper, and two 3 x 0.25 bars add stiffnes, lift the bottom up, so AC cable has more clearance. I didn't go for feet like on original unit and decided to use those spikes. They fit well.
Additional angles are riveted to those 3" bars on the sides and this allows for top cover attachment. The bars were alodined, copper is left unfinished.
Additional angles are riveted to those 3" bars on the sides and this allows for top cover attachment. The bars were alodined, copper is left unfinished.
Attachments

hifiZen said:
PS - where do you get your dry transfer lettering from?
I got it from graphics supply stores.
 it looks awsome can we have a pic of the naked
High resolution pics of main board can be found here: http://www.marklevinson.com/image_library/index.asp?categoryID=7&productID=9
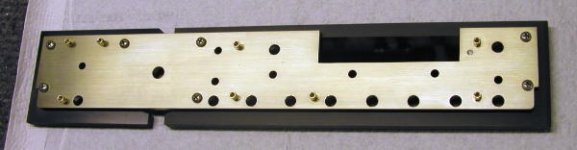
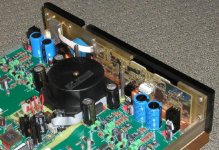
This is how front panel is integrated into preamp. We got some cheap HP encoders off ebay, but they had to be modified into different resolution.
Now the question how it sounds?
Well, the first impression was that it sounds not bad. Please note that I have "S" version of the preamp, with 4 layer board, special board material, Vishay resistors in critical spots.
But so far I am not blown away by its sound either. While it's very proper and well balanced, it somehow doesn't present completely the emotional aspects of performance as well the rhytm and pace is not what I'm used to. Highs are a little bit etched (but not to the extension that it bothers you). The presentation is somewhat hypnotising (as one of my friend described it) but not very alive. It's lacking the directness, that I'm used to with more simple setups. But over all it's pretty good.
I still prefer my passive attenuator (at the input of my GC), but recently I noticed that on more complex material, ML may actually sound better.
There is still a lot to do, to upgrade this unit to current 380 status and first thing is to replace rectifiers and electrolytics, then some semis and add wire harness in certain spots (PS and output mostly)
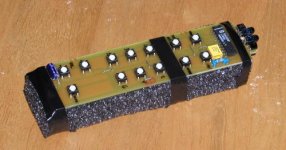
To show you how practical I am, heres my implementation of remote control casing
Now the question how it sounds?
Well, the first impression was that it sounds not bad. Please note that I have "S" version of the preamp, with 4 layer board, special board material, Vishay resistors in critical spots.
But so far I am not blown away by its sound either. While it's very proper and well balanced, it somehow doesn't present completely the emotional aspects of performance as well the rhytm and pace is not what I'm used to. Highs are a little bit etched (but not to the extension that it bothers you). The presentation is somewhat hypnotising (as one of my friend described it) but not very alive. It's lacking the directness, that I'm used to with more simple setups. But over all it's pretty good.
I still prefer my passive attenuator (at the input of my GC), but recently I noticed that on more complex material, ML may actually sound better.
There is still a lot to do, to upgrade this unit to current 380 status and first thing is to replace rectifiers and electrolytics, then some semis and add wire harness in certain spots (PS and output mostly)
To show you how practical I am, heres my implementation of remote control casing
Attachments
Beside sound aspects, the overall control range, flexibility, available functions and overall ergonomics is first class and this unit is a pleasure to work with.
Additonal incentive was that I bought main board (regular version, not "S") for half the price of full Apox kit. Now, that's something
Additonal incentive was that I bought main board (regular version, not "S") for half the price of full Apox kit. Now, that's something
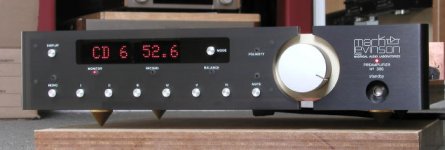
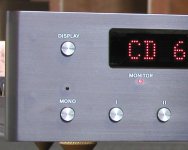
Yes, the final result amazes even me. This method came out as one step solution to machining, brushing, anodizing, silcscreening and installing a display window. It all can be done in one evening. I highly recommend that approach. Different types of acrylic may behave differently. This one was not too hard and not too soft, just perfect. Drilling holes was a hassle, as I had to use two sizes of drills in order not to damage the outside rim.
Here's close up of panel detail.
Here's close up of panel detail.
Attachments
- Home
- Amplifiers
- Solid State
- Building Mark Levinson 38 preamp chassis from scratch