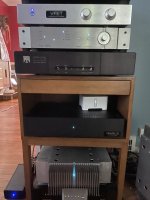
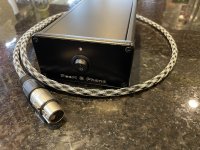
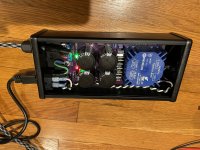
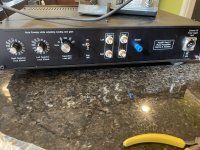
My Pearl 2 is done and singing! It’s running with a MM cart now, and I’ll try it on my big system soon with MC. The loading switches will be fun to play with on my MC cart.
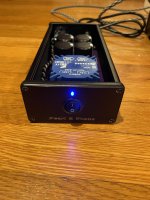
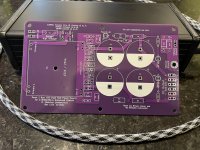
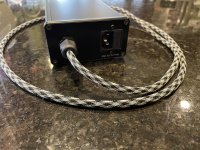
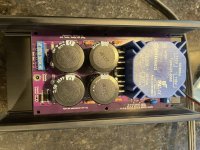
I made a CRC PSU with snubbers that fits in a small Hammond chassis. It’s workable, but I can think of a couple tweaks to the board. If anyone is interested in the R or C loading boards or PSU boards send me a message. I have extras.
I made a CRC PSU with snubbers that fits in a small Hammond chassis. It’s workable, but I can think of a couple tweaks to the board. If anyone is interested in the R or C loading boards or PSU boards send me a message. I have extras.
Attachments
-
 4A2D6057-4690-4C27-80FC-8670CD8DF273.jpeg503.2 KB · Views: 308
 -
 CE2A2BCD-9801-4CC0-8CAD-CE0AC94373FD.jpeg500.7 KB · Views: 283
 -
 4240411C-AA1C-4825-BB77-72642BF9B828.jpeg383.6 KB · Views: 290
 -
 81684CB3-C2ED-4825-BB09-4ED1687EBC4E.jpeg607 KB · Views: 299
 -
 E80AEFAD-3D47-4666-ABC6-7574762E20F5.jpeg592.1 KB · Views: 291
 -
 2A4C192C-C043-433C-A805-946461AFEDDB.jpeg591.2 KB · Views: 281
 -
 AE8DD5CA-FA8C-4A9F-B15C-F7FA4B35930B.jpeg638.3 KB · Views: 279
 -
 FA3B0255-221A-4678-8255-688F68C659D3.jpeg599.5 KB · Views: 288
 -
 868C1137-62E4-430F-98AB-DEBCF4517C7A.jpeg612.1 KB · Views: 292
 -
 0ED3FC1E-B84C-4533-829C-35CD29AFE800.jpeg347 KB · Views: 301

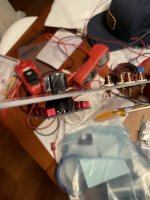
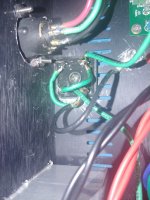
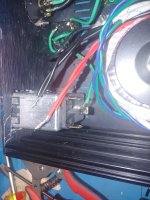
SOS! I need help. I was able to complete the phono section of the pearl 2 with no problem. However, I have hit a wall with the PSU. I have reviewed the various PSU's posted on this thread but none seem to give me insight on final wiring. Attached are photos on my progress. Can someone let me know if my layout is correct and if I am missing any components. any help would be extremely appreciated as the pearl project has been sitting on the shelf collecting dust.
Thanks.

Thanks.
Attachments
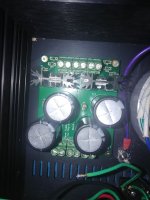
PSU board input is nicely labeled, as is the output. The ground breaker bridge connects to “to star” or PSU GND.
Primary lead wire to AC live, trail to neutral.
Check PM
Primary lead wire to AC live, trail to neutral.
Check PM
I realized I never followed up on this post. A check of voltages traced the problem to the Q1 transistor. The voltage was good coming in, but very low coming out. I replaced it and that solved the problem. I have not given thought at this point to why Q1 went bad. I will do that if I have further problems. Otherwise, I am just enjoying the music.I would appreciate your thoughts on troubleshooting a problem that has developed with my recently completed Pearl 2. The unit had been working great up to this point. However, when I went to listen last night, one channel was hardly putting out any sound, and what was coming out was scratchy and intermittent. I isolated the problem to the phono by confirming that other components were working fine. I also checked for bad cables or connections (which was the first thing that occurred to me given the symptoms), and found none. That is all the checking I have done so far.
I am hoping for suggestions on where to continue/prioritize my troubleshooting efforts.
You need v+, v-, and groundHow important is having dual bridges i.e. one for +V and one for -V?
Do you have a center tap transformer you’re considering?
Yes. I have purchased a 60VA with dual 22V secondaries.
https://www.audiophonics.fr/en/toro...h-electrostatic-screen-60va-2x22v-p-4751.html
I have also on order a power supply board, but, assuming it is the same as their 6 pos 35mm it does not use dual bridges. I also have the snap in caps.
https://www.audiophonics.fr/en/non-...y-board-4-35mm-snap-in-locations-p-10228.html
I thought I had read the dual bridge was used due to the different current draw of each rail.
By way of full disclosure the plan is for a two box build. Pearl II and Waynes BA2018 line stage in one enclosure with source select and volume control. In another enclosure will be dual mono power supply for each of them.
Another issue I see is the Pearl II has the regulator on board i.e. close, but, the regulators for the BA2018 are on my power supply which will be in the separate enclosure from the line stage board i.e. distanced. I'm not adverse to have local power supply caps at the input to the BA2018 if needed.
Another issue I see is the Pearl II has the regulator on board i.e. close, but, the regulators for the BA2018 are on my power supply which will be in the separate enclosure from the line stage board i.e. distanced. I'm not adverse to have local power supply caps at the input to the BA2018 if needed.
Dual bridges help keep the transformer physically quiet. This is usually more an issue with power amps. It is not necessary.
BA2018 already has local power supply caps at it's input. The regulators can be in your PSU box and still work quite nicely.
As long as you have the PSU in a separate box, and that box is kept away from the phono boards, it will be quiet.
BA2018 already has local power supply caps at it's input. The regulators can be in your PSU box and still work quite nicely.
As long as you have the PSU in a separate box, and that box is kept away from the phono boards, it will be quiet.
Here's what Wayne says in his original document:Yes. I have purchased a 60VA with dual 22V secondaries.
https://www.audiophonics.fr/en/toro...h-electrostatic-screen-60va-2x22v-p-4751.html
I have also on order a power supply board, but, assuming it is the same as their 6 pos 35mm it does not use dual bridges. I also have the snap in caps.
https://www.audiophonics.fr/en/non-...y-board-4-35mm-snap-in-locations-p-10228.html
I thought I had read the dual bridge was used due to the different current draw of each rail.
"Here we see the usual components found in a DIY linear power supply, with a couple items which directly address the needs of this project. First, there are two rectifier bridges instead of the usual one. We do this because the positive rail will be sourcing more current to the circuit than the negative, and in this circumstance dual rectifiers will avoid the transformer noise which often accompanies this. Also we see that the chassis is directly (and with heavy wire) attached to the earth ground of the AC line and that the signal ground of the circuit is attached to chassis through a high current bridge rectifier as shown."
I am interested to build Mini Pearl. Could you please send me the gerber files?I will give anyone who asks the Gerber files for the Mini Pearl -- it's SMT and there were two versions, one for SOT-23 devices and another for the SOIC. It is, however, a four-layer board which does a good job of eliminating some of the EMI issues.
The op-amp Pearl output stage I designed simply replaces the static sensitive MOSFET section with an OPA2604 (or similar). Must've been several years ago as I can't find it on the bench.
Many thanks
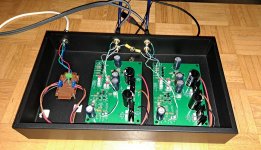
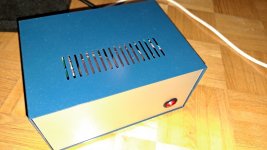
Here's my basic cheap and cheerful Pearl 2 build, which I have been working on and off (mostly off) for a quite a while. I used machine pin headers at the gain and loading resistor locations. The main chassis is a Hammond steel case and the external PS is housed in a recycled project box.
The build process was unremarkable though I did discover that if you leave out R14, the output is REALLY low. 🙂
The gain is the standard 55dB and so far so good even with my cartridge's spec'ed 0.25mV output. (This was not a surprise since I've used the same cartridge with another phono at a similar gain and it was adequate for me.)
I have a set of the original PCBs and matched jfets from PassDIY. But since I had this irrational fear that I would blow up my first attempt at building an MC phono preamp, I ended up ordering some boards using the Gerber files on PassDIY and used some low-ish IDSS (<7mA) 2sk170BL I already have.
Thank you Wayne for this wonderful project. And thanks to Jim for the very helpful build guide.
Cheers,
Dennis
Attachments
Hi all, I've just ordered the Pearl 2 pcb from diyaudio store and starting to collect parts
I can't find any ZTX450 and ZVP3310
Which are the best substitutes for these two ?
I can't find any ZTX450 and ZVP3310
Which are the best substitutes for these two ?
TP2104N will work in place of the ZVP3310.Hi all, I've just ordered the Pearl 2 pcb from diyaudio store and starting to collect parts
I can't find any ZTX450 and ZVP3310
Which are the best substitutes for these two ?
Zetex "E-Line", their version of TO-92 have been in short supply for over a year.
I just got some ZTX450STZ from Newark/Farnell. They show they still have ~1000.Hi all, I've just ordered the Pearl 2 pcb from diyaudio store and starting to collect parts
I can't find any ZTX450 and ZVP3310
Which are the best substitutes for these two ?
ZTX450STZ -- hit it in the Diodes Inc. website search engine and it comes up ZTX450!
In the Mini-Pearl I used ZXTN2018F which has higher hfe and lower noise, but it's SMT.
In the Mini-Pearl I used ZXTN2018F which has higher hfe and lower noise, but it's SMT.
- Home
- Amplifiers
- Pass Labs
- Building a Pearl 2