On second thought, if I snip those jaggies, I can re-coat them with some industrial Poly Urethane paint that I have, what do you think, folks?They will be wrapped double sided style, I'm not going to worry just yet.🙂
The thing is, those jaggies you see in the pic end up closing themselves off at the other end of the panel, (due to the way they cut them) that's why I clipped a few and didn't go any further.
Decisions, decisions...
 🤐
🤐
Last edited:
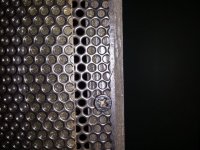
Here, I just took an edge pic of the 15 year-old Sanders panel that's never arched (from the edge, anyway) not even with this higher voltage I've been applying...
It wasn't until the rust started getting bad before they arched (middle of panel).
Again, what do you guys think? Should I snip the jaggies and possibly crack the powder-coating, or should I just apply an extra coat of the poly-urethane to the edge with a dauber?
It wasn't until the rust started getting bad before they arched (middle of panel).
Again, what do you guys think? Should I snip the jaggies and possibly crack the powder-coating, or should I just apply an extra coat of the poly-urethane to the edge with a dauber?
Attachments
Wreck: just to be on the safe side, spend the time to grind out the points. It's tedious, but with a 4" grinder, or similar tool, you can grind them down pretty easily (especially when you get the "rhythm" down.) Then you won't have to worry about arcing on the edges. Jazzman's tape-over-edge method helps to mitigate the arcing also.Good luck...have a few beers while doing it, too.
Thanks waldtraut.
So to your thinking a grinder as opposed to snipping...hmmm
Darnnit, I'm paranoid about using either method..haha.. I don't want to crack the powder coat with snippers, and I'm deathly afraid of a grinder catching and bending the panel all to hell.
What grit paper for the grinder are you thinking 80? 100? or finer?
I may HAVE to have drinks, just to calm my nerves...
Anybody else have other suggestions? Thanks.
Last edited:
Ya, it is a hard lesson and more work but you will be better off without them.
You can try and give them a super heavy coating along the edge and hope for the best.
My little panel that burned up was initially caused from a sharp point (from the wire mesh) that was buried in the silicone seal around the perimeter but not deep enough.
Once it arced and burned through it seemed that I was never ever going to be able to successfully seal it up again, and, it was a very difficult and time consuming task.
In my case I could have built 10 more brand new panels without the flaw during that time.
Only I did have anymore of the powder coated screen that I used to make them.
If you snip them off then you still have to grind each point down so that it is rounded and dull with no sharpness to them and then give them a heavy coating.
Charlie once had a situation where one of the points caused issues for him and the tape didn't stop it much and arced right around the tape.
The same thing happened to me, the arc traveled the long way right around the extended part of the frame that was meant to stop this sort of thing from happening.
Good Luck !! 😉
jer 🙂
Thanks Jer..🙂
Like a Dremel fiber wheel? I have those, and that seems a more 'safe' method to my way of thinking (and my way of handling power tools...HAHA!) 😀
Like a Dremel fiber wheel? I have those, and that seems a more 'safe' method to my way of thinking (and my way of handling power tools...HAHA!) 😀
Then use a stone to smooth them up or some 360 grit emery paper.
You shouldn't have any issues of cracking with the coating as it is pretty durable stuff.
If there is any chance of any cracks they will already be there due to the coating process.
When I had my wiremesh stator's PC'ed the guy rolled the material up in to a tube when I got it back, this did cause micro cracks and he had to re-do them.
Once I got the second piece back it was very flexible, but it didn't have any micro cracks in it.
That was the sample that I had made the little panels with and it worked great.
jer 🙂
Yep, Dremel types!!
You might use up a few of them and some time, but they work great.
Just pick a batch of them and work each one slowly.
Work on one and then move to the next few and then go back to the first one again so that you don't over heat the metal.
If you get the metal too hot then it starts to eat the Fiber wheel faster as well.
I have worn them down to about 3/8" diameter before.
jer 🙂
Last edited:
I used a 4" (maybe 4 1/2"?) Makita grinder. I laid the metal on my workbench, overhanging a 1/2'' and went at it. I braced the grinder against my leg to keep it steady and it was no big deal. No problem from catching/bending the metal. A variable speed grinder might even be better. A Dremel would work too, but I would have to think it would take much more time. Also, with the Makita, the grinding discs are just a little smaller in thickness than the diameter of the perf holes so you can grind two sides of one hole at the same time. (You have to try it to see what I mean...)I would also think with trimming you would bend the metal along the edge...unless you had a brake (break?), but who has one of those?
All done. I used snips first, then a few Dremel drum sanding sleeves to smooth them out, then painted.
Four more metal bands to glue up, and a stretching jig to finish.
From there I should be ready to tape, copper ring, Mylar, Licron Crystal, then sandwich them together.
Hopefully I'll have pics soon, thanks again guys..😎
Four more metal bands to glue up, and a stretching jig to finish.
From there I should be ready to tape, copper ring, Mylar, Licron Crystal, then sandwich them together.
Hopefully I'll have pics soon, thanks again guys..😎
Thanks Jer, almost forgot...
I see Martin Logan uses some sort of metal broom or brush, what do you recommend?
I see Martin Logan uses some sort of metal broom or brush, what do you recommend?
Not sure what you mean?!!
For HV testing?
I just use a screw driver blade or you could use a metal trowl if you want more surface area.
Or even a flat metal hambuger flipper would work as well!!
Some have even suggest a big piece of aluminium foil to get more of a surface area tool.
Tie the HV out to the stator and use the ground side to connect to your scanning tool so that there won't be any risk of getting a Jolt!
jer 🙂
Thanks Jer,
I figure I'm going to use a piece of 14 AWG speaker wire that is stripped at the end and then strands spread out to allow it to contact the stators without risk of scratching, (being a 'soft' contact)... should work fairly well. What do you think?
On a different note:
A new observation has taken place while preparing to urethane the next set of metal bands to the other set of stators... The powder coating on them seems a bit thin on these two, not what I wanted to see, but there it is.
Does anyone think that spraying this set (and maybe the other set) with a few coats of clear Krylon will help make it less prone to arching? Or maybe a better question is: do you think it will have a negative effect on performance?
Thanks..
Yes, I used Clear Spray Acrylic to recoat my Powder Coated screens when I refurbished them.
I wasn't sure if you had them coated or if you had sprayed them with polyurethane.
Since they were PCed then you should have done the edges you just manicured with some Red Primer and then a coat of black with a heavy coat of clear all acrylic enamel.
The solvents in the enamel paint can cause issues when it gets on the polyurethane.
If it is put on too heavy and not allowed to cure before the next coat, It can soften it and cause it to bubble.
But it won't hurt the Powder Coating in my past experience.
jer 🙂
In my particular case, the black polyurethane I used IS primer... (it's an industrial PU paint used for priming before application of PU adhesive)
After I re-coat with clear this weekend, I'll be sure to do a thorough arch-checking.
On a side note:
The elongation for the mylar is 2%.. correct? (I'm re-checking my stretching jig)
Thanks again..
After I re-coat with clear this weekend, I'll be sure to do a thorough arch-checking.
On a side note:
The elongation for the mylar is 2%.. correct? (I'm re-checking my stretching jig)
Thanks again..
I apologze for my odd question, but I have noticed that seemingly all DIY ESL's have trouble below 100Hz. How is it that Quad, etc, managed to produce bass so much deeper?
Last edited:
Hi,
My build is only expected to reproduce 200-250 Hz due to my pairing with a T-line that will reproduce the rest of the spectrum...
I did't plan my ESL to reproduce as low as 100 Hz, therefore I have no good answer for you, sorry...
Have a good evening..🙂
My build is only expected to reproduce 200-250 Hz due to my pairing with a T-line that will reproduce the rest of the spectrum...
I did't plan my ESL to reproduce as low as 100 Hz, therefore I have no good answer for you, sorry...
Have a good evening..🙂
Last edited:
I apologze for my odd question, but I have noticed that seemingly all DIY ESL's have trouble below 100Hz. How is it that Quad, etc, managed to produce bass so much deeper?
My ESL is running full range, and I can get much lower than 100Hz. If you don't put too much tension on the diaphragm and if you can get good step up transformers, I'm sure you can achieve lower than 100Hz quite easily.
Wachara C.
- Status
- Not open for further replies.
- Home
- Loudspeakers
- Planars & Exotics
- Building a large curved ESL