Exactly. No hardware changes would be required, just write a small amount of Arduino code to change balance.Since DAC has two independent sides you could control each separately to get one side louder than the other or did I miss something in datasheet.
Again, yes, good idea.As for inputs you could go with something like MCP23S17 instead of MCP23S08 and just use two ULN2803A.
These things take long as I want them to 🙁
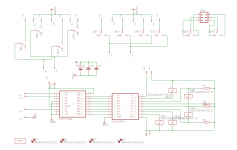
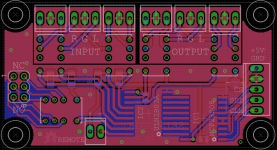
Anyway I managed to lay out second board for input and output selection based on your input selector. Basic thinking behind this since it will be for computer use I don't need many inputs so one for PC and other for any other gear I might want to connect. And two outputs (speaker amp and headphone amp) that act as mute switches also. There is also one relay that will act as speaker amp standby switch and one more output for additional outboard relay if I'll need it for something else.
Board size 35x65mm
Is this layout good enough?
Other thing is I added few vias between ground planes on MDAC digital side. If this is good? I am guessing some of them under regulator should be there for cooling.
One more thing max how did you select which resistors to use on latching relays?
OSHpark order this week I hope.
Attachments

Looks good to me! I like it.
In regards to the vias, I'm not really sure if that's a good idea or not. For dispersing heat, probably a good idea.
I chose the relay resistors by copying other designs.
Post pics when it's done!
In regards to the vias, I'm not really sure if that's a good idea or not. For dispersing heat, probably a good idea.
I chose the relay resistors by copying other designs.
Post pics when it's done!
Max:
The EEProm does have a limited number of writes, but you can use wear leveling to help balance that, and assuming 100k writes, 5 bytes per float (volume you record), that would give you 200*100000, or 20 million volume saves.
The EEProm does have a limited number of writes, but you can use wear leveling to help balance that, and assuming 100k writes, 5 bytes per float (volume you record), that would give you 200*100000, or 20 million volume saves.
Thanks for the suggestion, Eascen. So basically I would have to have my code save the volume level to a random part of the EEPROM instead of the same part every time?
So, two ways to go about this:
One, is to create a really cool circular ring buffer, where the first X bytes are used to store the location of the current location of the value, and then the last X bytes are stored. If, we have 1KB EEProm, which back to the 4 bytes, allows 256 values. Now, the first circular buffer we will want to evenly write, since the location of the current volume can only reach a max of 256, we can safely assume a single byte can store the pointer.
So, to calculate that as a very simple badly given example... I hate math but lets assume that you store 200 volume values, which leaves us with (256-200)*4(reconvert to byte from 4k cluster)=224 bytes. So, bytes 0-223 are used to store the current pointer in memory, to read the float from, and the last 800 are used for volumes.
This is a bit off kilter simply because first 224 bytes will have more writes than the last 800(/4), but for those first 224 bytes, assuming every time you get to full, you erase all 224 and start fresh... (224*100000)/2=11,200,000 total volume saves. (This, can be optimized, by creating a larger ring)
So, upon init, you start reading the first 224 till you see the byte you wrote which is an invalid value, say a number below 224. Once you fill up all of them, you write them all to a value below 224 and start at 0 once again.
The second super easy option, is just write an odd pattern, and read until you get a value that's unexpected in 4byte chunks. So, read 0-256 until you hit a value that you expect, then go back 4 bytes to the last recorded, which would be your pointer. Assuming, (256*100000)/2=12,800,000 saves. Also, when doing your for loop, make sure to +4 per for performance reasons.
Now that I've written all of this, I suppose I probably could have coded it easier for an example... but let me know if this makes sense. I can probably whip something up, too.
Make a list with a counter and the volume level. The list may have (lets say) N entries. Find the highest counter when reading the volume level, and when writing write the next counter at the next entry of the list (and the volume value you need to safe).
The next counter is; (HighestCounter % 2N) + 1
The index in the list is; Index = (Counter - 1) % N
When the list is full restart filling from the start with counter value N+1 (this is implemented by using above formula(s)). Fill the list until (again) all used, the current counter values are N+1 to 2N.
When the list is full restart filling from the start with counter value 1. Fill the list until (again 🙂) all used, the current counter values are 1 to N.
When finding the highest counter in the list (to read the volume level or to write the next one) implement it so that 1...N is larger them N+1...2N.
Easy 🙂 (and simple)
Last edited:
maybe my last post underAfter not quite finishing my previous preamp project I decided to change some of the goals and build a new one. This is what I want in my new preamp:
- Compact
- Volume control
- A few inputs
- Start-up mute
- Good performance
- Remote control of input selection, volume and mute
- Quality, high resolution rotary encoder
- Nice design
- Something I can actually finish and use!
In this thread I'll pull together a few separate modules I've made and include build details, pictures, BOMs, measurements etc.
I'll also post full Eagle PCB schematics and layouts so people can use or change my designs. All PCBs were made by OSHPark. If anyone wants PCBs, I may have 1 or 2 spare (as the OSHPark minimum order is 3) or just download the Eagle files, upload them to OSHPark and order them yourself 🙂
http://www.diyaudio.com/forums/anal...d-rc-volume-control-kits-overview-wanted.html
is helpful to find suppliers for certainly devices
Hey maxw
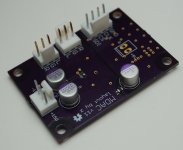
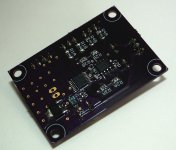
Thanks for all your help. I finally managed to complete my first mdac. I had only one bad solder after "finished it" on friday. Today I repaired that and it works now. Since this was my first ever smt work I think it is good enough.
Thanks for all your help. I finally managed to complete my first mdac. I had only one bad solder after "finished it" on friday. Today I repaired that and it works now. Since this was my first ever smt work I think it is good enough.
Attachments
Excellent, looks great! I'm so happy some people are using my design. How do you find it in use? Are you driving headphones or is this part of a preamp?
Hey maxw
Thanks for all your help. I finally managed to complete my first mdac. I had only one bad solder after "finished it" on friday. Today I repaired that and it works now. Since this was my first ever smt work I think it is good enough.
Today I just tested it if it works after repairs. Volume change is very nice with no clicking or other glitches. For now I found out if I use it without relay in front to mute it on start-up it clicks when code changes it to 0 but after that its OK.
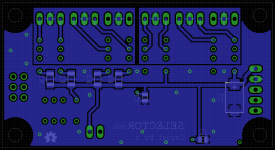
Sometime this week I should get selector PCB from oshpark and I already have all parts ready.
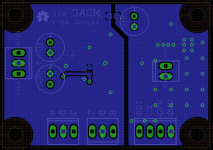
I also populated The Wire pcb today. So after that I should have working project but without a case. Amp for speakers will be TPA3116.
Code for controlling everything is almost finished just need to rewrite selector part. Maybe I'll play a bit more with fading on mute and stuff like that. But essentially display, ir, mdac and front panel buttons work.
mdac will be between selector inputs (2) and selector outputs (speakers, headphones). This will be my computer setup.
Sometime this week I should get selector PCB from oshpark and I already have all parts ready.
I also populated The Wire pcb today. So after that I should have working project but without a case. Amp for speakers will be TPA3116.
Code for controlling everything is almost finished just need to rewrite selector part. Maybe I'll play a bit more with fading on mute and stuff like that. But essentially display, ir, mdac and front panel buttons work.
mdac will be between selector inputs (2) and selector outputs (speakers, headphones). This will be my computer setup.
Finished my preamp based on your work this week:
More infos here: PREAMPuino
An externally hosted image should be here but it was not working when we last tested it.
An externally hosted image should be here but it was not working when we last tested it.
More infos here: PREAMPuino
Last edited:
200x112 are a bit too small.Finished my preamp based on your work this week:
An externally hosted image should be here but it was not working when we last tested it.
An externally hosted image should be here but it was not working when we last tested it.
More infos here: PREAMPuino
Any chance of attaching some more resolution and some internal shots as well?
200x112 are a bit too small.
Any chance of attaching some more resolution and some internal shots as well?
Please visit this link: PREAMPuino
you will have 4128*2322 resolution by left clicking on the photos.
@maxw: agreed for the network interface, it is programmed with very light interface that allow execution on any devices: computer, android phone, iphone, etc...maxw said:Nice, john_lenfr! I like the network control.
I choose not to use complicated stuff for this.
And you can also control the preamp by simple URL:
For example:
url: http: //XXX.XXX.XXX.XXX/?power=1
will put the preamp ON
url: http: //XXX.XXX.XXX.XXX/?power=0
will put the preamp OFF (in stadby mode)
url: http://XXX.XXX.XXX.XXX/?Input_number=2
will put the preamp on input 2 (bluetooth in my case)
By chaining these commands like cli commands you can manage your preamp with schedule tasks.
So for the morning I programmed schedule to wake up with my favorite radio: I programmed an alarm clock on my Logitech Squeezebox and do a schedule job with my windows server like this:
- power on the preamp: http: //XXX.XXX.XXX.XXX/?power=1
- wait 10s
- select source 1 (squeezebox in my case): http: //XXX.XXX.XXX.XXX/?Input_number=1
- wait 1s
- set volume to "150"*:http: //XXX.XXX.XXX.XXX/?volume=150
- just in case, unmute the preamp: http: //XXX.XXX.XXX.XXX/?mute=0
Cheers 😉
*"n" can be set from 1 to 255 so with formula you will have -95 to +31 db.
Last edited:
I can click on your pics and they come up the same size.
I view properties and it confirms 200 x 112 pixels.
Attach a bit bigger please.
I view properties and it confirms 200 x 112 pixels.
Attach a bit bigger please.
I can click on your pics and they come up the same size.
I view properties and it confirms 200 x 112 pixels.
Attach a bit bigger please.
Hello AndrewT, here are Hi Res photos:
http://johnlenfr.1s.fr/PHOTOS/Realisations/Electronique/arduino/2015-12-10-PGA2311/PGA2311-01.jpg
http://johnlenfr.1s.fr/PHOTOS/Realisations/Electronique/arduino/2015-12-10-PGA2311/PGA2311-02.jpg
http://johnlenfr.1s.fr/PHOTOS/Realisations/Electronique/arduino/2015-12-10-PGA2311/PGA2311-03.jpg
http://johnlenfr.1s.fr/PHOTOS/Realisations/Electronique/arduino/2015-12-10-PGA2311/PGA2311-04.jpg
http://johnlenfr.1s.fr/PHOTOS/Realisations/Electronique/arduino/2015-12-10-PGA2311/PGA2311-05.jpg
http://johnlenfr.1s.fr/PHOTOS/Realisations/Electronique/arduino/2015-12-10-PGA2311/PGA2311-06.jpg
http://johnlenfr.1s.fr/PHOTOS/Realisations/Electronique/arduino/2015-12-10-PGA2311/PGA2311-07.jpg
http://johnlenfr.1s.fr/PHOTOS/Realisations/Electronique/arduino/2015-12-10-PGA2311/PGA2311-08.jpg
http://johnlenfr.1s.fr/PHOTOS/Realisations/Electronique/arduino/2015-12-10-PGA2311/PGA2311-09.jpg
http://johnlenfr.1s.fr/PHOTOS/Realisations/Electronique/arduino/2015-12-10-PGA2311/PGA2311-10.jpg
http://johnlenfr.1s.fr/PHOTOS/Realisations/Electronique/arduino/2015-12-10-PGA2311/PGA2311-11.jpg
http://johnlenfr.1s.fr/PHOTOS/Realisations/Electronique/arduino/2015-12-10-PGA2311/PGA2311-12.jpg
http://johnlenfr.1s.fr/PHOTOS/Realisations/Electronique/arduino/2015-12-10-PGA2311/PGA2311-13.jpg
http://johnlenfr.1s.fr/PHOTOS/Realisations/Electronique/arduino/2015-12-10-PGA2311/PGA2311-14.jpg
http://johnlenfr.1s.fr/PHOTOS/Realisations/Electronique/arduino/2015-12-10-PGA2311/PGA2311-15.jpg
http://johnlenfr.1s.fr/PHOTOS/Realisations/Electronique/arduino/2015-12-10-PGA2311/PGA2311-16.jpg
- Home
- Source & Line
- Analog Line Level
- Building a complete Preamp with an Arduino, remote, volume and input control