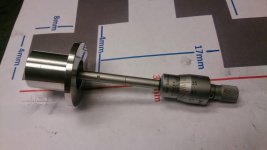
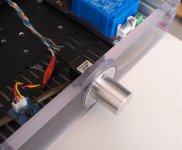
So I then started to search for something a bit more precise to convert a 6.35mm shaft to a 6mm hole ...
You can connect two shaft diameters with a bit of heat shrink tube (especially the type that has glue inside).
Here's a new version of my Arduino code.
Features:
Features:
- Controls MDAC attenuator - Converts dB values to DAC level, removes duplicate steps
- Controls Input Selector - Cycles through inputs, start-up mute, control via remote
- Save volume level - Since the EEPROM has limited write life I've set it to only save if the volume has been changed to a new value and if 60 seconds has passed
- Fade to saved volume on start up - This will slowly fade to the saved level. It's done in the main loop so it can be interrupted by the encoder or remote
- Encoder and remote increment amounts can be set separately
- A debug setting - Will print helpful debug information if enabled
Attachments

I'm still watching this project with interest. I have something very similar working now - a digital preamp (spdif/analog inputs, analog+spdif output) that I put together using some miniDSP products. I have the GUI fully developed for a 16x2 LCD (works with 20x2 also). The only thing I have left to do is implement the volume and switching, but I have the parts in hand for this and just need to solder on some headers to the PCBs... When the project is 100% done I will post details including Arduino code.
RE "Save volume level" - I have a SETUP menu in my GUI where you can save the current input or current volume to EEPROM as the "startup" input/vol. The user has control of when to do this, usually only one time. I don't see why you would want to continually save the volume setting... what is the rationale behind that? I see that you don't have a display... maybe you could save the volume only when the front panel knob is held in for >10sec or something like that (assuming it is a rotary encoder with pushbutton).
RE "Save volume level" - I have a SETUP menu in my GUI where you can save the current input or current volume to EEPROM as the "startup" input/vol. The user has control of when to do this, usually only one time. I don't see why you would want to continually save the volume setting... what is the rationale behind that? I see that you don't have a display... maybe you could save the volume only when the front panel knob is held in for >10sec or something like that (assuming it is a rotary encoder with pushbutton).
Last edited:
Perhaps it will be better if you save the volume when you turn off the device and only if current volume is different from the last saved one.RE "Save volume level" - I have a SETUP menu in my GUI where you can save the current input or current volume to EEPROM as the "startup" input/vol. The user has control of when to do this, usually only one time. I don't see why you would want to continually save the volume setting... what is the rationale behind that? I see that you don't have a display... maybe you could save the volume only when the front panel knob is held in for >10sec or something like that (assuming it is a rotary encoder with pushbutton).
I guess it isn't very "ergonomic" if you need to decide when to save the volume, unless you are configuring the device for the first time.
Hello Max,
I've got something for you....
Amazing! Can't wait to try it 😀
I'll be posting more in the coming weeks.I'm still watching this project with interest.
So this is just being able to set the default startup setting, which is fine and would work well too.RE "Save volume level" - I have a SETUP menu in my GUI where you can save the current input or current volume to EEPROM as the "startup" input/vol. The user has control of when to do this, usually only one time.
The rationale is that it mimics a pot. ie when you move a pot, it stays at that setting during power on/off. I think high end digitally controlled preamps have this feature.I don't see why you would want to continually save the volume setting... what is the rationale behind that?
This is not possible. How would the Arduino know when the device is going to be powered off? The power switch is on the mains line, it doesn't have soft-off as this adds way to much complexity.Perhaps it will be better if you save the volume when you turn off the device and only if current volume is different from the last saved one.
You don't need to decide, that's the point. The Arduino will save the setting and restore it, there is no need for the user to do anything.I guess it isn't very "ergonomic" if you need to decide when to save the volume, unless you are configuring the device for the first time.
Ok...my bad 😱... I didn't read all the thread and I suposed the preamp was going to have a soft-off.This is not possible. How would the Arduino know when the device is going to be powered off? The power switch is on the mains line, it doesn't have soft-off as this adds way to much complexity.
I'm working in my own project very like this one, and I am designing a soft-off because I can use it to turn off/on the preamp by using a remote control.
Would be nice if it was more general. It seems that I'm forced into a lane of products.
The next one might be more modular with the control totally independent of the preamp I choose to work with. Nice effort anyway.
Regards
The next one might be more modular with the control totally independent of the preamp I choose to work with. Nice effort anyway.
Regards
The modules I've designed are not products and are not for sale. I am just posting my schematics and layouts so others can change or use them if they wish.Would be nice if it was more general. It seems that I'm forced into a lane of products.
I don't know how this could be more modular, every module is separate and could be controlled by any microcontroller. Perhaps you should design your own preamp...The next one might be more modular with the control totally independent of the preamp I choose to work with.
I would like soft-off but don't have the room in this enclosure. Post pics of yours when it's complete, it sounds good 🙂Ok...my bad 😱... I didn't read all the thread and I suposed the preamp was going to have a soft-off.
I'm working in my own project very like this one, and I am designing a soft-off because I can use it to turn off/on the preamp by using a remote control.
Yep... take it for sure 😉... but it will take some more time...Post pics of yours when it's complete, it sounds good 🙂
Finished
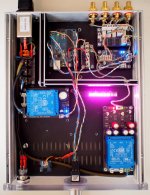
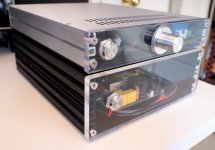
This is my last update as I think it's now complete 🙂
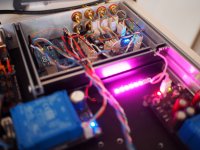
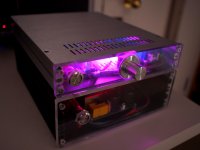
I've removed one of the 5V PSUs as it wasn't required and added a strip of 8 NeoPixels. These are controlled by the Arduino using a single data pin. I decided to use the NeoPixels because I think they look a bit nicer than LCDs which usually look a little cheap IMO. Using some smart colour fading/flashing/pulsing they can indicate input changes, mute and volume level. The NeoPixels will:
- Fade from blue to red as volume increases.
- Flash (very quickly) when changing inputs.
- Flash green when mute is enabled.
They are controlled by an 800 KHz bitstream. Initially I was worried that this would impact audio measurements since the DAC IC is sharing power/GND (that's why I used an SPI isolation IC on the MDAC) but while I can see it in Arta, it doesn't go higher than -140dB.
Final version of Arduino code is attached. I'm surprised how responsive the Arduino is. The volume and NeoPixel colour changes instantly when rotating the encoder, even when I do it really fast. I was worried that the amount of math I was having to do in the main loop when changing the volume level would slow it down but not at all!
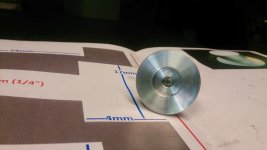
Big thanks to Pjotter for the custom aluminium knob that allowed me to get rid of the annoying shaft size adapter thing.
So there's my preamp from design to build to completion. With schematics, layouts and measurements posted too.
This is my last update as I think it's now complete 🙂
I've removed one of the 5V PSUs as it wasn't required and added a strip of 8 NeoPixels. These are controlled by the Arduino using a single data pin. I decided to use the NeoPixels because I think they look a bit nicer than LCDs which usually look a little cheap IMO. Using some smart colour fading/flashing/pulsing they can indicate input changes, mute and volume level. The NeoPixels will:
- Fade from blue to red as volume increases.
- Flash (very quickly) when changing inputs.
- Flash green when mute is enabled.
They are controlled by an 800 KHz bitstream. Initially I was worried that this would impact audio measurements since the DAC IC is sharing power/GND (that's why I used an SPI isolation IC on the MDAC) but while I can see it in Arta, it doesn't go higher than -140dB.
Final version of Arduino code is attached. I'm surprised how responsive the Arduino is. The volume and NeoPixel colour changes instantly when rotating the encoder, even when I do it really fast. I was worried that the amount of math I was having to do in the main loop when changing the volume level would slow it down but not at all!
Big thanks to Pjotter for the custom aluminium knob that allowed me to get rid of the annoying shaft size adapter thing.
An externally hosted image should be here but it was not working when we last tested it.
So there's my preamp from design to build to completion. With schematics, layouts and measurements posted too.
Attachments
You might think that finding a quality high resolution rotary encoder would be simple but it's not! There are tons of low resolutions ones available that are 32 PPR or less but once you've used a nice high res encoder the others feel really cheap.
If you have around 200 volume steps then it would take about 6 rotations to use the full range, which I find annoying. I tried two encoders:
Bourns EN series at 128PPR
An externally hosted image should be here but it was not working when we last tested it.
Bourns EM14 at 64PPR.
An externally hosted image should be here but it was not working when we last tested it.
128 PPR is I think this is about as high as you can go and still (just) be able to adjust by a single pulse. Both of these Bourns models are "designed for audio" and the feel of them is really nice compared to the cheap encoders. Also, they don't need debouncing at all in hardware or software.
Hi Maxw,
Can these encoder be used on your original http://www.diyaudio.com/forums/analog-line-level/173270-my-preamp-project-arduino-i2c-relay-selector-attenuator-tube-stage.html?
Yes, they just interface with the Arduido.Hi Maxw,
Can these encoder be used on your original http://www.diyaudio.com/forums/analog-line-level/173270-my-preamp-project-arduino-i2c-relay-selector-attenuator-tube-stage.html?
If you've got a spare board, I'll take one and pay for postage.
I've also got an arduino/ bluetooth / android / preamp project that I'd like to work on.
I've also got an arduino/ bluetooth / android / preamp project that I'd like to work on.
Arduino controlled (I2C) pre-amp
Hi,
Working on an Arduino controlled pre-amp as well. I have my prototypes working and am about to install in my Honda Pilot.
It has been a fun project although it took longer than I expected to write the code to control the IC I picked (TDA7419).
I read the thread above with interest. I picked the TDA7419 because it has four output channels (plus subwoofer) from stereo inputs (three stereo inputs).
See this page for pictures, notes, progress and soon example code.
https://www.facebook.com/ArduinoAudio?focus_composer=true&ref_type=bookmark
- Home
- Source & Line
- Analog Line Level
- Building a complete Preamp with an Arduino, remote, volume and input control