

that envy ..... I'm bursting !!🙁............. Then off to the CNC router. You can never have too many hobbies!


Hopefully last schmtc edit 🙂
changed (officially) R4 and R5 to 39R (from 27R)
- to cover broader range of input critters Idss
will beg Mods to replace schmtc in post #1 with these two
changed (officially) R4 and R5 to 39R (from 27R)
- to cover broader range of input critters Idss
will beg Mods to replace schmtc in post #1 with these two
Prepared The aluminum bracket for the SIT. It is advisable to use thermo-conductive paste to connect it to the heatsink. A question: the surface of the heatsink is anodised. Is it necessary to perform the abrasion of the contact surface between the two elements?
Attachments
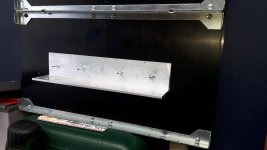
some sanding can't harm , though no need to make it fully silvery
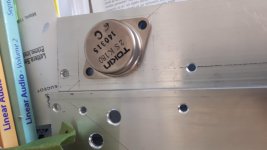
besides that - take care of using big washers on L bracket - these 4 bolts we see , same as spring washers
L bracket minimum 4mm thick , 5 even better
besides that - take care of using big washers on L bracket - these 4 bolts we see , same as spring washers
L bracket minimum 4mm thick , 5 even better
..............take care of using big washers on L bracket ................
surely ........ the bolt is too little
surely ........ the bolt is too little
see Plethora of bolts : Papa’s Koan (M)2 , an amp for living room | Zen Mod Blog
don't forget to check Plethora on yootoobe

don't forget to check Plethora on yootoobe
no, I'm on business travel ... so only at weekend and the enclosure will be take the longest time. :-(
Attachments

My Sissy fish😀
Hoi!
I may have to do a BabelFish/SissySIT just so I can put that logo on the front.
Hoi!
I may have to do a BabelFish/SissySIT just so I can put that logo on the front.
Yep. 😀
I'll have a light panel in plexiglas....
Something like this
Attachments


Last edited:
catch is ........ Mikorist (Webhamster of Baby DiyA) will have front plate logo approved by builder of his SissySIT
and it'll not be Babelfish

and it'll not be Babelfish
- Home
- Amplifiers
- Pass Labs
- Babelfish M25, SissySIT - general building tips and tricks