Thank you dear Taj...once and once again.
You're welcome. Merry ho ho ho. 😉
..Todd
Thank you all folks..family is arriving and i will have a warm Christmas together
my girls.
thank you all...was nice to have you around this last year.
Coolet, Studio, A square, A. Wayne and dear Taj.
regards,
Carlos
my girls.
thank you all...was nice to have you around this last year.
Coolet, Studio, A square, A. Wayne and dear Taj.
regards,
Carlos
I deeply understood what you mean..the water of course
very good to swim..no doubts about.
regards,
Carlos
very good to swim..no doubts about.
regards,
Carlos

Hi,
I uploaded the file to this address: http://www.nabucoeletronica.com.br/dx/files/Esquema-universal-english.pdf
I uploaded the file to this address: http://www.nabucoeletronica.com.br/dx/files/Esquema-universal-english.pdf
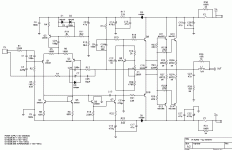
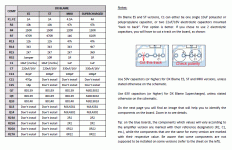
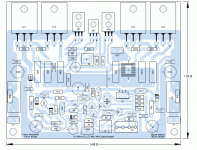
Files uploaded by Mitchel are pdfs showing Supercharged blue board
also the part's substitution chart to match each model and a schematic.
A nice work he made..this way, you can build the model you want and these pdfs will help a lot.
Here you have the images..but reduced ones..search for better images using the link Mitchel provided.
regards,
Carlos
also the part's substitution chart to match each model and a schematic.
A nice work he made..this way, you can build the model you want and these pdfs will help a lot.
Here you have the images..but reduced ones..search for better images using the link Mitchel provided.
regards,
Carlos
Attachments
Last edited:
I am asking Greg Erskine (Gerskine) to include these image in his pages
dedicated to Dx amplifiers...our tradicional and main reference site:
Greg's Web Site
regards,
Carlos
dedicated to Dx amplifiers...our tradicional and main reference site:
Greg's Web Site
regards,
Carlos
Uncle Carlos,
Greetings.
I"ve a problem with my DX blame es build.
There's 2 DC V and 11 DC V at the output
Supply Voltage +/- 32 DC,
I measure 1.5V at the 100R (fuse out the socket)
I've rechecked all component and soldering, they all seems ok
What should I look first?
Many thanks in advance
Greetings.
I"ve a problem with my DX blame es build.
There's 2 DC V and 11 DC V at the output
Supply Voltage +/- 32 DC,
I measure 1.5V at the 100R (fuse out the socket)
I've rechecked all component and soldering, they all seems ok
What should I look first?
Many thanks in advance
Increase your stand by current to the standard of 4.7V over 100 ohms resistance
and check your off set once again.
Check transistors position, how you have inserted them into the board, or base, colector and emitter position... check if PNP is in PNP's placa and if NPN is in NPN place.
For sure there's a mistake, off set is smaller than 25 milivolts, usually 3 milivolts and sometimes smaller.
Adjusting you will check if your bias adjustment is operating too.
You have checked, but for sure was not a deep check, because you have not found errors..and for sure they exist.
Good luck,
regards,
Carlos
Member
Joined 2009
Paid Member
check if PNP is in PNP's placa and if NPN is in NPN place.
I've been there and done one that before!

Greetings Carlos, I'd like to wish you and your family a healthy and rewarding 2011....
Thank you dear Bigun
I wish the same to you, and also to the whole audiophile community.
regards,
Carlos
I wish the same to you, and also to the whole audiophile community.
regards,
Carlos
Uncle Carlos,
Thank you for the kind help
Yes,, there's mistakes and Im still looking for it
Hopefully , Uncle Carlos Can help me
Increasing the bias on one of the amplifier module (the one with 2V Dc offset) resulted in 0 5 DC V at the o/p but the supply voltage drop to 25V DC
The other module the one with 11v dc offset) the bias won't set correctly
and check your off set once again.
Check transistors position, how you have inserted them into the board, or base, colector and emitter position... check if PNP is in PNP's placa and if NPN is in NPN place.
For sure there's a mistake, off set is smaller than 25 milivolts, usually 3 milivolts and sometimes smaller.
Adjusting you will check if your bias adjustment is operating too.
You have checked, but for sure was not a deep check, because you have not found errors..and for sure they exist.
Good luck,
regards,
Carlos
There are several mistakes that can produce this defect
The combination is really big... if you install, for instance, two BD140 at the driver's position..then you gonna have something alike you have.
Also one diode wrong way, the 1N4148 can result in off set from 2.8 to 3.5 volts, depending your supply and other mistakes and adjustments.
Do not try to discover, there are so many possibilities that check each one of them will be waste of time.
Check all your transistors position, if NPN is in the NPN's place...also if PNP are in PNP's places... check if the correct transistor is used...measure if they are good...remove them from the board to test them....check invertions in the small ones...are BC546 in their correct place?.... check it..... if you're using Blue boards, then you have to use 2N5401 and 2N555 or you gonna face troubles..they have coletor and emitter all the way round related the BC546/556.... cannot use BC546/556 in the blue board...also cannot use 2N5401/5551 in the Brazilian green boards or in Todd Johnson's layout (first layout published..the one has beautifull board image, an enhanced image).
After check all transistors..then check resistances...measure them...all them.... understand that they are in the circuit and will measure the correct value or LESS than the correct value because they are in parallel with other parts in the circuit..better to lift one resistance side to check.
Check condensers polarity and value..check diodes polarity and values..check solder below the board...ressolder and use a a magnified glass to observe if you left solder to be made or if you have shorts between leads or copper tracks (happens a lot).
Take it easy and relax...for sure the amplifier is not a bad guy..it works fine and it is tested...soon you gonna find what is wrong..but disengage your intelligence..this increases debugging time.... engage hard work, put energy and patience and check everything.
Make a copy of your schematic..print it..then you go painting with a red pencil or pen, all connections and parts checked..do it till you check everything... search for mistakes till you find them...because for sure they exist.
Do not try to analise... this was statistically proven that takes too much time..waste of time..there are too many possibilities of mistakes..to check each one of them will take 50 times more time than removing parts and measuring them.
regards,
Carlos
good advice in post335.
Check and recheck voltages at devices and compare to the correct/expected voltages of a working circuit.
When you find an anomaly concentrate on taking more measurements around that/those component/s. Check currents through resistors, check Vbe of transistors etc.
And power it through a bulb tester.
That bulb tester will not save a device if you accidentally short with your DVM probes, but it will prevent overheating in the quiescent circuit.
Uncle Charlie,
Andrew T gave you a thumbs up 😱 yes 2011 looking good ... 😀
All the best for the New Year to you and all here , yes you too Andrew 🙂 All the best.
Cheers..
Andrew T gave you a thumbs up 😱 yes 2011 looking good ... 😀
All the best for the New Year to you and all here , yes you too Andrew 🙂 All the best.
Cheers..
I wish your most sweet dreams become true dear A wayne
A happy new year to you.
regards,
Carlos
A happy new year to you.
regards,
Carlos
Hello Mr.Carlos I would like to wish you and your family a most joyious new year for 2011.😀 Its great to be ouit of the hospital,again. Now maybe I can catch up on the projects I,ve started. Happy New Year EveryonePeace and Love Evette
You will be distant from hospital for a very long time now
This is my best wish to you...special hug to my niece Evette.
Merry Christmas....i was missing you....so.... you must stay with us.
That Anjos and Arcanjos guarantee your recovery and healing....more vains will grow up into your circulating system.
regards,
Carlos
This is my best wish to you...special hug to my niece Evette.
Merry Christmas....i was missing you....so.... you must stay with us.
That Anjos and Arcanjos guarantee your recovery and healing....more vains will grow up into your circulating system.
regards,
Carlos
Last edited:
- Status
- Not open for further replies.
- Home
- Amplifiers
- Solid State
- Are you ready to face strong emotions?.. Dx Blame MKII and the Supercharged release!