Here is a link to the knife. It's OK. Still need a steady hand otherwise it'll just cut a zigzag line (still parallel though!). https://www.amazon.com/dp/B0006O5K6O?ref=fed_asin_title
It advertises 1/16th spacing but i only got 1/8 until I tweaked it a bit. Nice crispy lines and a huge time saver.
It advertises 1/16th spacing but i only got 1/8 until I tweaked it a bit. Nice crispy lines and a huge time saver.
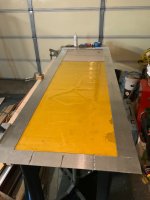
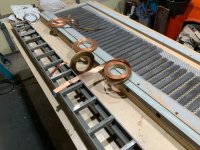
Pete as per our tex on laying down the kapton here’s a better visual understanding of what you will doing
this is a duetta signature panel BTW
kapton stickiy side up
After laying the kapton on the flooded foil immediately take a blade and cut the kapton at the edges to remove the frame
then roll out excess fluid with a 1” roller then starting at the center at a cross angle, start squeezing
the windex out to the edges
Attachments
Thanks David for the additional photos. You say "kapton sticky side up" what do you mean? do you mean keep it sticky side up while flooding the foil with windex (non ammonia based I imagine) then flip the frame over and lay it down and squeegee out the bubbles?
You must have the sticky side placed on the foil and when the fluid is squeezed out it will adhere to the foil
So when you start your layup unroll the kapton with its sticky side facing up and then the frame is placed and pressed around
its edges too capture the sheet then turned over and ready to place on top of your foil covered with the windex
So when you start your layup unroll the kapton with its sticky side facing up and then the frame is placed and pressed around
its edges too capture the sheet then turned over and ready to place on top of your foil covered with the windex
AH Now I get what you are saying. Lay it on another surface, sticky side up and then adhere the frame to it. My idea was (and it may not work) would be to mount the roll to the wall using some wire, and then pull it free and while taught, adhere it to the frame while it's on a table or on the ground. I'm sure your idea makes more sense!
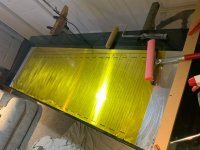
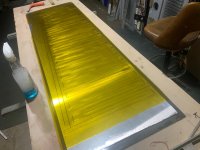
OK. Kapton laid. Lessons learned, but I can't say it's terrible for my first panel. I think it's viable, albeit a little on the ugly side.
I tried using a frame to apply it (like how AVWERK did) but instead I had more luck simply drenching both the kapton and foil with windex and wet applying by just draping it on top then squeegee-ing. I got most of the wrinkles out. Some of the kapton got scraped away / damaged in areas that will be under a clamp. I could do what Apogee did and simply put a piece as a "patch" in those sections if I wanted to. I think after corrugating and putting the clamps on, it will be viable.
I got a nice 2 ohms when running in series, each voice coil is 1 ohms exact.
Attachments


i found the frame to work for me but goes to show there are other ways to skin a cat.
Lessons learned on your first will now benefit the other side.
The tear from the squeegee edge while trying to get the fluid out was something
I almost did this myself and just rounded the rubber edges to lesson this.
Using a 1” paint roller first will help to get most of the fluid out before the final pass
with the squeegee
Agreed. Once I embark on the other panel I will use what I learned and see how that goes. I endeavor to have all perfectly parallel lines, less cutting errors (slow down, sharper blade) and a better kapton application process in preparation for corrugation. If it turns out 100% better I will may re-do this panel. Thanks for all of your help and wisdom sharing!
This one is even more viable. After the first panel, I went on a mission to build a mirror panel for the other speaker but exploring new techniques that I learned along the way. Some mess-ups on the sides as you can see but that shouldn't cause any problems as these will be under glue and clamps. Going to try to make a few more.
Welp - lost interest and energy in this one. It's now in AVWERK's capable hands. He's promised us quad-sided bass ribbons made of pure gold foil, efficiency 105dB and 8 ohms with quantum-infused AI driven neodymium magnets. Grab popcorn, stay tuned...
AI robots became self aware and are now on strike so it’s back to manual labor..
On these Scintilla 1/4 ohm versions the crossovers will be placed outside (ala Diva style) instead of inside the big open
area off to the side of the bass section so I can narrow down the look of the speaker
New bass diaphragms made with the connection points placed at the bottom for easy connections to the x-over box
The series mid foil resistor will be either folded or a new one made to accommodate the narrower baffle, not sure yet
New 1 inch MDF chassis along with horizontal stiffening legs for the bass magnet structure
The mid/twt array had a lot of rust so this will disassembled / repainted, and the ribbons will go into an ultrasonic bath
The aluminum foil return paths of the mid/twt array will be changed out to copper foil and instead of the washer and bolt connections, I will try and solder the copper to aluminum points together. I have purchased a special solder and specificflux, and will have to test this out first
if it’s possible or not
(FWIW - I did notice a .110” different set back or tilt of the top mid/twt connection points of the ribbons inside the magnetic field. not sure why this was done )
Attachments

A possible N52 separate build based on a scintilla based architecture
I purchased 600 of these 6mm X 18.5mm X 35mm neos
and this is just a mock up of the mid Tweeter array concept, and haven’t determined the overall length yet
or how I will lay out the bass ribbon structure
magnets originally were to be used in Vegas slot machines !
I purchased 600 of these 6mm X 18.5mm X 35mm neos
and this is just a mock up of the mid Tweeter array concept, and haven’t determined the overall length yet
or how I will lay out the bass ribbon structure
magnets originally were to be used in Vegas slot machines !
Attachments
btw guys just a heads up
foil from the grocery stores is now often coming in hard temper form. Im not sure if the larger longer rolls in big box is coming that way but the standard stuff on the shelf at the mart is
it used to ALL be dead soft (doesn't hold corrugations well as the yield strength is so low)
BUT lately I am seeing hard temper on the rolls from the grocery store
Al foil is often hard temper from the mill, then they heat treat to anneal it to soft temper for food use
as with many things today manufactures are cutting cost wherever they can and I suspect they are now simply not doing the heat treat to make it dead soft
theres basically two thicknesses
standard foil is about .0007" and "heavy duty" is around .001"
BTW I believe the Stage MRT uses .0007"
Also if your MRT ever sees too much power it may have been annealed. I re corrugated the mrts on a misused pair of stages once but they seemed to have lost their temper.
Also I cannot explain this one but I have a small roll of the kapton / foil I got from Lamart years ago when Apogee folded. I believe Apogee used this in the stage .0007"foil/ .0003"kapton/ silicone adhesive It has been in storage for years. It was not a temperature controlled storage so it was subject to temp swings of winter summer in NY state. It lost its temper over the years. Strange. Im not sure how that can happen
I have never used the soft temper for any bass panels I made, but it’s good to know the store bought stuff might now be
appropriate for making mids or twt ribbons.
What market brand of foil are we talking about as I would like to check it out ?
The scintilla twt are .0005” pure foil with no kapton on either mid or twt
The previous 1 ohm pair I restored did just fine with retensioning and has stayed stable now for years. I don’t drive them at insane
levels and at 5 foot lengths you have plenty of heat sinking available to resist that temp transition but anything’s possible
- Home
- Loudspeakers
- Planars & Exotics
- Anyone making Apogee bass panels?