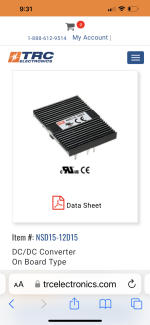
I went back a little further in the thread and found where Billyk mentioned/planned to use a meanwell NSD15-12d15 and PO89ZB from the diy audio store as a means to power the Muses control boards. So I’ll look into that too. It looks like the NSD15 can take the 24v from the wall wart and give me +-15v to drive the Muses. @billyk, I know I’m referencing an old post but did you have any luck implementing the muses volume control with the NSD15 and PO89ZB? Any input would be very helpful to me.Hey!
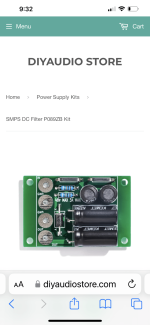
The plan is to incorporate the muses. The linear ps is something I had, I’ll be using a Meanwell IRM 60 24 as the main ps, and Meanwell NSD 15 for the +/- 14 muses ps. Also be using some of the PO89ZB filters from the store. I love the naked board look so will make it remote with umbilical. Still working on mounting the muses in an attractive way.
Thanks
Attachments
I’m finding that to be the case. I’m using the acp+, the 6-24 crossover and Amp Camp Mini to drive a pair of selenium d220ti compression drivers. The mini have has won me over. The top end end is sounding pretty good right now.My acp+ was used with the amp camp mini driving a set of 98db sensitive horns for a while. It's far better than it has any right to be.
Just switched the speakers to John Busch's Ultras which have an easy impedance load but are fairly low sensitivity ... somewhere in the mid to low 80's. Using a tpa3255 class d amp on that speaker. The acp+ sounds good in that mix, too.
Like it with headphones, too.

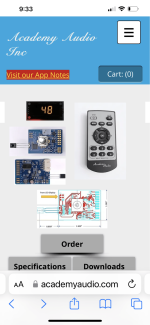
Update! Lenny at Academy Audio has added App note AN103 re ACP+ on their website https://www.academyaudio.com/_files/ugd/6fd7ca_3876d742313c411688abbd0b08f2703e.pdf.
I’m going to try to work through it. Anyone else interested?
I’m going to try to work through it. Anyone else interested?

This is one of the nicest pairings I have heard....ACP + MHDT NOS Dac with Rosson RAD "0"s....
Just simply amazing!

Just simply amazing!
dajack761 - apologies, only now seeing your post. And thanks for the nice words.
I used two DIYINHK power supplies I had from a previous project I scrapped. One was used for the ACP+, the other for Lenny’s VCX Muses kit.
The ‘big’ toroid is an Antek AS-0518 which feeds an LT-3045 based +/- 9/12/15V DIYINHK power supply kit. Found under ‘Audio Kits’ on their site. That kit comes as two rails with the + of one rail connected to the - of its identical neighbor to give the bipolar output. It’s also too high, once assembled, to fit the 1U height chassis I used so I cut the board in half, separating the two rails and then put them back-to-back and wired in series at the 12V setting to give the required 24V for the ACP+. The DIYINHK board has chokes rated at 500mA so no issue with the around 330ma the ACP+ pulls. Toroid is a bit of overkill at 50VA but I had it on hand so didn’t bother to buy a smaller toroid.
Smaller toroid is also an Antek, AN-0115, and used to supply a DIYINHK Classic Reference kit. It’s found under the ‘Outlet’ link on the DIYINHK site. I replaced the DIYINHK 5V regulators with a 12V 7812 and a -12V 7912 I had and wired them to give a bipolar +/- 12V output to feed the Academy Audio Muses board. Although Lenny sells and recommends a +/-15V PS for the VCX, a read of his VCX specs points out the VCX power requirement is +/- 9-16V and power draw is something like 15mA (from memory) so all good there, voltage-wise and power consumption-wise too.
Hope this helps. Go for it - it’s a very musical pre. It’ll seduce you…
Derek
Edit - forgot to mention, if you use Lenny’s kit you’ll need to use two 470k resistors in place of the Alps pot. Visible where the pot was originally in my photos.
Last edited:
Hi Derek,
Thank you so much for the detailed reply. That info will be very helpful. I’ve ordered all the parts so I’m just waiting for them to arrive then I’ll dive in. I bought and upgraded external power supply from a member her for my aca mini that I want to repurpose this set up. In the mean time I’ve put a little time into my repurposed chassis. Per the measurements of volume/infra red receiver board it should line up well with display window. This has been such a fun project.
Thank you so much for the detailed reply. That info will be very helpful. I’ve ordered all the parts so I’m just waiting for them to arrive then I’ll dive in. I bought and upgraded external power supply from a member her for my aca mini that I want to repurpose this set up. In the mean time I’ve put a little time into my repurposed chassis. Per the measurements of volume/infra red receiver board it should line up well with display window. This has been such a fun project.
It’s easy to extend the IR receiver if you need to.
Post your progress. Many ‘in between’ projects live vicariously off other’s projects…🙃. And learn new things.
Time spent planning and laying out projects is the most fun to me - almost feel disappointed when it’s all done!
Enjoy yours.
Post your progress. Many ‘in between’ projects live vicariously off other’s projects…🙃. And learn new things.
Time spent planning and laying out projects is the most fun to me - almost feel disappointed when it’s all done!
Enjoy yours.
Gretting from MADAGASCAR.
My project is not finished yet but it sound already very good to me ( My first HPA). I use it with beyerdynamic DT900PRO X
To do list 🙂:
Thank to M. PASS for his design


My project is not finished yet but it sound already very good to me ( My first HPA). I use it with beyerdynamic DT900PRO X
To do list 🙂:
- PCB for the controller ( PIC16F18346)
- Add IR receiver code in the software
- Do an enclosure ( very difficult 😉 )
Thank to M. PASS for his design
Attachments
Last edited:
Hey Derek,dajack761 - apologies, only now seeing your post. And thanks for the nice words.
I used two DIYINHK power supplies I had from a previous project I scrapped. One was used for the ACP+, the other for Lenny’s VCX Muses kit.
The ‘big’ toroid is an Antek AS-0518 which feeds an LT-3045 based +/- 9/12/15V DIYINHK power supply kit. Found under ‘Audio Kits’ on their site. That kit comes as two rails with the + of one rail connected to the - of its identical neighbor to give the bipolar output. It’s also too high, once assembled, to fit the 1U height chassis I used so I cut the board in half, separating the two rails and then put them back-to-back and wired in series at the 12V setting to give the required 24V for the ACP+. The DIYINHK board has chokes rated at 500mA so no issue with the around 330ma the ACP+ pulls. Toroid is a bit of overkill at 50VA but I had it on hand so didn’t bother to buy a smaller toroid.
Smaller toroid is also an Antek, AN-0115, and used to supply a DIYINHK Classic Reference kit. It’s found under the ‘Outlet’ link on the DIYINHK site. I replaced the DIYINHK 5V regulators with a 12V 7812 and a -12V 7912 I had and wired them to give a bipolar +/- 12V output to feed the Academy Audio Muses board. Although Lenny sells and recommends a +/-15V PS for the VCX, a read of his VCX specs points out the VCX power requirement is +/- 9-16V and power draw is something like 15mA (from memory) so all good there, voltage-wise and power consumption-wise too.
Hope this helps. Go for it - it’s a very musical pre. It’ll seduce you…
Derek
Edit - forgot to mention, if you use Lenny’s kit you’ll need to use two 470k resistors in place of the Alps pot. Visible where the pot was originally in my photos.
I see in your picture where you replaced the volume pot with the 2 470k resistors.
In Lenny’ write up he says to replace the resisters 150k ohm resistors at R2 and R3 with 470k ohm resistors. Did you install a total of 6? Im a bit confused.
Attachments

I left the ACP+ circuit as NP designed it. The original ACP+ Alps pot is the input impedance seen by whatever is plugged into the input jacks.
Lenny advises that the MUSES chip has better channel balance into a 470k load. So I simply put the 470K resistors where the Alps pot would have been.
Lenny advises that the MUSES chip has better channel balance into a 470k load. So I simply put the 470K resistors where the Alps pot would have been.
Thanks Derek. Where did you connect the input and output to/from on the muses board? Where did you ground the output of your +-15v power supply? I ask because Lenny seemed to be pointing to a point in between c8 and c9 as the star ground point in his instructions but not sure where to connect.
Attachments

Once the positive wires from the input RCA phono jacks have gone through the selector switch on my build and then the tape monitor switch (I opted for a tape in/out) they go to the Left + In and Right + In on Lenny’s board.
I do not run ground wires for these as all the RCA jacks are grounded to the ACP+ board at one point. And one wire connects the ACP+ ground to Lenny’s board (see below).
The Left and Right + Out from Lenny’s board go to where the left and right Out of the Alps pot would have been. Which is also the point where the non-grounded leads of the 470k resistors Lenny suggests are connected.
I take a single ground wire from Lenny’s board (any of the four signal ground points works) to the nearest physical ACP+ ground point - in my build that’s the grounded side of the ACP+ LED.
The +/-15VDC supply for Lenny’s board went from the +/0/- output of the PS directly to the corresponding input points on Lenny’s board.
I am not a fan of running lots of loops of wire to various points although some will argue this. Hope this helps.
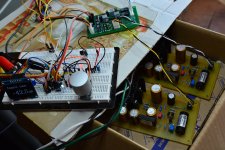
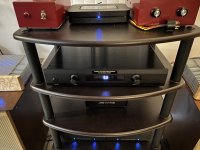
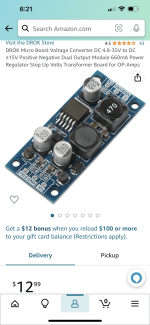
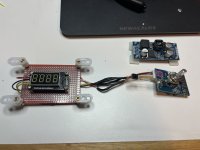
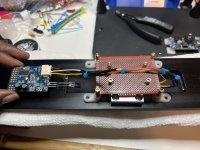
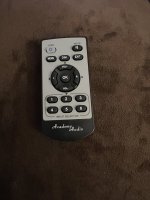
Hear are a few pictures of my little project. The chassis is just a cheap one from AliExpress that I was originally going to use for a balanced version of the PASSDIY 6-24 crossover. The board on the right of the chassis is the ACP+. The board on the Ieft is the 6-24 active crossover. Both were purchased from the diyAudio store. Toward the front of the chassis is a Drok Micro Boost Voltage Converter. This is used to provide the +-15v power needed for the Academy Audio Inc. VCX Micro Hi-End MUSES Electronic Volume Control. I used a generic circuit board and stand offs to mount the Muses display to the front of the chassis. It comes with a remote control(CR2025 battery not included) which works great for volume adjustment and also provides a balance control. I currently have the Muses set up to go into standby mode on power up. It also has a mute function and dimmer on the remote. This has been a great entry point into this fun hobby.
Thanks to Nelson Pass for sharing his wonderful designs and keeping them simple enough for novice like me to achieve a measure of success in assembling them. It’s difficult for me to put words just how happy it makes me to experience the amazing sound the Pass DIY produce.
Thanks to folks in the DIYAUDIO community like @6L6 for creating the build guides that without which I wouldn’t have attempted any these awesome builds. Thanks to @derekr for sharing his build and providing info in great detail which got me through implementing the Muses remote volume control with my ACP+. Thanks to everyone in this community for being supportive and helpful.
Attachments

- Home
- Amplifiers
- Pass Labs
- Amp Camp Pre+Headphone Amp - ACP+