
Progress?
Hi,
How are the amps? Is there progress to be mentioned?
I'm very interested in hearing the latest status, I was just browsing through older threads, when I came across this one. Going to build four Aleph channels myself (albeit Aleph 5), in two chassis with a low pass filter on one of the channels in each chassis (waiting for that "coming attraction" on the pass diy site).
Regards,
Jarno.
no REAL progress to speak of. the front faces will be done in a week or so. i will post those, they will be awesome 🙂
im guessing all in all another 4 months or so 🙁 we still need to do quite a bit. a LOT of time will be spent on the chassis. the whole project will be around 1 year timeframe. it's not what i wanted, but the outcome will be more than i had ever dreamed.
im guessing all in all another 4 months or so 🙁 we still need to do quite a bit. a LOT of time will be spent on the chassis. the whole project will be around 1 year timeframe. it's not what i wanted, but the outcome will be more than i had ever dreamed.
noteworthy progress
well, the faceplates are done from the machine shop, to many of you they will look a bit familiar. thank you nelson!
they are coming together slowly but surely.
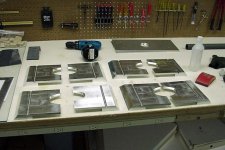
here is the metal waiting to be put together. you can see the pieces for the faceplates.
well, the faceplates are done from the machine shop, to many of you they will look a bit familiar. thank you nelson!
they are coming together slowly but surely.
here is the metal waiting to be put together. you can see the pieces for the faceplates.
Attachments

Woohhooooo, very nice. What about designer's right? Just good intentions 
All compliments.
Trigon.
All compliments.
Trigon.
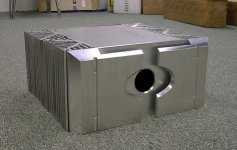
well, for the materials AND labor, it was $150 each. not TOO bad considering. you gotta see them in person to tell. they are absolutely PERFECT. they were done to perfect tolerences. this is the front fins and the back plate with the hole in it.
the bevels for the fins are actually varying. they get more acute the closer to the inside. plus, this aint cheap crappy aluminum, the whole project is T6 grade. the fins are 1 piece also. there are 2 8"x8"x1" slabs of T6 per faceplate. those werent cheap either. all in all, im happy with the cost of it. after they are completely finished, they will look as good, or better than any commercial amp out there.
there is a lot of work left. just finishing the faceplate to how we want it is a 4 stage process. i am VERY picky on how i want the finish to look. you cant tell by the picture, but the finish on the faceplates is brushed (220 grit), that is "polished" with ultrafine steel wool pads. this gives it that coarse industrial look, without the deep grooves or pits that brushing causes. it also takes out the dullness. so it has a kinda polished mirror look to it, but still that "unfinished" look of being just brushed. pretty unique.
oh, the top plates are going to be "hydro jetted". its a process where water jets cut holes through the metal. since its all done through an automated CAD layout, complex designs are just as easy as straight slits. so, i may come up with something unique for the top vents... suggestions welcome.
Nicely done work.
What format do you use to give to the machine shop? I have access to a machine shop at school here, but I haven't used any cad software for a long time.
I found some cheap 6061-T6 1" x 12" x 12" pieces for $1.85/lb at Metal Supermarkets, and am thinking about getting them machined for my amplifier at school. I am trying to think of a design substantially different then the Pass Labs design.
What kind of gauges are you putting on the front panels?
--
Brian
cowanrg said:
there is a lot of work left. just finishing the faceplate to how we want it is a 4 stage process. i am VERY picky on how i want the finish to look. you cant tell by the picture, but the finish on the faceplates is brushed (220 grit), that is "polished" with ultrafine steel wool pads. this gives it that coarse industrial look, without the deep grooves or pits that brushing causes. it also takes out the dullness. so it has a kinda polished mirror look to it, but still that "unfinished" look of being just brushed. pretty unique.
How do you brush the plates?
i'm not sure how you are asking? the first step is done with a belt sander, but everything past that is done strictly by hand...
Peter Daniel said:
How do you brush the plates?
It is pretty complicated shape, so I was wondering if you decided to do the brushing yourself or some other place. What size belt sander? And how you do the curves? I did some of that myself, but it never matches the quality of professional metal finishers (well, almost never😉). That's why my question; it's very nice metal work, so should be finished nicely too.😉
Also there is a difference between finish on a belt sander, stroke sander and abrassive wheel. Belt sander is not always preffered. This is also one of my concerns with my current amps. I subcontracted the work to be done by the finishing house (they do Sonic Fronteers and Bryston, but it wasn't very satisfactory (I might be more picky than you😉). Some pieces had to be redone and the quality varied. I'm still looking for a good place to do that kind of work.
Also there is a difference between finish on a belt sander, stroke sander and abrassive wheel. Belt sander is not always preffered. This is also one of my concerns with my current amps. I subcontracted the work to be done by the finishing house (they do Sonic Fronteers and Bryston, but it wasn't very satisfactory (I might be more picky than you😉). Some pieces had to be redone and the quality varied. I'm still looking for a good place to do that kind of work.
its a 4"x36" belt sander. using the belt, not the disc. the piece is being held in place, so its flat, flush, and square... the curves arent being sanded at the same time. the bevels are going to be polished, not brushed. it will add depth to the piece.
the belt sander didnt give the finish we wanted exactly, so we opted for finishing it by hand. the 220 grit didnt give us what we needed either. it was the right "texture", but gave too many lines, and was impossible to keep uniform.
so then we decided to use a fine steel wool to basically "brush out" the imperfections of the 220 grit. this worked like a dream. it evened up the lines from the 220 grit, and even gave it a little polish. you cant see heavy brush marks at all, but its definately not a polished finish. worked really well. it takes awhile (1.5 hours per piece maybe), but its just how we want it. i couldnt imagine a shop doing any better....
so, the "face" is going to be this finish, as well as the back plate behind it. all the bevels are going to be brushed, including the channel on the front. the edges we have not decided. they are machined to an almost polish, and they look GOOD, but i might end up brushing them as well, and leaving the bevels as the only polish...
btw, is there a way to somehow seal this finish, because with bare aluminum (and polished mostly), its impossible to keep fingerprints off of it.
we have not yet decided on the metering on the front yet. it might be old-school carver style, but we arent sure. either way it will be blue backlit, with a brushed face (almost identical to the pass labs one, but not as big). a lot of the decisions are still up in the air for now. it just comes down to what we can accomplish.
Wow, massive amounts of work done, and more to do. You guys
have really made some progress.
Your Meters are going to have to be first rate to keep up with the
quality of what you've done so far!
Keep us posted!
m.
have really made some progress.
Your Meters are going to have to be first rate to keep up with the
quality of what you've done so far!
Keep us posted!
m.
Wow...
What a project! I'm jealous!
As far as sealing finished aluminum- Eastwoodco has some spray on stuff to use after you polish aluminum wheels for your car. That may be an option, although I don't know if it will dull the finish.
What a project! I'm jealous!
As far as sealing finished aluminum- Eastwoodco has some spray on stuff to use after you polish aluminum wheels for your car. That may be an option, although I don't know if it will dull the finish.
If you intend to anodize, don't use any spray or sealer, because this may complicate things later. Just be careful when handling. Some finishers use a sort of powder (talc) to prevent finger marks.
And anodizing is the only way to go here.
And anodizing is the only way to go here.
here's the info from www.eastwoodco.com
<img src= "http://www.eastwoodco.com/images/P6991.jpg"[/url]>
Eastwood Diamond Clear Metal Aerosol 12 Oz
Item No. - 10200 Z
Protect metal parts with a crystal clear, tough, flexible coating that will keep brass, aluminum, steel, die-cast, even cast iron looking great. This special self-leveling formulation, when properly applied, will not chip, crack, fade, or yellow. Resistant to fuels and temperatures up to 300 degrees F, this product is ideal for underhood applications (except exhaust manifolds). Great for polished mag wheels, aluminum valve covers as well as items around the shop and home. Diamond Clear for Bare Metal is a solvent-based clear in a 12 oz aerosol can.
Regular Price: $9.99
Buy 3 or more Pay Only: $ 9.49 ea.
And anodizing is the only way to go here.
Absolutely... I'm always thinking cheap and easy with my stuff. With the money you already have invested, why not spend the extra for the anodizing?
- Status
- Not open for further replies.
- Home
- Amplifiers
- Pass Labs
- aleph theatre?