Are those Audioquest XLR cables with battery packs, feeding voltage potential to the amp end?
They are Audioquest water cables, I am not sure what the battery pack does. I got a great deal on them and they seem to work well after some time in the system.
The psu (+/-27VDC without load) has been used with my M2x.
I've built aleph j and power it up with dim bulb tester.
But it was not my expectation.
Both channels show the same result.
I've built aleph j and power it up with dim bulb tester.
But it was not my expectation.
Both channels show the same result.
My understanding is it puts a trickle charge thru the Dielectric in an effort to lower the noise floor. I admit to being very skeptical. Nearly impossible to compare w/ or w/out the battery as the charge takes time to dissipate. A few years ago our Audioquest rep. brought in 2 equal lengths of their Type 9 spkr cable and Type 9 w/ DBS, the difference was quite dramatic.They are Audioquest water cables, I am not sure what the battery pack does
One word of caution, the button on the DBS should only be pressed every few weeks or months to check that the batteries are still good. Constant pressing will drain the battery much faster.
@namghiwook, what wattage is the bulb in your DBT? Have you used this device to power up an amp successfully before?
Last edited:
@namghiwook, nice clear pictures along with an explanation of your setup (specifically the PSU wiring) would be much more helpful to us then that video. The video is "jumpy" and it's hard to get a clear view of your configuration.
This bulb is 60W and has been used for M2x and others amps building.@namghiwook, what wattage is the bulb in your DBT? Have you used this device to power up an amp successfully before?
Attachments
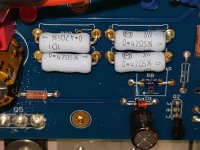

@namghiwook, what's the purpose of the two separate ground wires going from the terminal strip/PSU to the Aleph J boards? Also, what's the little blue wire going from IN- wrapping around the back of the board? Connection to GND?
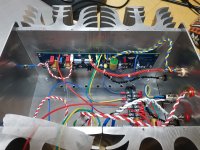
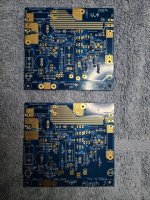
Give us an entire picture of each board, one down the center of the chassis, and one of the inside of the PSU, so we can follow your wiring.
Give us an entire picture of each board, one down the center of the chassis, and one of the inside of the PSU, so we can follow your wiring.
Last edited:
You may need a bigger bulb:This bulb is 60W and has been used for M2x and others amps building.
For example: A 40 Watts bulb draws 0.36 Amps to operate. A 60 Watts bulb draws 0.54 Amps to operate. A 80 Watts bulb draws 0.72 Amps to operate. A 100 Watts bulb draws 0.90 Amps. And so on...
Where are you located? Are you using 100, 110(120 in reality), or 230 volt mains?
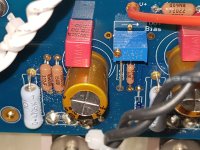
Red +V
Blue -V
Green, Yellow GND from PSU
2 twisted Red wire : Speaker Out
2 twisted Black wire : Speaker Gnd
Blue, yellow twisted wires for Signal +In, Gnd
Blue jumper wire between Gnd to -In for single ended singnal.
PSU with 400VA 220AC main and SLB has been using with M2x.
Blue -V
Green, Yellow GND from PSU
2 twisted Red wire : Speaker Out
2 twisted Black wire : Speaker Gnd
Blue, yellow twisted wires for Signal +In, Gnd
Blue jumper wire between Gnd to -In for single ended singnal.
PSU with 400VA 220AC main and SLB has been using with M2x.
Attachments


My understanding is it puts a trickle charge thru the Dielectric in an effort to lower the noise floor. I admit to being very skeptical. Nearly impossible to compare w/ or w/out the battery as the charge takes time to dissipate. A few years ago our Audioquest rep. brought in 2 equal lengths of their Type 9 spkr cable and Type 9 w/ DBS, the difference was quite dramatic.
One word of caution, the button on the DBS should only be pressed every few weeks or months to check that the batteries are still good. Constant pressing will drain the battery much faster.
Thank you for the information, much appreciated.
I powered it up without dim buld tester.
I set R27 to 50K (12.5 turns) and measured source resistors and dc offset.
RCA was shorted.
R16 : 522mV
R17 : 425mV
R18 : 466mV
R19 : 472mV
dc offset : -23.3V
I adjusted R7 but dc offset did not change.
The heatsink with R16, 17 was so hot but the other heatsink with R18, 19 was cold.
I set R27 to 50K (12.5 turns) and measured source resistors and dc offset.
RCA was shorted.
R16 : 522mV
R17 : 425mV
R18 : 466mV
R19 : 472mV
dc offset : -23.3V
I adjusted R7 but dc offset did not change.
The heatsink with R16, 17 was so hot but the other heatsink with R18, 19 was cold.
What are you using for the small bipolar transistors (Q2, Q3 and Q4)? The ones I can see are not the ZTX ones so I wonder if you might have the wrong pinout. For example, if you are using BC550/560 then I think Q2 and Q3 (which I can see in the photos) are backwards.
Last edited:
namghiwook, You have a jumper soldered in the R7 position. That needs to be removed.
Whoops, please disregard, as I misread R27 for R7.
Strange that R18 and R19 indicated strong current through Q7 and Q8, yet the offset was 23.3V. Q7 and Q8 shorted?
Whoops, please disregard, as I misread R27 for R7.
Strange that R18 and R19 indicated strong current through Q7 and Q8, yet the offset was 23.3V. Q7 and Q8 shorted?
Last edited:
I have the honor(?), being a notch above novice, of being 1 of the chosen Ones to build the Aleph J. At this point I have tackled, some successfully some not, kits by several vendors and I would say the quality of the parts, the thoroughness of the build guide and the level of support here are head and shoulders beyond the others!
And it begins!!!!
And it begins!!!!
namghiwook, Please check the DC voltage at R11 or R12 - black probe at Ground, red probe at R11 or R12. What is the voltage? Does the voltage change if you adjust R7?
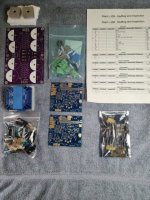
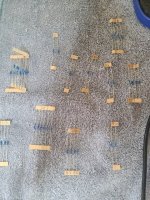
A little late night porn. The 2nd photo shows the resistors after I checked them against the BOM, as you can see I wrote down the values which saved a lot of time when stuffing the boards.
Finding the resistor locations from the board stencil often was more difficult to locate vs. locating it in the Guide.
Finding the resistor locations from the board stencil often was more difficult to locate vs. locating it in the Guide.
Attachments
- Home
- Amplifiers
- Pass Labs
- Aleph J illustrated build guide