Ah, I see the torque is still something here...
It is quite easy in fact:
0.9Nm is like hanging a weight of ca. 90g on a bar 100 cm away from the measuring step (the mosfet), which is equal to a weight of ca. 900 gr at 10 cm, or 9000 gr at 1 cm (the handle of a screwdriver for example)...
So, as long as you don't Hercules around, I'd say you're pretty good.
(But, those torque-wrenches... sssiigh)
Of course, you should take this with the appropriate grain of salt, and verify it for yourself. (I never did so, just talked about it someplace here)
Tightening the MOSFETS
Flohmann suggests the following method for getting the correct amount of tension in his Aleph J Build Guide for Noobs:
“Once you are confident that the MOSFET leads are correctly positioned when the amp boards are screwed onto the stand-offs, now is the time to tighten the MOSFETs to the heat sink (the L wrench included with the 4U Deluxe chassis kit also fits the M3 screws in the back panel kit, so feel free to use it). Tighten until the split washers are fully compressed.”
Is that a satisfactory way of doing it?
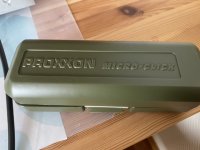
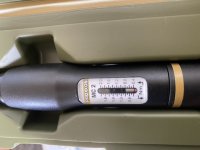
Okay.. I odered Wera tool code 05074700001
This one: Series 7400 Kraftform adjustable torque screwdrivers (0.1-3.0 Nm) with Rapidaptor quick-release chuck - Wera Product finder
My local Wera distributor promote discounts till the end of september on the list of tools this one included.
It's about 39% discount.
Also I have acquaintance that helped me to order it for shop incoming price.
If I convert rubles to $, this tool cost me about $65.
Still not cheap but the cheapest tool with a brand name on it that I could find.
I make excuse to myself that this would be a nice tool to have.. for life. 🙂
Yes, very fast. Ordered yesterday afternoon… will be using Keratherm, and my used ones have obvious signs of too much torque. This will be a step up for sure.
Here ya go: Just tighten them. When you occasionally check offset and bias, check them. Worked great for years and years. I save the torque wrench for accurately setting the torque on rifle scope mounts.Ah, I see the torque is still something here...
It is quite easy in fact:
0.9Nm is like hanging a weight of ca. 90g on a bar 100 cm away from the measuring step (the mosfet), which is equal to a weight of ca. 900 gr at 10 cm, or 9000 gr at 1 cm (the handle of a screwdriver for example)...
So, as long as you don't Hercules around, I'd say you're pretty good.
(But, those torque-wrenches... sssiigh)
Of course, you should take this with the appropriate grain of salt, and verify it for yourself. (I never did so, just talked about it someplace here)
Russellc

Since we are drifting a bit accessory land, any tips for simple drill guides? Like the one ZM used in one of the builds on his blog. To drill straight holes for M3/2.5?
Edit: I can fin plenty at 3mm+, but need to drill 2.5mm to tap for 3. so tips are very appreciated 🙂
Regards,
Andy
Edit: I can fin plenty at 3mm+, but need to drill 2.5mm to tap for 3. so tips are very appreciated 🙂
Regards,
Andy
Last edited:
best thing you can do is to invest in cheap bench drill
they're everywhere , China production, so called 250W motor , 5 or 6 speeds ( belt) , up to 13mm chuck, 50mm drill depth
they're for eons hovering around 100E
you can do wonders with that
they're everywhere , China production, so called 250W motor , 5 or 6 speeds ( belt) , up to 13mm chuck, 50mm drill depth
they're for eons hovering around 100E
you can do wonders with that
To save space on the bench/workshop (but then it won’t look like ZM‘s wonder-dungeon for a long time), you could get/make yourself a stainless drill-template, much like what’s used by locksmiths/carpenters… with the common diameters, thick enough to have the drill perpendicular, big enough to be able to clamp it down, with the holes placed so that you can reach narrow corners… with precise marks on the sides for comfy alignments…
But a good custommade template like that probly gets mo‘ expensive than china-drek [emoji83][emoji83][emoji83]
But a good custommade template like that probly gets mo‘ expensive than china-drek [emoji83][emoji83][emoji83]
- Home
- Amplifiers
- Pass Labs
- Aleph J illustrated build guide