Hi Jozua,
Not so. The size of the steel was determined after extensive modeling with the program FEMM, a magnetic circuit modeling program. It's freeware with a support group on Yahoo. If your inclined, you can download it. The size of the steel is determined by both the strength of the magnetic material, and the total area of the magnets. As I mentioned earlier, the field in the gap dropped significantly with any steel size smaller than what was chosen due to saturation.
This also reduces efficiency radically.
The trick here is to corrugate the foil sufficiently so that the foil is never under any real tension. This also lowers the resonance to the point that it's out of the audio band.
Don't I know it. My first ribbon attempt was over 20 years ago, before the internet. I spent the better part of a year, off and on, experimenting before throwing up my hands. Moving metal is easy, making music, not so much.
Casey
My gut feeling is that the steel you using is to thick and will cause a significant loss in magnetic power from the magnets.
Not so. The size of the steel was determined after extensive modeling with the program FEMM, a magnetic circuit modeling program. It's freeware with a support group on Yahoo. If your inclined, you can download it. The size of the steel is determined by both the strength of the magnetic material, and the total area of the magnets. As I mentioned earlier, the field in the gap dropped significantly with any steel size smaller than what was chosen due to saturation.
I used a very thin layer of Kapton foil "sellotape" (used as isolation material in electrical motors) which I stuck to the back of the ribbon to give it strength.
This also reduces efficiency radically.
If you dont support the foil once mounted you will find that the ribbon movement/tension (which can be quite severe!) will cause hairline cracks to start developing across the "ribbon" and eventually it will simply break.
The trick here is to corrugate the foil sufficiently so that the foil is never under any real tension. This also lowers the resonance to the point that it's out of the audio band.
It all looks simple but believe me it is not.
Don't I know it. My first ribbon attempt was over 20 years ago, before the internet. I spent the better part of a year, off and on, experimenting before throwing up my hands. Moving metal is easy, making music, not so much.
Casey
Feedback
Casey
Let see how your design works out. Hopefully I am wrong.
Please post the link to the software. It might tempt me to start looking working on the drivers again.
Jozua
Casey
Let see how your design works out. Hopefully I am wrong.
Please post the link to the software. It might tempt me to start looking working on the drivers again.
Jozua
Jozua,
Here is FEMMS homepage . The "official" manual did more to confuse me than to help, but the supplemental docs cleared things up for me..at least enough so that I could fake it 😀 . Just remember that it is 2D, and to model your dimensions so that the cross section area of the "square" material in the model represents the cross section area of the material used.
Casey
Casey,
How goes the ribbon project? I'm sure a bunch of us are looking forward to seeing the outcome and hearing your impressions of the drivers.
- JP
How goes the ribbon project? I'm sure a bunch of us are looking forward to seeing the outcome and hearing your impressions of the drivers.
- JP
Sorry for not posting an update in a while 🙁
I had a pretty bummer of a bicycling accident this last spring (busted up a collar bone), and it was against my doc's advice that I started this project so soon after..should have listened..DUH! I was starting to experience some problems while lapping the second set of cross blocks. The constant motion under pressure aggravated things, so I decided to chill out for a bit and give myself the time to heal properly.
I'm hoping to dive back in full throttle in the next week or two.
Casey
And then their were two. Thats 250+ lbs of steel laying there...
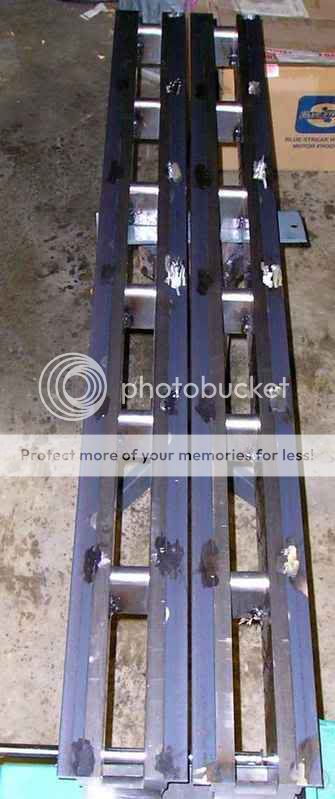
I didn't take pictures of the assembly of the second frame for two reasons. First, it took a l-o-n-g time to lap & shape the second set of blocks..took little bites because of my injury... and when I got to the point where I could assemble them I didn't want to pause to take pics to save time. And second, the process was identical to the first frame, which I documented.
Next I'll be figuring out my end caps that the ribbon will be attached to, and drilling the mounting rails.
Resumption of operation "Voice of Heaven" is a go!!
Casey
Re: Making your own ribbons
Sonus use aluminium/Kapton in their 1m ribbon.
Jozua said:
I went to a aluminium manufacturer and bought sheets of aluminium foil of various thickness until I found what I thought worked best.
I used a very thin layer of Kapton foil "sellotape" (used as isolation material in electrical motors) which I stuck to the back of the ribbon to give it strength. The commercial manufacturers use Mylar.
Sonus use aluminium/Kapton in their 1m ribbon.
Casey,
I'm sorry to hear that your injuries from that nasty wreck are still causing you troubles, but, hey, you're making progress. Every time I look at these pictures, I'm awed by your work. This project is shaping up to be brutes capable of the most delicate music.
Glad to see this is still progressing.
- JP
Hi JP,
Ironically, it was the "light" work of lapping the cross blocks, and not schlepping the considerable weight around that set me back. Seems the freshly healed soft tissue around my neck and shoulder didn't care much for the hours of repetitive motion under moderate pressure required to do the job. I felt it wise to back off until I had a chance to fully heal before i started up again..which I have.
My biggest problem now is to collect my scattered notes of the project 😀 . I replaced my PC since then, but forgot to transfer some of my files, and God only knows where I put my printed copies. I still have the old PC so all is not lost, but it's still a pain in the butt.
Casey
I'm sorry to hear that your injuries from that nasty wreck are still causing you troubles...
Ironically, it was the "light" work of lapping the cross blocks, and not schlepping the considerable weight around that set me back. Seems the freshly healed soft tissue around my neck and shoulder didn't care much for the hours of repetitive motion under moderate pressure required to do the job. I felt it wise to back off until I had a chance to fully heal before i started up again..which I have.
My biggest problem now is to collect my scattered notes of the project 😀 . I replaced my PC since then, but forgot to transfer some of my files, and God only knows where I put my printed copies. I still have the old PC so all is not lost, but it's still a pain in the butt.
Casey
First, I forgot to thank you JP for your kind compliment in the above post..thank you 😉
I spent a while in my shop tonight staring at my frames thinking about my yet to be designed end blocks to mount the foil to. I had been running several options through my head, but finally decided on a simple billet scheme. I am going to mill my blocks out of this...
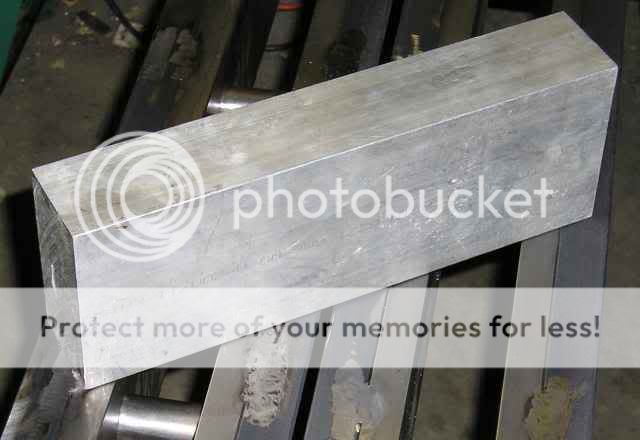
Its a piece of 7075-T6 aluminum I picked up many moons ago. I plan to mill an insulating block out of 1/2" Corion to go between it and the frame.
This brings me to my question for all you chemist types that may be lurking 😀 . What material is best suited for the terminal connector ? My concern is dissimilar metal corrosion, as well as the possibility of the electrolysis degrading the signal. A quick search on the net came up with this composition for the 7075 alloy...
Component Wt. %
Al 87.1 - 91.4
Zn 5.1 - 6.1
Mg 2.1 - 2.9
Cu 1.2 - 2
Fe Max 0.5
Si Max 0.4
Mn Max 0.3
Cr 0.18 - 0.28
Ti Max 0.2
Ok guys..school me 🙂
Casey
I spent a while in my shop tonight staring at my frames thinking about my yet to be designed end blocks to mount the foil to. I had been running several options through my head, but finally decided on a simple billet scheme. I am going to mill my blocks out of this...
Its a piece of 7075-T6 aluminum I picked up many moons ago. I plan to mill an insulating block out of 1/2" Corion to go between it and the frame.
This brings me to my question for all you chemist types that may be lurking 😀 . What material is best suited for the terminal connector ? My concern is dissimilar metal corrosion, as well as the possibility of the electrolysis degrading the signal. A quick search on the net came up with this composition for the 7075 alloy...
Component Wt. %
Al 87.1 - 91.4
Zn 5.1 - 6.1
Mg 2.1 - 2.9
Cu 1.2 - 2
Fe Max 0.5
Si Max 0.4
Mn Max 0.3
Cr 0.18 - 0.28
Ti Max 0.2
Ok guys..school me 🙂
Casey
valveitude said:What material is best suited for the terminal connector ?
Casey
Hi Casey,
You might consider:
1) GOLD....Use two scrap gold plated PCBs to clamp the foil. Clean well with acetone to remove coatings.
2) Silver Solder...Use a high sliver content solder and directly solder the wire to the foil ribbon after the insulating clamp isolates any strain. Experiment to get the correct temperature.
You many want to decide how you will tension your ribbon to get the desired resonant frequency. This might affect the design of the end clamps. As an example, the Apogee bottom clamp allowed attachment of a weight to the ribbon below a loose open clamp before the ribbon clamp was tightened. Some ribbons use end suspension structures for tensioning and for wave absorption. Foam rubber is sometimes added to the end clamp structure to absorb vibrations that can be reflected.
Hi LineSource,
Re-reading my post, I can see I wasn't very clear on my query . I'll be clamping my foil onto my aluminum block with an aluminum block. As this is the point with the largest surface area for potential dissimilar metal issues, I feel better about mounting aluminum foil with aluminum..though the alloys ARE different.
My question has to do with the big 'ol wire connection on the back of the block. My concern has to do with the material threaded into the aluminum. My first thought was a split brass stud, but then I started thinking about the electrolysis potential. Cleaning the surface of the connection from time to time is doable, but the contact between the two metals deep in a threaded hole..not so much.
Casey
Re-reading my post, I can see I wasn't very clear on my query
. I'll be clamping my foil onto my aluminum block with an aluminum block. As this is the point with the largest surface area for potential dissimilar metal issues, I feel better about mounting aluminum foil with aluminum..though the alloys ARE different.My question has to do with the big 'ol wire connection on the back of the block. My concern has to do with the material threaded into the aluminum. My first thought was a split brass stud, but then I started thinking about the electrolysis potential. Cleaning the surface of the connection from time to time is doable, but the contact between the two metals deep in a threaded hole..not so much.
Casey
Casey- Electrolysis sin't a problem unless there is an electrolyte😀
I would venture to suggest that assembling the connections in dry conditions and then sealing them somehow- Shellac knotting compound, paint etc.-would work well. Perhaps mount a stud in the ali block and connect onto that using 2 nuts and a ring terminal?
Brass/Ali combo is used on boats from time to time (not recommended, though), and is ok as long as the joint is kept dry. Of course, in presence of seawater, a copper coin can eat it's way through aluminium.
Either that or use an alloy screw to hold a ring-type conector on.
James
P.s.- As with the TT, Stunning work and brilliant use (and creation) of tools. Nice to see you posting again.
Hi James,
True enough 🙂. There is a good chance I am over thinking this, and I really don't need to worry about it..but..many a time over the years I have disassembled an aluminum housing from a piece of gear that was in what I believed to be in a dry/warm enviroment and found fasteners "time welded" in place. Whether this was from electrolysis or some other mechanism, I don't know.
This is along the lines of what I have been thinking about. My concern (justified or not) is the potential corrosion between the dissimilar metals of the block and stud. Being a half ohm load, there will be considerable current flowing through this junction.
Thank you James . I have NOT abandoned the TT project by the way. I will resume that as soon as I have something to listen to it with..hence this bunny trail 😀.
Casey
Casey- Electrolysis sin't a problem unless there is an electrolyte 😀
True enough 🙂. There is a good chance I am over thinking this, and I really don't need to worry about it..but..many a time over the years I have disassembled an aluminum housing from a piece of gear that was in what I believed to be in a dry/warm enviroment and found fasteners "time welded" in place. Whether this was from electrolysis or some other mechanism, I don't know.
Perhaps mount a stud in the ali block and connect onto that using 2 nuts and a ring terminal?
This is along the lines of what I have been thinking about. My concern (justified or not) is the potential corrosion between the dissimilar metals of the block and stud. Being a half ohm load, there will be considerable current flowing through this junction.
P.s.- As with the TT, Stunning work and brilliant use (and creation) of tools. Nice to see you posting again.
Thank you James
. I have NOT abandoned the TT project by the way. I will resume that as soon as I have something to listen to it with..hence this bunny trail 😀.Casey
valveitude said:I'll be clamping my foil onto my aluminum block with an aluminum block.
Casey
Casey,
You may find that this mounting causes the ribbon to tear at its ends from vibration where it is rigidly clamped. Some designs use soft rubber of foam as the first mechanical clamp point, then transistion to a more rigid clamp.
end clamps:
rubber --> metal electrical clamp
rubber --> hard plastic clamp --> strain relieved electrical contact(clamp or solder)
LineSource,
Point taken. I had actually been a little concerned about that, and was planning to chamfer the edges to minimize the "knife" effect on the ribbon. I like the soft pre-mount idea better..thanx. I can also see how that could help with dampning any internal resonance the foil may have.
Another idea I have been kicking around is to fold the last 1/2" or so into an acute accordion (much like vintage paper speakers), and coat that area with a rubber compound. Kind of a dual suspension, where the pleated ribbon handles all the excursion during normal levels, and the "accordion" gives the extra travel (as well as providing a limit) during ridiculous levels with the likes of Billy Idol 😀.
Thoughts ?
Casey
You may find that this mounting causes the ribbon to tear at its ends from vibration where it is rigidly clamped. Some designs use soft rubber of foam as the first mechanical clamp point, then transistion to a more rigid clamp.
Point taken. I had actually been a little concerned about that, and was planning to chamfer the edges to minimize the "knife" effect on the ribbon. I like the soft pre-mount idea better..thanx. I can also see how that could help with dampning any internal resonance the foil may have.
Another idea I have been kicking around is to fold the last 1/2" or so into an acute accordion (much like vintage paper speakers), and coat that area with a rubber compound. Kind of a dual suspension, where the pleated ribbon handles all the excursion during normal levels, and the "accordion" gives the extra travel (as well as providing a limit) during ridiculous levels with the likes of Billy Idol 😀.
Thoughts ?
Casey
I didn't get as much done this weekend as I had hoped, but it's all good 🙂. An audiphile club has formed in my area, and I spent a fun Saturday meeting new friends while listening to some great (and not so great) gear. Thanx again JP for the heads up.
Anyway, my focus now is the termination block assemblies for the ribbon. I spent my time turning my big block of aluminum into the pieces I need. After cutting off a couple of chunks I clamped one down on my saw to bisect it...
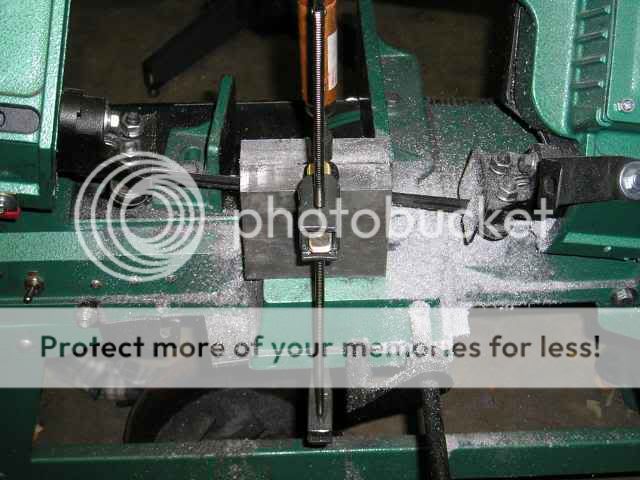
This worked..barely. In spite of cranking the clamp until it bowed under the pressure the block managed to "walk" about a 1/4" during the cut. This gave me a couple decidedly un-square pieces. Fortunately the thinnest point was still thicker than my target for the finished block so I was still able to use it. For the next cut I took a different approach that turned out to be much better...
I used a couple of pieces of some flat stock I had laying around that formed a "box" clamp with one of the other pieces at the back. This cut was more or less perfect.
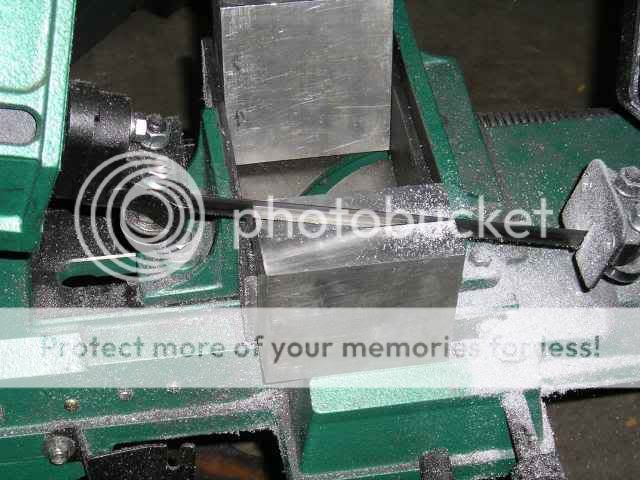
After I had my 4 pieces I milled them to the final dimensions of .8" x 3.235" x 4"...
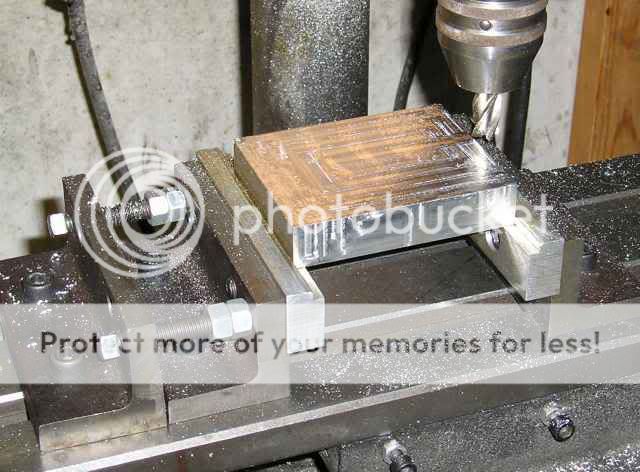
Actually I still have 2 to mill yet to the .8" thickness. Since this is "small" work I should be able to get this done before next weekend (a 3 day one for me).
At least I got something done.
Casey
Anyway, my focus now is the termination block assemblies for the ribbon. I spent my time turning my big block of aluminum into the pieces I need. After cutting off a couple of chunks I clamped one down on my saw to bisect it...
This worked..barely. In spite of cranking the clamp until it bowed under the pressure the block managed to "walk" about a 1/4" during the cut. This gave me a couple decidedly un-square pieces. Fortunately the thinnest point was still thicker than my target for the finished block so I was still able to use it. For the next cut I took a different approach that turned out to be much better...
I used a couple of pieces of some flat stock I had laying around that formed a "box" clamp with one of the other pieces at the back. This cut was more or less perfect.
After I had my 4 pieces I milled them to the final dimensions of .8" x 3.235" x 4"...
Actually I still have 2 to mill yet to the .8" thickness. Since this is "small" work I should be able to get this done before next weekend (a 3 day one for me).
At least I got something done.
Casey
valveitude said:Another idea I have been kicking around is to fold the last 1/2" or so into an acute accordion (much like vintage paper speakers), and coat that area with a rubber compound. Kind of a dual suspension, where the pleated ribbon handles all the excursion during normal levels, and the "accordion" gives the extra travel (as well as providing a limit) during ridiculous levels with the likes of Billy Idol 😀.
Thoughts ?
Casey
There have been many glowing reviews of the RAAL ribbons applauding their dynamics when compared to traditional ribbon tweeters. RAAL uses a zig-zag pattern embossed (stamp or rolling press?) into the aluminum foil for strength instead of the traditional corrugated horizontal pleats. The RAAL ribbon also uses a heat shrink plastic film attached to the end of the ribbon foil as a tunable suspension which also has good reflected wave energy absorption. I think RAAL trademarks "FlatFoil" for their ribbon design.
Hi
It looks excellent. Wish I had those tools at home......
I can wait to hear how they going to sound.
Jozua
It looks excellent. Wish I had those tools at home......
I can wait to hear how they going to sound.
Jozua
- Status
- Not open for further replies.
- Home
- Loudspeakers
- Planars & Exotics
- A 60" Ribbon w/TL Loaded Extremis Hybrid