Subuckethead, you will be pleasantly surprised. Typical cutting speeds for aluminium using multi axis CNC machines is 300-600m/min. This equates to 8000-16000rpm for a 12mm cutter so within the adjustable speed range of woodworking routers. From experience I would not try it with 1/4" shank cutters! WD40 or soluble cutting oil is essential to get anything like a decent surface finish and to stop the cutter clogging. A proper solid carbide helical end mill or slot drill ground for aluminium works considerably better than woodworking cutters as they have the correct geometry and hugely reduce vibration, but I have machined 12mm aluminium with woodworking cutters. Get it right and it is actually very simple, and extremely satisfying!

Thanks for the confidence. I'm somewhat inclined and ill go with trusting your expertise and go continue on.
The surface can be poor if accurate np. The circle edges will be hidden behind decorative bezels. The stereo head unit cut out is square so it will easily clean up pretty with a file and 3m scotch Brite. I'll show how it went tomorrow.
The surface can be poor if accurate np. The circle edges will be hidden behind decorative bezels. The stereo head unit cut out is square so it will easily clean up pretty with a file and 3m scotch Brite. I'll show how it went tomorrow.
Here's a speaker using a Hammond 1590E aluminium project box
https://www.divine-audio.com/pecorino/
---
Adhesive backed floor tiles, car audio damping sheets, etc.
---
post#4 North Creek Glop - ?might work?
https://www.diyaudio.com/community/...speaker-project-question.394304/#post-7230227
---
Cut & glued with subfloor adhesive(these might be too thick though)
https://www.amazon.ca/BXI-Sound-Abs...hvlocphy=&hvtargid=pla-4583795267548731&psc=1
----
Radio Shack LX5 Speaker mods
https://theaudiostandard.net/thread/275/modifications-genexxa-pro-lx5-loudspeakers
Last edited:
50 holes like this, was it?
Actually, I have 2 aluminium baffles per speaker with butyl rope between them, so it ended up being 100 holes 😀.
I always knew you can work aluminum with wood blades, but lower speeds would be more favorable when going powered.
As I had a fixed speed router, I got one of these to be able to lower rotation speed. Even for wood I had to adjust the speed at times.
Warning: I did try router bits with bearing followers, but the bearings simply disintegrated within minutes. Even ceramic bearings did not last.
To still be able to copy shapes from a template, I made a fixed "follower" pin out of some scrap parts.
You can actually see the scrap hole pieces that were cut using the jigsaw as height adjustments in the above picture.
To help out the pain of the jigsaw job I drilled holes for a start and sometimes at certain points as a temporary relieve.
The outer baffle was 6 mm, the inner baffle 10 mm.
from OP post #9,
-The Visaton W130S has quite a smooth frequency response. Have you used it? Basic coated paper and quite cheap. I haven't seen any crossover designs with it.
Visaton W130
https://www.diy-hifi-forum.eu/forum/showthread.php?4401-FAST-mit-Visaton-W130S4-und-FRS5X
https://boxsim-db.de/?s=w130
https://techtalk.parts-express.com/...Project=&highlight=parts+express+home+theater
More ideas- fullrange woofer
Here are 2 Visaton w170
old
KOBRA 16 MINI
How to construct ALTO I
KOBRA 16 MAXI
How to construct ALTO II
Compare graphs, etc
https://www.visaton.de/index.php/en/products/drivers/bass-midranges/w-130-s-8-ohm
vs
https://www.visaton.de/en/products/drivers/woofers/w-170-s-8-ohm
Monacor SPH165 minimal crossover
https://www.caninialtoparlanti.it/minidiffusore1.htm
Last edited:
Perfect! I hadn't thought of using my volt regulator with my tools. I usually use them to variate the speed of fans. I <3 diyaudio.Actually, I have 2 aluminium baffles per speaker with butyl rope between them, so it ended up being 100 holes 😀.
View attachment 1182741
As I had a fixed speed router, I got one of these to be able to lower rotation speed. Even for wood I had to adjust the speed at times.
Warning: I did try router bits with bearing followers, but the bearings simply disintegrated within minutes. Even ceramic bearings did not last.
To still be able to copy shapes from a template, I made a fixed "follower" pin out of some scrap parts.
View attachment 1182743
You can actually see the scrap hole pieces that were cut using the jigsaw as height adjustments in the above picture.
To help out the pain of the jigsaw job I drilled holes for a start and sometimes at certain points as a temporary relieve.
The outer baffle was 6 mm, the inner baffle 10 mm.
View attachment 1182744
Sorry for not getting back sooner. I wasn't thinking FR. For reasons being placement aim is nowhere close plus I already have small coax to go higher up in L and R pillars.from OP post #9,
-The Visaton W130S has quite a smooth frequency response. Have you used it? Basic coated paper and quite cheap. I haven't seen any crossover designs with it.
Visaton W130
https://www.diy-hifi-forum.eu/forum/showthread.php?4401-FAST-mit-Visaton-W130S4-und-FRS5X
https://boxsim-db.de/?s=w130
https://techtalk.parts-express.com/...Project=&highlight=parts+express+home+theater
More ideas- fullrange woofer
Here are 2 Visaton w170
old
KOBRA 16 MINI
How to construct ALTO I
KOBRA 16 MAXI
How to construct ALTO II
Compare graphs, etc
https://www.visaton.de/index.php/en/products/drivers/bass-midranges/w-130-s-8-ohm
vs
https://www.visaton.de/en/products/drivers/woofers/w-170-s-8-ohm
Monacor SPH165 minimal crossover
https://www.caninialtoparlanti.it/minidiffusore1.htm
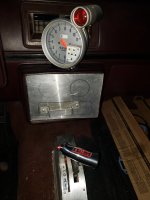
When I say I made this radio panel by hand Ill mean it. I got the cut nearly bang on wich surprises me a bit. My scripto lines still visible. I simply filed away the flash.
The nice thing about aluminium its soft enough you can easily work it with a file with a beer on your porch.
I'm where some ppl start, with a flat new sheet.
My thumb is still on the mend. It became personal between me that piece of scrap metal 😉.
But actually its going in a place wear you'll look at it dozens if not hundreds of times. That makes its worth doing.
You see how it ties in to the other aluminium. After and before a good 3m scotchbriting. It can use 1 or 2 step sanding with ligh grit👍
Attachments

Wesay so machined metal is just the best.
I <3 that stuff. As a kid it was anodized aluminum machined bmx and mtb parts. Now its the same except on to car and moto parts. The raw milled monolithic chunky parts looks beautiful too vs the ano finish. I even liked industrial machined parts i had no idea what they were for. I always had a think for the mill work.
The roller rockers and girdle in the same car is anodized machined aluminum freshly done.
Attachments
Aluminium is enjoyable to work because its soft.
I cut starter holes with an everyday spade bit for wood. And a wood blade with my jigsaw to cut the stereo slot. They both cut through it smoother than butter.
Two cuts left, and a once over buff.
Another plus is how easy aluminum cleans up with simple scuff pads.
I cut starter holes with an everyday spade bit for wood. And a wood blade with my jigsaw to cut the stereo slot. They both cut through it smoother than butter.
Two cuts left, and a once over buff.
Another plus is how easy aluminum cleans up with simple scuff pads.
Attachments

Last edited:
Making some progress with my larger aluminium cabinet. I have the sides now cut to size. Cost of the aluminium was £99 plus shipping, not bad. This will be a really easy build - just need to add front, back, top and bottom. No gluing required, no interior bracing needed. Just bolt it all together with visco-elastic damping in between. I have Soudaseal MS Clear.
This will substantially weaken the structure while providing limited damping because of the modest amount of damping material being deformed. The baffle needs to be stiff to reduce the amount of energy entering the cabinet structure while the other 5 sides don't need to be particularly stiff but do need a high damping force which opposes the bending in the problematic mode/s in terms of sound radiation to the listening position (see KEF LS50 white paper for an example) to dissipate that energy.
Then add self-adhesive butyl damping sheets inside, Dodomat heavy butyl.
This should provide the most damping but I have doubts extensional damping with weak damping materials will be sufficient. CLD with an aluminium structural layer is widely used in the aerospace, automotive and other engineering industries so there should be plenty of information and products around. If this isn't enough then internal damping panels in the right place/s will be. Simulating it would be the most efficient if that is practical. Alternatively you could implement the simplest, check it, remove and implement the next level if insufficient,...
Looks like a nice fun project and good luck with it. I would advise against looking to strongly audiophile companies like Magico for engineering guidance (if that is what you are doing rather than joking).
Hmmm..... interesting.
1. Are you suggesting it's better to just bolt the 2 side pieces solidly to each other without a layer of Soudaseal? Greater rigidity. I'm on the fence here. I will use M10 bolts.
2. Why don't the other 5 sides need to be stiff? Not following you here.
3. The baffle will be stiffened by being bolted to the aluminium sides, which additionally have 4x 50mm aluminium pieces reinforcing the baffle. It would be possible to make an aluminium baffle but I don't have the means to cut a 145mm hole for the woofer unless I laboriously use an electronic jigsaw. And anyway it's quite a small baffle and you'd be throwing away a good half of it by cutting the driver holes. I can review this later, since the front and back can be removed and revised.
I have indeed looked to audiophile companies for guidance. Piega have been most helpful and informed me of the 2 products they use for damping the panels. I'm not joking at all, though I wouldn't expect any help from Magico - that's a completely different level of aluminium machining. But any of the companies using aluminium for cabinets are interesting from a research point of view. When starting any project you look at what has been done already.
1. Are you suggesting it's better to just bolt the 2 side pieces solidly to each other without a layer of Soudaseal? Greater rigidity. I'm on the fence here. I will use M10 bolts.
For supporting/stiffening the baffle as rigid as possible. For connections between panels that don't involve the baffle perhaps. Aluminium panels are not usually bonded with a few large bolts if that is what is being proposed. The stronger the bond, the less panels will move relative to each other and the less effective the damping material will be. But if there is significant amount of contact area and the panels move relative to each other there is the option for significant damping. And a cabinet like this requires significant amounts of damping to turn what would be loud resonances into quieter ones.
2. Why don't the other 5 sides need to be stiff? Not following you here.
The drivers vibrating the baffle is the main mechanism for moving the cabinet and radiating sound. The varying internal air pressure is only significant at low frequencies which is below the lowest cabinet resonant frequency and hence relatively unimportant. Recalling from physics classes: the rate of energy entering the cabinet is the product of the reaction force to the acceleration of the cone and the velocity of the baffle in the direction of that force. The force is fixed (unless you mount the driver on soft grommets but that causes other issues) but the velocity will reduce with the stiffness of the baffle. So the stiffer the baffle the less energy will need to be dissipated by radiating unwanted sound and absorption by the damping in the structure. (Caveats but this is the gist).
Stiffness in the 5 non-baffle panels has little direct role in making the cabinet quieter. They need to cope with the low frequencies which can be an issue in a small sealed sub but no much in a 2 way and, indeed, some 2 way speaker cabinets are designed to be weak (e.g. old BBC approach and was it Celestion?). But they do need to dissipate the energy that is being pumped into the baffle to reduce the amount that gets radiated as unwanted sound and that means as much damping as possible. That KEF paper shows an example of the effect of stiffening the cabinet - the resonances move higher in frequency but are just as loud. And damping (in the right place) - large reduction in the amplitude of the problematic resonance.
I have indeed looked to audiophile companies for guidance. Piega have been most helpful and informed me of the 2 products they use for damping the panels. I'm not joking at all, though I wouldn't expect any help from Magico - that's a completely different level of aluminium machining. But any of the companies using aluminium for cabinets are interesting from a research point of view. When starting any project you look at what has been done already.
I was referring to engineering guidance based on looking at designs rather than guidance in general. Aluminium plus damping material ought to result in a better performing cabinet than wood in terms of sound radiation and external acoustic shape if it is well engineered. Likely examples would be those from Genelec and B&O which will have been designed using conventional engineering principles without needing to emphasise what is attractive to nontechnical audiophiles (e.g. Magico). Note that if you are selling into the ultra-fi sector you better be making your products attractive to rich audiophiles so I am in no way criticising Magico just pointing out their designs are not the best place to look for guidance on how to engineer speakers. Don't know Piega.
Thats why I'd like a peek inside some modern metal speaker designs to see how they dealt with resonances.
To combat resonance while adding rigidity I took it upon myself to screw and cement or cement only where screws are unsightly some 1/4" plywood or mdf to the inner side of potential trouble areas.
, ie with larger spanning panels that are more prone to vibration and resonances. Yes it eats into cab volume but the tradeoff can be worth while.
And some type of self adhesive membrane should always be mandatory imo.
Whenever metals and audio acoustics intermingle.
This was made very apparent when I moved a machine from a wooden floor to concrete; on the wooden floor the machine that has a 3,000 rpm motor, often with an out of balance load, would vibrate the floor and quite a lot of the large industrial building, and make some noise..So the stiffer the baffle the less energy will need to be
After moving it downstairs, onto concrete, even in a much smaller reverberant room, it was shocking how much quieter it is, all the rattles of the floor gone. Because the concrete isn't moving, it's not taking any energy from the vibration, whilst the movement of the wooden floor seemed to "suck" energy from the machine. A very profound, if inadvertent experiment in vibration transfer.
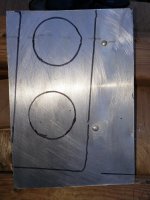
I cut it and then messed it up by trying to squeeze a small voltage guage in the middle which would of fit with less than a quarter inch between the two others. 8 hrs in the scrap pile. Its ok I learned a few valuable lessons about cutting this material.
I had drilled dummy holes to clamp down securely otherwise the thin stuff can violently flap then distort the piece beyond putting back.
I was sure to drill inside the two cut outs. Shifting the two over just so, wasn't enough and edges of the clamp holes peek out on one or other side.
Too late its already done. Soo tomorrow ill start another, and include all three straight off.
Only this time I'll use 1"4 aluminum and your router method and hopefully result with 3 nice clean circle cuts like you make in your line arrays. Cool stuff would like to see them as finished.
- Home
- Loudspeakers
- Multi-Way
- 2-way bookshelf with aluminium cabinet