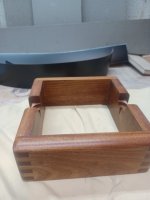
Not quite 10 cm... Bliesma drivers require small holes, so this makes the baffle look bigger and thicker than it actually is.
The MT baffle is 55 mm thick. My Baltic birch plywood was 18.3 mm, so I ran the cherry boards through the thickness planer to 18.3 mm to match.
Here are the layers of the MT baffle before glue up. The outer most layer is solid cherry. The inner layers have solid wood on the outer edges, with birch ply at the core. The solid wood was arranged so that the grain direction alternated with each layer.

Here is the three layers during the glue up process. I used West Systems epoxy for this step. I knew that I would not be able to maintain perfect alignment, so I oversized each panel and machined to final size later on using a table saw.

It takes 72 hours for the epoxy to fully cure. In the past I have made the mistake of cutting/sanding epoxy layups after just 24 hours, and although the epoxy feels hard to the touch, it softens under the heat of power tools. It gums up sandpaper and saw blades and does not machine well.

After the panel was trimmed to final size, I cut the compound bevels. I talked about this earlier in the thread

j.
The MT baffle is 55 mm thick. My Baltic birch plywood was 18.3 mm, so I ran the cherry boards through the thickness planer to 18.3 mm to match.
Here are the layers of the MT baffle before glue up. The outer most layer is solid cherry. The inner layers have solid wood on the outer edges, with birch ply at the core. The solid wood was arranged so that the grain direction alternated with each layer.
Here is the three layers during the glue up process. I used West Systems epoxy for this step. I knew that I would not be able to maintain perfect alignment, so I oversized each panel and machined to final size later on using a table saw.
It takes 72 hours for the epoxy to fully cure. In the past I have made the mistake of cutting/sanding epoxy layups after just 24 hours, and although the epoxy feels hard to the touch, it softens under the heat of power tools. It gums up sandpaper and saw blades and does not machine well.
After the panel was trimmed to final size, I cut the compound bevels. I talked about this earlier in the thread
j.

It depends on the brand and ambient temperature. With West System epoxy (with 205 hardener) I could usually resume work after a day, but with cheaper stuff from some online marine supplies store it was indeed 2-3 days at higher ambient temperatures before I could do anything with it.It takes 72 hours for the epoxy to fully cure
I finished the edge trim except for one troublesome spot. I have 2 coats of polyurethane satin applied.
I am pleased with the veneer that veneersuplies.com sent me. It has nice figure, and it matches the solid wood portions in color and character. I have been using this veneer vendor for many years, and I recommend them.


There is a troublesome spot adjacent to the transition block. I applied some wood trim there, but it did not look right, so I removed it.
I am still contemplating what to do. I might apply a thin strip of veneer or black laminate, or even paint it black. Fortunately, I only need to be concerned with aesthetics, there are no structural or diffraction considerations... so that makes it a bit easier to deal with.
In hindsight, I should have made the transition block the full width of the cabinet, instead of matching the width of the Mid-Tweeter baffle. I drew it both ways, and in the drawings, it looked better as matching the width of the MT baffle. But covering that 2 inch section of exposed plywood edge in a tasteful way is challenging.

I will do a final sanding with 320 grit, then one more coat. Then I will install the wool stuffing, the wiring, and the drivers. Measurements can then begin... Looking forward to that.
j.
I am pleased with the veneer that veneersuplies.com sent me. It has nice figure, and it matches the solid wood portions in color and character. I have been using this veneer vendor for many years, and I recommend them.
There is a troublesome spot adjacent to the transition block. I applied some wood trim there, but it did not look right, so I removed it.
I am still contemplating what to do. I might apply a thin strip of veneer or black laminate, or even paint it black. Fortunately, I only need to be concerned with aesthetics, there are no structural or diffraction considerations... so that makes it a bit easier to deal with.
In hindsight, I should have made the transition block the full width of the cabinet, instead of matching the width of the Mid-Tweeter baffle. I drew it both ways, and in the drawings, it looked better as matching the width of the MT baffle. But covering that 2 inch section of exposed plywood edge in a tasteful way is challenging.
I will do a final sanding with 320 grit, then one more coat. Then I will install the wool stuffing, the wiring, and the drivers. Measurements can then begin... Looking forward to that.
j.
Very nice and sculptural looking!

Why not just extend the small wooden strip that goes around the mid-tweeter-block and trim it flush at the baffle?troublesome spot
That is what I originally tried, but it looked surprisingly bulky and kludgy. I am experimenting with a much thinner strip, but it is not easy to machine such a thin strip with my equipment. I am also going to try some quarter-round to see how it looks. When I cover it with plack paper, it looks surprisingly good. So I am still thinking... Thanks for the suggestion.
The issues you're having with the epoxy are due to not having a bulk filling agent in it. The material ends up curing into a soft plastic type of consistency, which smears and loads up tools when working it. I prefer to use sawdust mixed into it
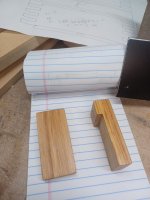
When I mistakes like this Rather than try and hide, make it a feature by using a contrasting piece or maybe a piece of brass. The idea would cut out the area of the mistake and make it larger and possibly route other areas and add the contrasting pieces. Here is a espresso knock box that I did this on by adding the canary wood to the sides, it actually improved the look giving it an art deco look.
Attachments
A couple of days ago I applied the final coat of polyurethane varnish. I am very pleased with the results. Normally I do a final polish with 0000 steel wool and wax, but I don't think I am going to do that this time. The 320 grit sanding before the final coat really smoothed the surface so the final coat went on like glass... I am fearful that any further polishing would only decrease the finish quality.
I ran wire for all three drivers. When I make active speakers, I wire all drivers with positive polarity, and if any of them need to be reversed, I handle that with the DSP filtering before the amps. I find this reduces potential confusion.
There are two holes in the bottom of the speaker. The wiring exits the speaker through a hole which is offset to one side and is sealed with silicone. The second hole is in the exact center, and this one has a 5/16" T-nut fixed internally. The speaker will be attached to the stand with a 5/16" bolt.
The cabinets were stuffed with natural sheep's wool. I normally stuff at a density of 16 g / liter, and with 32 liter enclosed volume, that is 512 g. However, after filling with 350 g, the box was completely filled so I stopped. If I find an acoustic resonance in future testing, I can always add more wool.
My source of wool is Mountain Meadow Wool. I pay about $45 for a 5 lb box, and this is enough to stuff 150 to 200 liters of speaker cabinets. My first 5 lb box was enough for 8 speaker projects. This is a short fiber wool, and I tease it / fluff it to a loose state before I put it in the cabinet.
I fitted the drivers into one of the cabinets, and testing has begun. I know someone will point out the screws I used on the tweeter so I will talk about it up front. The Bliesma screw recess on the T25 tweeter is a tight fit, and a standard pan-head #6 black-oxide screw will not fit into the recess. I had some #6 stainless steel screws, and those head just fit (barely). So that is why the tweeter has silvery screw heads visible.
Impedance sweeps of all three drivers did not show any surprises ... everything is as expected. There are no odd wiggles in the woofer or midrange impedance which could indicate a resonance. I did near field scans of all three drivers, and again, there is nothing to indicate any problems. Usually if there is an acoustic resonance (standing wave mode), it would be detected by both the impedance curve and by a matching peak in the woofer near field response... thankfully, there is none of that so far.
I also surveyed the cabinet for localized resonances by playing pink noise (loudly) through the woofer and using a mechanic's stethoscope to listen to the cabinet walls. When doing this kind of test, the sound coming through the cabinet walls should sound like muffled pink noise. If there is a distinct tone, it means there is some sort of resonance. I did detect a slight emphasis at about 800 Hz in a few areas, but it is very low level. I need to do some more investigation to understand that.


j.
I ran wire for all three drivers. When I make active speakers, I wire all drivers with positive polarity, and if any of them need to be reversed, I handle that with the DSP filtering before the amps. I find this reduces potential confusion.
There are two holes in the bottom of the speaker. The wiring exits the speaker through a hole which is offset to one side and is sealed with silicone. The second hole is in the exact center, and this one has a 5/16" T-nut fixed internally. The speaker will be attached to the stand with a 5/16" bolt.
The cabinets were stuffed with natural sheep's wool. I normally stuff at a density of 16 g / liter, and with 32 liter enclosed volume, that is 512 g. However, after filling with 350 g, the box was completely filled so I stopped. If I find an acoustic resonance in future testing, I can always add more wool.
My source of wool is Mountain Meadow Wool. I pay about $45 for a 5 lb box, and this is enough to stuff 150 to 200 liters of speaker cabinets. My first 5 lb box was enough for 8 speaker projects. This is a short fiber wool, and I tease it / fluff it to a loose state before I put it in the cabinet.
I fitted the drivers into one of the cabinets, and testing has begun. I know someone will point out the screws I used on the tweeter so I will talk about it up front. The Bliesma screw recess on the T25 tweeter is a tight fit, and a standard pan-head #6 black-oxide screw will not fit into the recess. I had some #6 stainless steel screws, and those head just fit (barely). So that is why the tweeter has silvery screw heads visible.
Impedance sweeps of all three drivers did not show any surprises ... everything is as expected. There are no odd wiggles in the woofer or midrange impedance which could indicate a resonance. I did near field scans of all three drivers, and again, there is nothing to indicate any problems. Usually if there is an acoustic resonance (standing wave mode), it would be detected by both the impedance curve and by a matching peak in the woofer near field response... thankfully, there is none of that so far.
I also surveyed the cabinet for localized resonances by playing pink noise (loudly) through the woofer and using a mechanic's stethoscope to listen to the cabinet walls. When doing this kind of test, the sound coming through the cabinet walls should sound like muffled pink noise. If there is a distinct tone, it means there is some sort of resonance. I did detect a slight emphasis at about 800 Hz in a few areas, but it is very low level. I need to do some more investigation to understand that.
j.
- Home
- Loudspeakers
- Multi-Way
- High Performance 3-way based on Bliesma M74A