fun fact i bought an elegoo max 4 so i could print the horn in a single piece but the fking print file was too big to fit on the printers memory even after i tried to simply it down 🙁 so now im doing this glue crap ffs
Just sand it! It's a bit of a skill to sand well but it's well worth mastering if you care about finish. Prep is king!
any particular recommendations with the sand paper grit / type etc?
there is also some gaps i would want to fill. should i just use more of the PU glue to fill the gaps as well? or something else?
there is also some gaps i would want to fill. should i just use more of the PU glue to fill the gaps as well? or something else?
Last edited:
Try a sanding filler. No bubble holes.
I have a tray of sandpaper sheets of various grades of grit up to 2000. Start coarse and work your way up.
Just remember that the coarser you start the more grades you'll likely need to work through to get to your target finish.
I recommend this video - it describes the concept of "shaving down the sanding peaks" and how to get to a mirror finish, if that's what you're after...

Please, build it and test it 🙂I was playing with ROSSE numbers to get wider HF coverage. The result is for 1 inch driver.
My guess is that it will be really usable only from quite high frequency, and that it will resonate more than one would like. The radiation pattern should match the sim, though. Quite creative work with the formula, BTW.
Last edited:
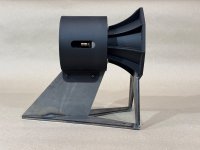
Either a very well tuned plasma cutter or LASER cut. Nicely done!while the petals are busy being milled on the CNC I had a chance to weld up the horn stands - at 1/4” plate steel they won’t be going anywhere
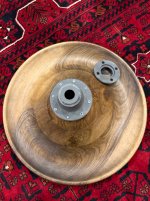
I couldn't make the measurements because the throat piece delaminated. It was not a strong enough bond to hold the horn it seems. It is made out of MJF and I have used (per HP's recommendation) the Loctite HY4070.
At this point I am considering if I should make the throat one piece out of mjf or maybe even wood. Why was the throat in parts to begin with? Is it for the ease of printing?
At this point I am considering if I should make the throat one piece out of mjf or maybe even wood. Why was the throat in parts to begin with? Is it for the ease of printing?
Attachments
Hi @kodomo,
Nylon easily absorbs humidity.
If you don't have already do this, you could check this steps:
Is the glue good, not too old ?
Are the 2 parts mixed correctly?
It's possible to pour the glue in a cup to see the quantity and mix by hand
Nylon easily absorbs humidity.
If you don't have already do this, you could check this steps:
- Drying the parts in an oven, maybe few hours at low temp like 50° celsius. Be aware of a potential shrinkage. Measuring the throat hourly.
- Cleaning with isopropyl alcohol
- Sanding the surfaces
- Cleaning again
- Quick drying with an hairdryer
Is the glue good, not too old ?
Are the 2 parts mixed correctly?
It's possible to pour the glue in a cup to see the quantity and mix by hand
Yes, ease of printing. But it was never intended for holding all the weight as in your case, the more so with such a heavy horn.Why was the throat in parts to begin with? Is it for the ease of printing?
It would try to find the center of gravity of the whole thing and design someting on which you just lay it and fix. The recent adapters are all cylindrical from the outside, which also helps, maybe you could redesign this particular one to something more suitable in your situation.
In this case I farmed out the cutting to an outfit called sendcutsend - they do custom lasercutting from drawing files and they are really pretty reasonable. I've done the clamp-a-tube-section-and-cut-with-an-angle-grinder thing in the past but you go through so many disks that it ends up being more expensive anyway, not to mention much less precise.I am guessing plasma cut and then cleaned up on a disc sander?
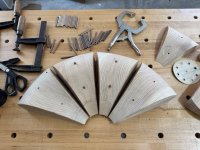
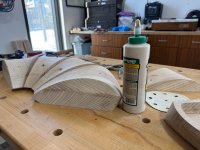
Also - finally starting the process of milling the tops and gluing up each of the 9 petals per horn. Here's what the first three look like (fourth was a test with mistakes) and a photo with a glue bottle for scale. Also obligatory clamp picture.
Attachments

Has anyone printed the horn as a single piece? in theory the elegoo max 4 should be able to fit it on the build plate but the Gcode file comes out too large in file size to fit on the machines memory 🙁
You could try to split in 2 gcode files.
For the first file, the end of the gcode must be removed so that the extruder stays at the position and the temperatures don't change...
For the second, remove the initialization and directly start the next layer.
However you have to be there to launch by hand at half the print.
For the first file, the end of the gcode must be removed so that the extruder stays at the position and the temperatures don't change...
For the second, remove the initialization and directly start the next layer.
However you have to be there to launch by hand at half the print.
- Home
- Loudspeakers
- Multi-Way
- Acoustic Horn Design – The Easy Way (Ath4)