I am using a basic CLC filter with an attached socket and build in fuse.I will have a fuse between transformer and 230V input. Was thinking of buying another one with filter that I have for my 3D printer as well.
It's not even in use right now, so could borrow it for now.
Bought at Aliexpress: Socket
Don’t know if it has any improvements in SQ…
Some likes filtering, others don’t!
Attachments
I can try it out. I have a socket without filtering as well.
Never experimented with it before.
Never experimented with it before.
Hello everyone,
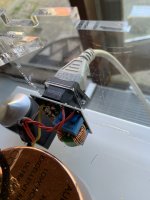
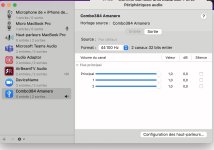
I purchased #92B project from @iancanada as well as Original Amanero Combo384 USB digital interface. Everything is powered by different UcPure 3.3V and 5V. I use Roon Core on Mac and an RPI4 as a bridge. As shown in this thread, I connected a USB cable between RPI4 and ReceiverPi DCC. I mainly use Qobuz streaming but I have a few DSD albums that I want to play via Roon Core. I also plan to plug TV to ReceiverPi DCC through optical.
Here is my problem that I cannot resolve: whatever my tests and my setup choices, no signal is perceived by MonitorPi Pro (only attempt Qobuz).
It is obvious that I lack knowledge that I cannot find. Do you have any ideas ?
Thanks in advance.
Here are some photos to help see what's wrong:
Attachments
-
 2.jpg150.5 KB · Views: 124
 -
 1.jpg46.2 KB · Views: 132
 -
 IMG_9999.jpeg251.6 KB · Views: 136
 -
 IMG_0011.jpeg268.3 KB · Views: 136
 -
 IMG_0010.jpeg260.7 KB · Views: 142
 -
 IMG_0009.jpeg225.5 KB · Views: 139
 -
 IMG_0008.jpeg248.3 KB · Views: 130
 -
 IMG_0007.jpeg148.8 KB · Views: 140
 -
 IMG_0006.jpeg274.8 KB · Views: 129
 -
 IMG_0005.jpeg193.9 KB · Views: 121
 -
 IMG_0004.jpeg201.6 KB · Views: 129
 -
 IMG_0003.jpeg243.9 KB · Views: 135
 -
 IMG_0002.jpeg353.5 KB · Views: 134
 -
 IMG_0001.jpeg256.5 KB · Views: 140
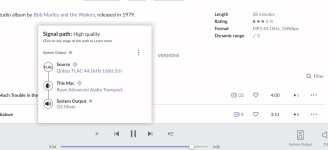
Could you try connecting the usb cable directly to your Mac -> Amanero?
Make sure you see it in MIDI settings at your Mac.
Can’t remember the receiverPi exactly but is the amanero input selected at the MonitorPi Pro? Have you enabled the receiverPi/DDC settings in MonitorPi pro?
Make sure you see it in MIDI settings at your Mac.
Can’t remember the receiverPi exactly but is the amanero input selected at the MonitorPi Pro? Have you enabled the receiverPi/DDC settings in MonitorPi pro?
Not an easy one…
Looking at picture 13, it looks like you have connected the jumpers on the StationPi. That’s correct right? And then using a single supply to power both the DDC and dirty side of audio side?
Have you tried other inputs? Optical or spdif?
Looking at picture 13, it looks like you have connected the jumpers on the StationPi. That’s correct right? And then using a single supply to power both the DDC and dirty side of audio side?
Have you tried other inputs? Optical or spdif?
" it looks like you have connected the jumpers on the StationPi. That’s correct right? And then using a single supply to power both the DDC and dirty side of audio side? "
Totally correct : I bought the project built and tested from Ian. But I had to add Amanero for USB input. Optical or spdif, not yet. My cables are short and TV is far. I will try tomorrow night. Thanks a lot.
Totally correct : I bought the project built and tested from Ian. But I had to add Amanero for USB input. Optical or spdif, not yet. My cables are short and TV is far. I will try tomorrow night. Thanks a lot.


Maybe a clue, red from receiverpidcc manual :
« 3. Works with a Raspberry Pi
The ReceiverPi DDC needs to be installed in to the GPIO of a RaspberryPi when works with it. The supplied 17mm standoffs will be used to mount them together. ReceiverPi DDC will be powered through the RPi GPIO,
so J9 must be kept un connected under this mode.
A GPIO spacer may need to be installed to J1 of the ReceiverPi »
Let’s try it tomorrow night. I will let you know. Thank you @miklau
Good that you've found a way to improve your listening. I regularly read in here and find it quite unfortunate that most people assume that if they encompass some devices or parts like clocks into some soft "dampening" materials, then it automatically must sound better this way. But seeing their implementation and choice of materials, I on the other hand assume that the opposite is true, but I rather keep quiet because I don't want to appear just critical of others and/or arrogant.Best “downgrade” made.
I read by other members here on the forum that using some dampening material at the SC-Pure clocks would improve the listening experience.
I tried this when rebuilding my new DAC, with two different materials; drum sticks damper (like moon gel) and some ptfe foam type. I added a small amount under the clock, so it didn’t rest on the legs in the sockets and a bigger piece on top that where compressed slightly once the next board in the stack was fitted. The clock was floating on the form.
I have literally thought that there was something wrong with my DAC for many weeks now. It sounded dull. Closed in a box like, if that makes any sense.
Today I removed the damping and left the SC-pure in the socket as originally intended.
This was an improvement! I could once again hear the female voice vibrating when pitching and the voices and instruments separated from each other.
Just my humble opinion 🙂
Has anyone experienced similar things?
The arrow on the photo indicates the brown damping foam I used.
But based on my years of experience of resonance management with different methods and materials, I simply wouldn't just assume anything before I listen to it, which I expected all of you did, when you come up with your own solutions. Theories or assumptions is one thing, but there is only one way to find out, if any new solution is good or bad for the sound - carefully listen and compare (and of course without any preconceived notion).
The thing with the resonance management is that each material that gets to contact with the device or part I want to improve (or is supporting it from below), is introducing its own resonance characteristics to it. This type of management can gain you a lot (I mean a L-O-T if done meticulously), but is also very easy to lose if done inappropriately. Therefore an upmost care must be taken when dealing with supporting or otherwise damping. For example I wouldn't recommend mixing two different materials from above & below the clocks for their different resonance characteristics and loading factor.
For this particular task of decoupling clocks from the board itself, I haven't found any better material for this task than the Moongel pads (1 below and 2 on top). I'm quite sure I gained more precision & tighter PRaT. I also experimented with Crown Control Gels in the other parts of my build, but I don't find them as neutral as Moongels, so I haven't implemented them near the clocks. With the Sorbothane, there has to be a surprisingly considerable pressure exerted for it to work optimally, but the pressure needed for even a duro 40 class could damage the clocks or at least change the overall resonance characteristic of your whole build.
Speaking of which - when I look at what is the "base" of your build, I would tell that you're leaving around 35-45% of the potential of your streamer on the table. The type of potential that no cables, clocks or caps can deliver.
This is also written in the manual 🙂Maybe a clue, red from receiverpidcc manual :
« 3. Works with a Raspberry Pi
The ReceiverPi DDC needs to be installed in to the GPIO of a RaspberryPi when works with it. The supplied 17mm standoffs will be used to mount them together. ReceiverPi DDC will be powered through the RPi GPIO,
so J9 must be kept un connected under this mode.
A GPIO spacer may need to be installed to J1 of the ReceiverPi »
Let’s try it tomorrow night. I will let you know. Thank you @miklau
“Works at either RPi free mode or with a RPi”
Have you tried measuring the voltage at the input terminals of each board?
I would try the other input first, just to see if you can get some music and then work back from there with the amanero and later with the RPi -> USB -> Amanero.
Sorry to ask basic questions, but just to rule those out☺️
Edit: Fixed
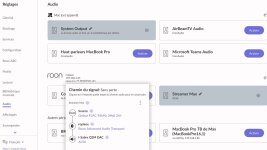
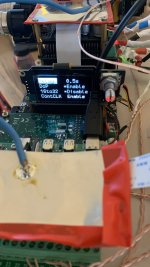
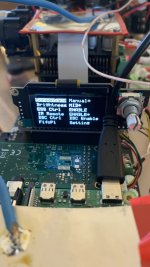
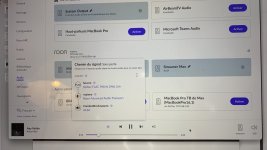
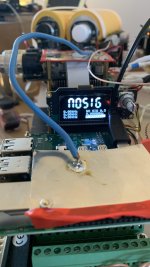
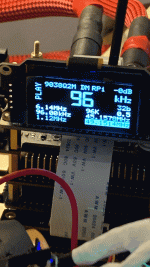
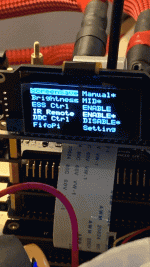
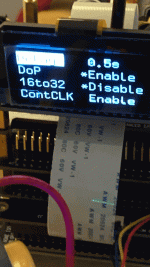
In the process of building my next gen DAC/Streamer, I have the need to try out the new MonitorPi Pro (MPP) for case fitting purposes. To test it and see what the new options are, I used another streamer I had built that was using the ESS Controller with the FiFoPi Q7, along with a RPi for network playback. Using the ESS controller, that system (a roon end-point) works fine, and displays the pertinent information. To test the new MPP, I simply unplugged the ESS controller from the non-isolated GPIO header and plugged in the new MMP. I powered up the system, and the startup banner scrolled across the screen, and then displayed NOSIG. See image below.

This was as far as I got. The end-point wasn't displayed as a configurable audio output device in roon. It was my understanding that the MPP has an integrated ESS controller, and should be a plug-n-play replacement display. I proceeded to look at the menu system on the MPP, but even with trying different settings, I was never able to change the behavior of the MPP, or get the system to be recognizable in roon. Nothing else would be displayed, as the system was not seen by roon. In order to get anything displayed on the MPP, I had to plug back in the ESS controller, and move the MPP to another the DAC GPIO header. When I did that the system 'booted up' properly and I was then able to get the corresponding data from the DAC (Ian DUAL mono). So, the only thing that changed was adding the new MPP. BTW, I am using the extension kit to bring MPP out so I can see it and use it to test. I'm sure I'm overlooking something that I can't see as obvious, or have a setting that's wrong. I was expecting to see more information, yet it seems it have broke my system. Obviously, Ian didn't design the MPP to have to be used together with the ESS controller. Page one of the documentation states that. I need to know the secrets of the MPP, because I am planning on using it in the new build. If there's another board I need to add, I need to know that - but I suspect not.
In the process of building my next gen DAC/Streamer, I have the need to try out the new MonitorPi Pro (MPP) for case fitting purposes. To test it and see what the new options are, I used another streamer I had built that was using the ESS Controller with the FiFoPi Q7, along with a RPi for network playback. Using the ESS controller, that system (a roon end-point) works fine, and displays the pertinent information. To test the new MPP, I simply unplugged the ESS controller from the non-isolated GPIO header and plugged in the new MMP. I powered up the system, and the startup banner scrolled across the screen, and then displayed NOSIG. See image below.
This was as far as I got. The end-point wasn't displayed as a configurable audio output device in roon. It was my understanding that the MPP has an integrated ESS controller, and should be a plug-n-play replacement display. I proceeded to look at the menu system on the MPP, but even with trying different settings, I was never able to change the behavior of the MPP, or get the system to be recognizable in roon. Nothing else would be displayed, as the system was not seen by roon. In order to get anything displayed on the MPP, I had to plug back in the ESS controller, and move the MPP to another the DAC GPIO header. When I did that the system 'booted up' properly and I was then able to get the corresponding data from the DAC (Ian DUAL mono). So, the only thing that changed was adding the new MPP. BTW, I am using the extension kit to bring MPP out so I can see it and use it to test. I'm sure I'm overlooking something that I can't see as obvious, or have a setting that's wrong. I was expecting to see more information, yet it seems it have broke my system. Obviously, Ian didn't design the MPP to have to be used together with the ESS controller. Page one of the documentation states that. I need to know the secrets of the MPP, because I am planning on using it in the new build. If there's another board I need to add, I need to know that - but I suspect not.
Last edited:
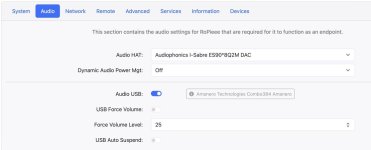
Eureka! After re-reviewing the docs I realized I had not change to the Audiophonics I-Sabre roon configuration map. It works. 🙂
Belive it or not,i have double layers of 3mm duro 70 sorbothane on top clocks.Pressing down by the upper hdmi pro cardMuch better against the the sound whith or whithout dampening.Good that you've found a way to improve your listening. I regularly read in here and find it quite unfortunate that most people assume that if they encompass some devices or parts like clocks into some soft "dampening" materials, then it automatically must sound better this way. But seeing their implementation and choice of materials, I on the other hand assume that the opposite is true, but I rather keep quiet because I don't want to appear just critical of others and/or arrogant.
But based on my years of experience of resonance management with different methods and materials, I simply wouldn't just assume anything before I listen to it, which I expected all of you did, when you come up with your own solutions. Theories or assumptions is one thing, but there is only one way to find out, if any new solution is good or bad for the sound - carefully listen and compare (and of course without any preconceived notion).
The thing with the resonance management is that each material that gets to contact with the device or part I want to improve (or is supporting it from below), is introducing its own resonance characteristics to it. This type of management can gain you a lot (I mean a L-O-T if done meticulously), but is also very easy to lose if done inappropriately. Therefore an upmost care must be taken when dealing with supporting or otherwise damping. For example I wouldn't recommend mixing two different materials from above & below the clocks for their different resonance characteristics and loading factor.
For this particular task of decoupling clocks from the board itself, I haven't found any better material for this task than the Moongel pads (1 below and 2 on top). I'm quite sure I gained more precision & tighter PRaT. I also experimented with Crown Control Gels in the other parts of my build, but I don't find them as neutral as Moongels, so I haven't implemented them near the clocks. With the Sorbothane, there has to be a surprisingly considerable pressure exerted for it to work optimally, but the pressure needed for even a duro 40 class could damage the clocks or at least change the overall resonance characteristic of your whole build.
Speaking of which - when I look at what is the "base" of your build, I would tell that you're leaving around 35-45% of the potential of your streamer on the table. The type of potential that no cables, clocks or caps can deliver.
This is also written in the manual 🙂
“Works at either RPi free mode or with a RPi”
Have you tried measuring the voltage at the input terminals of each board?
I would try the other input first, just to see if you can get some music and then work back from there with the amanero and later with the RPi -> USB -> Amanero.
Sorry to ask basic questions, but just to rule those out☺️
"Sorry to ask basic questions, but just to rule those out☺️"
Please, don't be. Everything is helpful. First off all : many thanks
“Works at either RPi free mode or with a RPi”
I will feed it with my Mac
"Have you tried measuring the voltage at the input terminals of each board?"
Yes I did it. Everything is ok (3.1V at Q7 clean side too low ?) . All cards are powered with UcPure ( 50VA Toroidy transformer to each card)
"I would try the other input first, just to see if you can get some music"
During the weekend, I will try with optical from TV
" and then work back from there with the amanero and later with the RPi -> USB -> Amanero."
I tried simpler setup : RPI4, Q7, ESS, OPA. Q7 and DAC seem to be locked. But still no sound out at all.
Here is some pictures :
Attachments
Correction !!!! I've got it : 3 mistakes.
1. ReceiverDCC must be on RPI plugged through GPIO
2. Amanero was upside down
3. ESS jumpers was 90 degrees rotated wrong (D4 less brightness gave me the clue)
Everything will be ok now.
First listening : so easy, so pleasant
1. ReceiverDCC must be on RPI plugged through GPIO
2. Amanero was upside down
3. ESS jumpers was 90 degrees rotated wrong (D4 less brightness gave me the clue)
Everything will be ok now.
First listening : so easy, so pleasant
@MaxB_70
Glad to hear you’re got music playing🙂
It looks like you got some interesting cabling done at your build. What are you using ?
Feel free to share any good recommendations and how well it improves sound quality🙂
I am using some simple 99.99% OFC 1.25mm2 copper cable between my UcPure and DAC stark. As short as possible. I think it is hard to fit much larger size cables in the Phonix Contact connectors. A 1.5 mm2 would probably also work…[/USER]
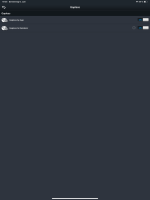
- Home
- Source & Line
- Digital Line Level
- Asynchronous I2S FIFO project, an ultimate weapon to fight the jitter