I've just gone through this process myself, and here was my procedure:Much obliged! I used a tap drill bit in a small power drill, twice. They broke, twiceno slow speed and backing up with such machines!
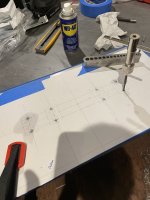
1) Make templates of the hole in a CAD software, then print them out and verify that it fits with the actual PCBs.
2) Position the paper on the area that needs tapping/drilling.
3) Make a tiny dent with a hand punch in the middle of the X of each hole.
4) Take the smallest drill bit you have: manually make the tiny dent into a bigger groove by turning it a few times (I found that the bigger drill bit will have less play versus just using the punch, and not having to whack the punch to make a bigger dent makes the positioning much more precise).
5) If you only have an imperial drill guide (the metal bar with holes in my picture below), use the closest imperial drill bit rounded down, add a stop to for the depth you want (if you're going for blind holes) taking into account the drill guide height.
6) Place the drill bit in the right size hole, and place it in the small groove made in step 4.
7) Carefully clamp down the other end of the drill guide to the surface you're drilling (if the groove from step 4 is deep enough, the drill bit and guide should remain well aligned).
8) Drill with the hand drill to the stop, or all the way through.
9) Unclamp the drill guide.
9.5) If an imperial drill guide was used, take the correct metric drill bit for the tap size (I used 3.3 mm for M4 and 2.4 mm for M3) and re-drill the holes without exerting much pressure on the drill. The very-slightly bigger metric drill will just follow the path of least resistance and enlarge the previously made holes while keeping the 90-degree angle. Stop when you feel resistance if doing blind holes
10) Make sure you clear the aluminium bits from the holes if doing blind holes.
11) For blind holes: first use a tapered spiral flute tap and lubrication (I got some Guhrings that seem to be great quality) until you feel resistance (it feels slightly different than when you just need to un-screw and re-screw the tap). Do not use a drill, use the tap holder (something like in the picture).
11) Make sure you clear the aluminium shavings from the holes again
12) Switch to a bottoming tap, be gentle on screwing it back into the previously cut thread, and get a couple of extra turns (I was getting about 1.5 extra turns). Same as before, stop when you feel resistance despite the "un-screw / re-screw" method.
13) Clear the shavings from the holes.
If not going for blond holes, just use the tapered spiral flute tap all the way through. If you're using quality taps and taking your time, blind holes are not more difficult than through ones, and the extra time it takes isn't too great.
The template and punch/tiny drill method worked very well for me. I've bottom tapped 4x MOSFET holes and 4x rectifier holes (the picture is the template for the rectifiers) and the alignment was perfect. So much so that I did the same for all the bottom plate holes for the PSU and softstart (M3 tap, but all the way through given the small thickness of the bottom plate).
Hope this helps
Attachments

Next time I need to drill and tap holes, I'm going to use a stubby drill bit intead of a standard length one. I did some M3 holes in an aluminum heatspreader on my current project (still in process) that came out a little crooked from the drill bit (a #39) deflecting under pressure.
I've just gone through this process myself, and here was my procedure:
tnx for that post, it'll certainly help some Greedy Boyz
just to add funny pic, as illustration that paper is doing wonders.......
btw. when I have just several holes to mark, I'm using paper tape (yellow is better to draw on, than black of heatsink) and calipers/metal ruler
My experience with M3 M4 4-40 6-32 is use a one piece drill/tap, oil and a 7 (15 is the max on mine) or so setting on your drill. Justin Forbis taught me this years ago. Is it tedious? YES
I just used the board itself and the mosfet for any needed template. Marked with sharpy. Board back over. Right on, use tap to make guide whole. Didnt take much time at all. All the time was carefully cutting the threads, and if you want, positioning between the fins.
Russellc
Russellc
So you turned the tap with a drill? I've heard of that, dont think I have that good of a touch. I did it slow poke style, bit and tap were amazon cheapie. Worried they would break. I stop the cut as soon as the drag increases, back up re do, etc. Fortunately, only 8 holes!My experience with M3 M4 4-40 6-32 is use a one piece drill/tap, oil and a 7 (15 is the max on mine) or so setting on your drill. Justin Forbis taught me this years ago. Is it tedious? YES
So you turned the tap with a drill
I'm doing that all the time
cordless drill, set to min. torque and slow speed
but, that's really matter of mileage
if one doesn't have it, better to be cautious - slow and steady - two turns CW, half turn CCW, with schneid paste, back all the way and shoot with compressed air if tap is deep, then proceed
etc.
edit: worth noting - there are several types of tap tools - regular taps (set of 2 or 3 bits per size for gradual work), same arranged sets but for blind holes
then machine regular taps - one piece covering all 2(3) phases of hand taps , and machine taps for blind holes are usualy having spiral form
for work with cordless drill I'm using machine taps
and - with time I decided that it's better keeping drill and tapping phases separate - had few mishaps using drill-tap
in cases when stumbling on cheesy aluminum better to avoid risks

Last edited:
Hi,
I just discovered that I have a couple of Mundorf resistors wirh 0.1R 20w; they are normally used in xo applications.
They are flame proof and have a very low inductance of 0.07 mH. Are they okay in a CRC psu? I think so but have no experience.
Just a symbolic picture with different value:

I just discovered that I have a couple of Mundorf resistors wirh 0.1R 20w; they are normally used in xo applications.
They are flame proof and have a very low inductance of 0.07 mH. Are they okay in a CRC psu? I think so but have no experience.
Just a symbolic picture with different value:
electrically OK, just take care of mounting - surface ceramic is tough but better to prevent contact to case if surface decide to crumble of 
anyhow - note that inductance of resistor in that position is even welcome
not that today's WW resistors are having much inductance ......
(rebranding specialists ....... one day I'll start my own production of resistors and caps, ultraexpensive and ultragigamegabest)
anyhow - note that inductance of resistor in that position is even welcome
not that today's WW resistors are having much inductance ......
(rebranding specialists ....... one day I'll start my own production of resistors and caps, ultraexpensive and ultragigamegabest)
Cool, thanks - so if inductance is welcome, I even could use the yellow power resistors in aluminum housing, they are defined as inductive.

If you are lucky you can fit a nut (or the head of a machine screw) at the other end and then you don’t need to tap, just use a nut and machine screw.Yes, a hole with light at the other end!
Will you be using these in your Iron Pumpkins ?I can inform you that work on my superduperZM_AI CNC winding apparatus is nicely coming along
necessary to make nice fine-wire-windings for my Turtles, fed enough with all issues having that part of work outsourced
from now on ( say week - 10 days) I believe I'll doing that as easygoing Zen practice
winding 2Kturns or so, 25 taps including start and end, if wire is fed by hand - that's hard Zen practice
so, only logical is that AI works for me hard part of the job, while coffee and making taps and foot-tapping - that I'm keeping as my job
was in dilemma - either to purchase smaller, factory made one through Alibaba or to make my custom one
then fact that I hate paperwork necessary for import but also fact that my custom one will function same as I'm thinking ......... enough reasons to avoid import of factory made
I mean, I'm going to make just one product, and - if I ever go totally nutz thinking that I need sturdy apparatus - it's goping to be a breeze to make one, once when I have proven recipe and software for Arduion brain
so, now you see where my activity is lately
amps - who need more amps...... buy more speakers
yes, those being exactly for Pumpkins
in short, finally moving production of coils from outsource to in-house
my guy, who did perfect work, can't do that work anymore from various reasons, and I'm not in the mood to search someone else, just to be forced to thoroughly check every piece afterwards
in short, finally moving production of coils from outsource to in-house
my guy, who did perfect work, can't do that work anymore from various reasons, and I'm not in the mood to search someone else, just to be forced to thoroughly check every piece afterwards
- Home
- Amplifiers
- Pass Labs
- Babelfish XA252 / Babelfish XA252 SIT / Babelfish XA252 SET