Played few hours more this morning, and raised the volume a bit more. Everything becomes more balanced at mid-volume, then lows start to increase in the balance at levels above what I usually listen to (those speakers needs way less that the 30W they can handle).
Anything to focus on to understand if I’ll need to do something on the speaker or positioning when the break-in will be finished?
Thank you all!
Roberto
Anything to focus on to understand if I’ll need to do something on the speaker or positioning when the break-in will be finished?
Thank you all!
Roberto

Is it needed to have a gasket between the cabinet and the speaker?
I have mounted them on the FHXL with the MA11MS brand new, but I haven't them on the MA10.3 I've bought used for the Silbury.
Thanks
Roberto
I have mounted them on the FHXL with the MA11MS brand new, but I haven't them on the MA10.3 I've bought used for the Silbury.
Thanks
Roberto
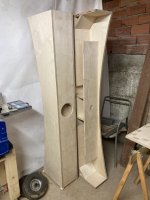
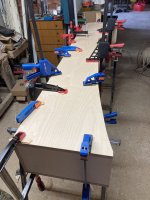
Silbury glued and clamped.
Is there a way to be sure internal passages are not leaking, bypassing the horn effect?

Is there a way to be sure internal passages are not leaking, bypassing the horn effect?
Attachments

I use gap-filling polyurethane glue (Gorilla glue, though I used name brand equivalents). I apply enough to insure squeezeout along seams. More cleanup on the outside, I leave in on the inside most of the time. I've never had a leak I could detect or an audible effect that suggested a leak this way. That final glueup rendering much of the interior unreachable is scary!
Thanks! I used vinavil, so not the best choice. Anything I can do now to check if it is leaking somewhere, or to fix it?
Thanks @Scottmoose !
I have some more question that came with the box closed 🙄
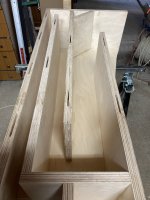
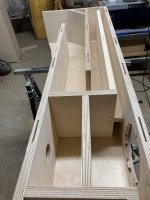
We kept internal edges sharp. Would it be better to shape the internal sheets of wood with small 45 degrees (or rounded) edges like for the bottom one on the FHXL?
We used alot of wood bisquits to keep everything mechanically tight. This makes it difficult to close the cabinet at the end (small variation in the perpendicularity or location of the bisquits need the bisquits to be aligned by pushing them with a rod from outside). What is the suggestion on the positioning of the bisquits? Did we overdo?
We closed the side by: adding vinavil then gently brushing for a constant layer of it on all holes for bisquits and all sides of the already glued cabinet; putting the side on as close as possible aligning all bisquits, then starting from the bottom with screwed clamps (with wood between clamps and cabinet to avoid signs on the latter) then substitued with quick action clamps (good to keep in place, not to move the side into place) up to the top of to side.
I have some more question that came with the box closed 🙄
We kept internal edges sharp. Would it be better to shape the internal sheets of wood with small 45 degrees (or rounded) edges like for the bottom one on the FHXL?
We used alot of wood bisquits to keep everything mechanically tight. This makes it difficult to close the cabinet at the end (small variation in the perpendicularity or location of the bisquits need the bisquits to be aligned by pushing them with a rod from outside). What is the suggestion on the positioning of the bisquits? Did we overdo?
We closed the side by: adding vinavil then gently brushing for a constant layer of it on all holes for bisquits and all sides of the already glued cabinet; putting the side on as close as possible aligning all bisquits, then starting from the bottom with screwed clamps (with wood between clamps and cabinet to avoid signs on the latter) then substitued with quick action clamps (good to keep in place, not to move the side into place) up to the top of to side.
I have to say that my best friend Marco did most of the job on them, as my expertise on wood is very limited.
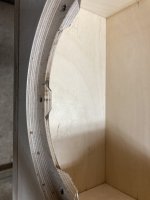
It is a more complicated job compared to the FHXL, starting from cutting all parts correctly (I preferred to give dimensions to a wood supplier to have this job correctly done), then the curve on the back (in the last set of photos you can see the wooden template we did of half of the curve to be sure to cut it properly), up to the placement and alighement of internal passages (thanks to have made them straight!).
But then, even before any painting and even not finished, being close to them is fashinating. They are a piece of art. The rear curve is the essence of καλὸς καὶ ἀγαθός : it’s beauty that becomes functional.
We kept internal edges sharp. Would it be better to shape the internal sheets of wood with small 45 degrees (or rounded) edges
No.
The LF we want to get thru willnot se them, the HF we do not will be iltered out by them.
dave
- Home
- Loudspeakers
- Full Range
- A new pair of Silbury speakers: newbie questions