I select around 1.8 A in TIC control center (according to the stepper datasheet. It's quite easy to calculate approximate power dissipation of each phase with coil impedance.The retro fit looks good. How much current did you set to end up with that temperature?
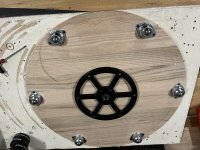
New parts have been made. The gear has been changed to allow it to be printed in one piece without supports on the teeth. I wasn’t happy with the outcome of gluing the two pieces together.
The one inch hole for the spigot wasn’t completely square so a new mount was printed there is a 30mm section to go in the base. I’ve made a router template that aligns with the plug I printed before. With this I should be able to get a nice neat straight hole 😀
The one inch hole for the spigot wasn’t completely square so a new mount was printed there is a 30mm section to go in the base. I’ve made a router template that aligns with the plug I printed before. With this I should be able to get a nice neat straight hole 😀
Attachments


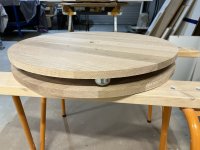
Good news and bad news. I made a platform that spins, bad news the laminated solid wood is moving and warping as soon as it isn’t fixed to a flat surface more than I am comfortable with.
Attachments
There is a way to avoid mechanical bearings and warped boards that I will relate here. I first saw it mentioned a long while ago in a post by John Kreskovsky IIRC. He use two large (e.g. 4x4 feet) sheets of melamine covered particleboard. This is the white coated stuff sometimes used for cheap countertops, etc. There was a central pin about which the upper sheet rotated. The lower sheet was fixed (e.g. to the ground), I think just lying on it but you could pin or stake it down. He used some sort of lubricant or friction reducing agent (graphite? spray teflon?) in between the two sheets. Supposedly it was pretty low friction and turned easily. The large are of the top sheet made it easy to set up the speaker so that the center of the baffle plane remained above the axis of rotation (the pin). Keep in mind that this means that the speaker is displaced to one side. If you center the speaker within the round turntable, the baffle plane will rotate around in a circle. This causes the distance between the mic and the drivers to change with angle, which will impart an angle-dependent error into the data (for both SPL and phase).
If you used the two-sheet construction approach but made the upper sheet round you could probably still drive it via a simple plastic chain or belt in a groove around the circumference mated to a stepper motor. You would get a lot of reduction that way, which should translate to precise rotational positioning.
I know you have invested a lot of time and effort in the current turntable, but you might consider this other approach since it has some advantages.
Last edited:
It is not as good looking as solid wood, but I had never a single problem with Birch multilayers plywood. Use 2 layers of 18 mm screwed together or 30 mm sheet. So maybe also a way to consider...
You could try attaching battens across the grain using screws and glue, it might stabilize it enough. To get it flat again, lightly dampen the concave side with water, using a mist or a wet towel. It should unwarp in about 10 minutes. Then attach the battens. As I said, this might work, but there is no guarantee.
The more certain path forward is to cut a pair of matching circles from plywood, MDF, or some other sheet material. You can re-use all your hardware, and that is a big plus. JCGA recommends two layers of 18mm, but honestly I think 1 layer might be stiff enough.
I sympathize. I have been constructing in wood for more than 30 years and I still get bit in the *** by this kind of crap.
j.
Attachments
If you can still buy them at a good price, you might consider laminating two tops together to form a single surface.
If you glued two of the round tops together, with the grain at right angles, the result would be very much more stable than what you have now.
The downside is now your mechanism is twice as thick, and twice as heavy.
j.
If you glued two of the round tops together, with the grain at right angles, the result would be very much more stable than what you have now.
The downside is now your mechanism is twice as thick, and twice as heavy.
j.
All very reasonable suggestions and all were considered as options before starting out. The original plan was to use form ply for it's low friction and stability, something cheap shiny and simple took my eye instead.
The warp came out easily enough by clamping to a flat surface with a weight in the middle, but the ease of warping and bending back gives me pause that this a worthwhile material to use in this application. I do have a spare one but it might be more useful as a coffee table 🙂
I considered direct drive with a large belt, there are a few projects using that method, mtg90's turntable has a belt in a groove and that works out fine. There is another design for rotating people and works too.
https://github.com/MGX3D/Turntable
I decided against it preferring to have a specific number of geared teeth but I can see pros and cons either way.
I can reuse almost everything for another purpose so I'm not tied to what I started with. I have to decide if I change material and keep with the original plan or change to a different strategy altogether.
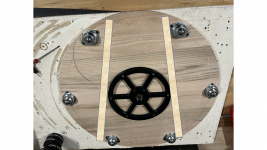
I decided to hedge my bets and try using the circular platform as a pulley with 594mm disc I get the equivalent of 936 teeth which rounds out to 26 steps per degree and doesn't trigger an OCD response 🙂
Formply will be the material as it is one of the only suitable things that has not gone through the roof in price. The birch ply sheet I used for my CNC table has gone up from an expensive A$145 to an unpalatable A$260.
Formply will be the material as it is one of the only suitable things that has not gone through the roof in price. The birch ply sheet I used for my CNC table has gone up from an expensive A$145 to an unpalatable A$260.
From github: "ARTA calls Arta_tic with either -r or angle."
So that means I just have to create a program that reacts to "\turntable.exe 45" with turning the table to 45° relative to on axis?
I created my own turntable with a cheap TB6600 stepper motor driver, an Arduino Nano for grbl Firmware, a 50cm diameter axial bearing (50€ on ebay) and some lasercut gears. Total cost was ~70€ + wood for table and gears. At the moment I send gcode to grbl, but bought ARTA to be able to automate the whole process.
Sending gcode is pretty easy with python and chatgpt, but there doesn't seem to be any documentation on what ARTA sends to the program apart from the comment on Toms github.
I'll publish everything as soon as I get it running as I think this is the cheapest way to build a turntable.
YesSo that means I just have to create a program that reacts to "\turntable.exe 45" with turning the table to 45° relative to on axis?
I tried grbl in conjunction with the Tic as a stepper controller and it was very temperamental and subject to noise. I had a few times where my prototype went into a full speed spin and would not stop without the power being pulled 😱I created my own turntable with a cheap TB6600 stepper motor driver, an Arduino Nano for grbl Firmware
The Tic with Tom's code is rock solid, it is more expensive but I think it is a good solution. My problem with grbl was the Tic not being a good external stepper, that is an easy problem to overcome, grbl and a basic stepper is a good option, Audiomatica use it in their open source turntable.
I did speak with Tom about having the code send gcode via Python to an Arduino via Pyserial. The custom version of the code can be changed to do that or use it as a base to add the functionality into an exe. I wanted to do it via Bluetooth which can work but I gave up and bought a long USB lead for the Tic instead 🙂
I tried my turntable (with a standard TB6600 stepper motor driver and a NEMA23 I found in our parts bin) several times, I never had an issue. Apart from my gearing being too high to move a 60kg speaker reliably. I fixed that by having a friend stand behind the speaker and give it a little push lol. Will fix some time in the future that by reducing the gearing further.
What is "the Tic"?
My main program:
And the program to control the main program by starting it with "control.py [angle]":
Compiling the control program to an .exe file is a piece of cake. The main program is a bit more difficult, but I'd prefer to leave it as a Python script, as this would be executable under Linux as well. Maybe REW will add the functionality to control a turnbable at some point.
What is "the Tic"?
Does ARTA expect anything else, like feedback when the movement is finished?
My main program:
Code:
import serial
import time
import configparser
import tkinter as tk
from tkinter import ttk
import threading
import socket

# Function to get available COM ports
def get_available_ports():
    import serial.tools.list_ports
    return [port.device for port in serial.tools.list_ports.comports()]

# Function to connect to GRBL
def connect_grbl():
    try:
        global grbl_serial
        grbl_serial = serial.Serial(port_var.get(), baudrate=int(baudrate_var.get()), timeout=float(timeout_var.get()))
        grbl_serial.write(b'\r\n\r\n')
        time.sleep(2)
        grbl_serial.flushInput()
        grbl_serial.write(b'$X\n')
        update_output_text("Connected to GRBL\n")
    except Exception as e:
        update_output_text(f"Connection failed: {e}\n")

# Function to disconnect from GRBL
def disconnect_grbl():
    global grbl_serial
    if grbl_serial is not None:
        try:
            grbl_serial.close()
            update_output_text("Disconnected from GRBL\n")
        except Exception as e:
            update_output_text(f"Disconnection failed: {e}\n")
    else:
        update_output_text("Not connected to GRBL\n")

# Function to toggle GRBL connection
def toggle_grbl_connection():
    global grbl_connected
    if not grbl_connected:
        connect_grbl()
        grbl_connected = True
        connection_button.config(text="Disconnect")
    else:
        disconnect_grbl()
        grbl_connected = False
        connection_button.config(text="Connect")

# Function to send G-code command
def send_gcode_command(command):
    global grbl_serial
    if grbl_connected:
        try:
            grbl_serial.write(f"{command}\n".encode())
            update_output_text(f"Sent command: {command}\n")
            grbl_response = grbl_serial.readline().decode().strip()
            update_output_text(f"GRBL response: {grbl_response}\n")
        except Exception as e:
            update_output_text(f"Sending command failed: {e}\n")
    else:
        update_output_text("Not connected to GRBL\n")

# Function to set the zero position
def set_zero_position():
    send_gcode_command("G10 P0 L20 X0 Y0 Z0")

current_angle = 0

def update_current_angle(angle):
    global current_angle
    current_angle = angle


def handle_connection(conn, addr):
    # Get the desired angle and update the current angle
    desired_angle = float(data)
    relative_angle = desired_angle - current_angle
    update_current_angle(desired_angle)

# Function to adjust the turntable position in steps
def adjust_turntable_position(step):
    send_gcode_command(f"G91 X{step} F500")

# Functions for specific step buttons
def move_small_step_positive():
    adjust_turntable_position(0.5)  # Change this value according to your requirements

def move_small_step_negative():
    adjust_turntable_position(-0.5)  # Change this value according to your requirements

def move_large_step_positive():
    adjust_turntable_position(10)  # Change this value according to your requirements

def move_large_step_negative():
    adjust_turntable_position(-10)  # Change this value according to your requirements

# Function to save settings to config.ini
def save_settings():
    config = configparser.ConfigParser()
    config["SETTINGS"] = {
        "Port": port_var.get(),
        "Baudrate": baudrate_var.get(),
        "Timeout": timeout_var.get(),
    }

    with open("config.ini", "w", encoding="utf-8") as configfile:
        config.write(configfile)

    update_output_text("Settings saved\n")

# Function to update output text and scroll to the end
def update_output_text(text):
    output_text.insert(tk.END, text)
    output_text.see(tk.END)

# Function to send the entered configuration command
def send_configuration_command():
    config_command = config_entry.get()
    send_gcode_command(config_command)

# Function to load settings from config.ini
def load_settings():
    config = configparser.ConfigParser()
    config.read("config.ini")

    if "SETTINGS" in config:
        port_var.set(config["SETTINGS"]["Port"])
        baudrate_var.set(config["SETTINGS"]["Baudrate"])
        timeout_var.set(config["SETTINGS"]["Timeout"])

# Initialize the main window
root = tk.Tk()
root.title("GRBL Controller")

# Variables for settings
port_var = tk.StringVar()
baudrate_var = tk.StringVar()
timeout_var = tk.StringVar()

# Load settings from config.ini
load_settings()

# Create main frame
main_frame = ttk.Frame(root, padding="10")
main_frame.grid(row=0, column=0, sticky="w")

# Port dropdown menu
port_label = ttk.Label(main_frame, text="Port:")
port_label.grid(row=0, column=0, sticky="w")
port_dropdown = ttk.Combobox(main_frame, textvariable=port_var, values=get_available_ports())
port_dropdown.grid(row=0, column=1, sticky="w")

# Baudrate dropdown menu
baudrate_label = ttk.Label(main_frame, text="Baudrate:")
baudrate_label.grid(row=1, column=0, sticky="w")
baudrate_dropdown = ttk.Combobox(main_frame, textvariable=baudrate_var, values=["9600", "19200", "38400", "57600", "115200"])
baudrate_dropdown.grid(row=1, column=1, sticky="w")

# Timeout entry
timeout_label = ttk.Label(main_frame, text="Timeout:")
timeout_label.grid(row=2, column=0, sticky="w")
timeout_entry = ttk.Entry(main_frame, textvariable=timeout_var)
timeout_entry.grid(row=2, column=1, sticky="w")

# Connection button
connection_button = ttk.Button(main_frame, text="Connect", command=toggle_grbl_connection)
connection_button.grid(row=3, column=0, columnspan=2)

# Set zero position button
zero_position_button = ttk.Button(main_frame, text="Set Zero Position", command=set_zero_position)
zero_position_button.grid(row=4, column=0, columnspan=2)

# Small step positive button
small_step_positive_button = ttk.Button(main_frame, text="+ 0.5°", command=move_small_step_positive)
small_step_positive_button.grid(row=8, column=0, sticky="w")

# Small step negative button
small_step_negative_button = ttk.Button(main_frame, text="- 0.5°", command=move_small_step_negative)
small_step_negative_button.grid(row=8, column=1, sticky="w")

# Large step positive button
large_step_positive_button = ttk.Button(main_frame, text="+ 10°", command=move_large_step_positive)
large_step_positive_button.grid(row=9, column=0, sticky="w")

# Large step negative button
large_step_negative_button = ttk.Button(main_frame, text="- 10°", command=move_large_step_negative)
large_step_negative_button.grid(row=9, column=1, sticky="w")

# Save settings button
save_button = ttk.Button(main_frame, text="Save Settings", command=save_settings)
save_button.grid(row=6, column=0, columnspan=2)

# Configuration entry
config_label = ttk.Label(main_frame, text="Manually send G-CODE:")
config_label.grid(row=10, column=0, sticky="w")
config_entry = ttk.Entry(main_frame)
config_entry.grid(row=10, column=1, sticky="w")

# Configuration button
config_button = ttk.Button(main_frame, text="Send", command=send_configuration_command)
config_button.grid(row=11, column=0, columnspan=2)

# Output text
output_text = tk.Text(main_frame, wrap="word", width=40, height=10)
output_text.grid(row=7, column=0, columnspan=2)

# Global variables
grbl_connected = False
grbl_serial = None

# Function to handle incoming connections
def handle_client_connection(client_socket):
    angle = client_socket.recv(1024).decode()
    update_output_text(f"Received angle: {angle}\n")
    send_gcode_command(f"G90")
    send_gcode_command(f"G0 X{angle}")
    client_socket.close()


# Function to create a socket server
def create_socket_server():
    server = socket.socket(socket.AF_INET, socket.SOCK_STREAM)
    server.bind(('localhost', 5000))
    server.listen(5)

    update_output_text("Listening for angle commands...\n")

    while True:
        client_sock, _ = server.accept()
        client_handler = threading.Thread(target=handle_client_connection, args=(client_sock,))
        client_handler.start()

# Start the socket server in a new thread
socket_server_thread = threading.Thread(target=create_socket_server)
socket_server_thread.daemon = True
socket_server_thread.start()

# Start the main loop
root.mainloop()
And the program to control the main program by starting it with "control.py [angle]":
Code:
import sys
import socket

def send_angle(angle):
    try:
        angle = float(angle)
    except ValueError:
        print(f"Invalid angle: {angle}")
        return

    # Connect to the server (main program)
    server_address = ("localhost", 5000)
    try:
        sock = socket.socket(socket.AF_INET, socket.SOCK_STREAM)
        sock.connect(server_address)
        sock.sendall(str(angle).encode())
        sock.close()
    except Exception as e:
        print(f"Error connecting to server: {e}")

if __name__ == "__main__":
    if len(sys.argv) > 1:
        angle_arg = sys.argv[1]
        send_angle(angle_arg)
    else:
        print("No angle provided")
Compiling the control program to an .exe file is a piece of cake. The main program is a bit more difficult, but I'd prefer to leave it as a Python script, as this would be executable under Linux as well. Maybe REW will add the functionality to control a turnbable at some point.
Attachments
Last edited:
I don't know. Maybe it just waits for the exe to finish?Does ARTA expect anything else, like feedback when the movement is finished?
You could try autoit scripting. And sometimes I think I could write my own and import the data into REW. But I have an idea every 5 minutes, time for 1 a month and I finish even less...Maybe REW will add the functionality to control a turnbable at some point.
ChstGPT4 wrote that program for me. I wouldn't have the patience to read all the documentation for one project. I feel you for having a million projects. Makeshift solution is the best kind of solution 😀
I tried autoit and REW but it can't read the window text of a Java application apparently. And just checking the pixel color at a specific location isn't reliable enough imho, so I bought ARTA instead.
I'll test it in a minute. Let's hope this wasn't a waste of time 🙂
I tried autoit and REW but it can't read the window text of a Java application apparently. And just checking the pixel color at a specific location isn't reliable enough imho, so I bought ARTA instead.
I'll test it in a minute. Let's hope this wasn't a waste of time 🙂
ARTA let's you set a delay which I could set to zero because the turn table is much quicker than ARTA.I don't know. Maybe it just waits for the exe to finish?
Everything works perfectly with the program I posted.
I will make a post how I built everything soon.
"Tic" is the name of a collection of motor control boards from Polulu, they are self contained boards that can be controlled by various software interfaces.What is "the Tic"?
The Tic is the equivalent of the Arduino and the TB6000 in something the size of a matchbox.
The code Tom created is an interface between Arta and ticcmd a windows based program to control the Tic, so arguments from ARTA can control a stepper motor through the tic.
I actually really like it and am glad that I chose it. It is more expensive than an Arduino and motor control board but it is a simple straightforward device that works.
You might want to create your own thread to document your build, not to chase you away but to avoid confusion for anyone following at a later time.
If you link it back here I can put the link in the first post as an alternative path to follow.
Hello! Did you share your project?ARTA let's you set a delay which I could set to zero because the turn table is much quicker than ARTA.
Everything works perfectly with the program I posted.
I will make a post how I built everything soon.
I want to do exactly the same - control a stepper motor driven turntable that accepts Gcode commands over USB serial. You used Grbl but I plan to use Marlin firmware on the control board, however both accept Gcode commands.
I have zero coding skills so your Python scripts are foreign to me. Would you be able to help me out with an .exe that accepts the ARTA argument and sends Gcode over serial?
Thanks!
Hi Tenson,
no, I haven't done that yet. Also, I don't have much coding skills either, that was 95% ChatGPT 😀
At the moment the turntable is in a storage unit until winter. However, with the code above, you should be able to use that if you do exactly the same. I put GRBL on an Arduino Nano, hooked it up to the TB6600 which controls the motor. The Arduino is connected to my PC via USB. If you encounter errors, show the code and the error to ChatGPT, it's ridiculous how good that thing is.
- Home
- Loudspeakers
- Multi-Way
- Automatic Polar Measurements using ARTA, stepper motor and Tic Controller