Here's a guy taking apart the Sony DML honeycomb driver and repairing it some 8 years ago. Note the size of the voice coil and the massive magnet. Looks like we can turn any standard cone speaker into a DML speaker, just cut the cone and add a honeycomb to the existing surround with some spikes fixed to it and the voice coil.
The flat honeycomb panel is square and quite small.
And, here's a guy, probably in Vietnam, recreating something nice out of a damaged Sony DML speaker system 3 years ago.
The flat honeycomb panel is square and quite small.
And, here's a guy, probably in Vietnam, recreating something nice out of a damaged Sony DML speaker system 3 years ago.
Last edited:

As Andreas alluded, there's really no concensus on the best way. But, in my own experience, what I find works best is a layer of double sided tape between the frame and the panel around most (or all) of the perimeter. The best tape is one with good damping properites.Can someone please explain to me based on their own experience how to connect the vibrating plate to its frame, such as whether it is better to make it integral around the entire perimeter or only the short or long side or maybe just some points and if you need rubber pads or screwed directly
Thank you
Below are a few pictures of a prototype I happened to build just last night. It's a glass panel (inspired by chdsl's recent posts) attached to a poplar frame using 1/2" wide double sided tape.
So far, this type of mounting to be the best I have found so far. Attaching the panel to the frame this way constrains the perimeter enough to get the most low frequency response out of the panel, while smoothing out the resonances.
I have found three tapes that work quite well:
3M Extreme: https://www.scotchbrand.com/3M/en_U...ing-Tape/?N=4335+3289430068+3294529207&rt=rud
3M 411: https://www.scotchbrand.com/3M/en_U...430038+3294529207&preselect=3293786499&rt=rud
Butyl Rubber Glazing Tape: https://www.amazon.com/Black-Butyl-...crl+1/8+x+1/2+butyl+tape,industrial,73&sr=1-4
Incidentally, I don't recommend this tape: 3M Indoor: https://www.scotchbrand.com/3M/en_U...7&preselect=5584757+8716348+3293786499&rt=rud
This provides no significant damping. But try it if you are interested in seeing the effect.
Don't fear damping. Counter-intuitively, damping the perimeter does not reduce output. It will tame some spikes however and reduce "ringing"
As shown in the images, I don't usually go all the way to the corners with the mounting tape, but stop a few inches short. This is only because I do a lot of prototyping and I found that it's much easier to separate a panel from the frame if you don't go all the way to the corners! But there is very little effect of leaving the corners free vs. taped in my experience.
The best width (and thickness) of the tape will vary depending on the panel, and so far the only way I know how to optimize it is by trial and error. For my 5 mm plywood panels, about 1/2" wide works pretty well. Going wider seems only to overconstrain the panel, driving up the fundamental frequency without any increase in damping. Going much narrower reduces the damping and exacerbates the ringing and spikes and dips in the response.
Using spots of tape every inch or two can work about the same, but is more effort than applying a continuous strip, so I usually opt for the strip method. But too few spots is like going too narrow (spikes and ringing).
Eric
Oh oh! Acrilyc or glass under test? 😉As Andreas alluded, there's really no concensus on the best way. But, in my own experience, what I find works best is a layer of double sided tape between the frame and the panel around most (or all) of the perimeter. The best tape is one with good damping properites.
Below are a few pictures of a prototype I happened to build just last night. It's a glass panel (inspired by chdsl's recent posts) attached to a poplar frame using 1/2" wide double sided tape.
So far, this type of mounting to be the best I have found so far. Attaching the panel to the frame this way constrains the perimeter enough to get the most low frequency response out of the panel, while smoothing out the resonances.
I have found three tapes that work quite well:
3M Extreme: https://www.scotchbrand.com/3M/en_U...ing-Tape/?N=4335+3289430068+3294529207&rt=rud
3M 411: https://www.scotchbrand.com/3M/en_U...430038+3294529207&preselect=3293786499&rt=rud
Butyl Rubber Glazing Tape: https://www.amazon.com/Black-Butyl-Architectural-Glazing-Tape/dp/B000KZUWAI/ref=sr_1_4?crid=3D9AC50KPAR7X&keywords=crl+1/8"+x+1/2"+butyl+tape&qid=1670271106&s=industrial&sprefix=crl+1/8+x+1/2+butyl+tape,industrial,73&sr=1-4
Incidentally, I don't recommend this tape: 3M Indoor: https://www.scotchbrand.com/3M/en_U...7&preselect=5584757+8716348+3293786499&rt=rud
This provides no significant damping. But try it if you are interested in seeing the effect.
Don't fear damping. Counter-intuitively, damping the perimeter does not reduce output. It will tame some spikes however and reduce "ringing"
As shown in the images, I don't usually go all the way to the corners with the mounting tape, but stop a few inches short. This is only because I do a lot of prototyping and I found that it's much easier to separate a panel from the frame if you don't go all the way to the corners! But there is very little effect of leaving the corners free vs. taped in my experience.
The best width (and thickness) of the tape will vary depending on the panel, and so far the only way I know how to optimize it is by trial and error. For my 5 mm plywood panels, about 1/2" wide works pretty well. Going wider seems only to overconstrain the panel, driving up the fundamental frequency without any increase in damping. Going much narrower reduces the damping and exacerbates the ringing and spikes and dips in the response.
Using spots of tape every inch or two can work about the same, but is more effort than applying a continuous strip, so I usually opt for the strip method. But too few spots is like going too narrow (spikes and ringing).
Eric
View attachment 1116974
View attachment 1116975
View attachment 1116976
Check what happens, if/when you close the back of the frame, making it boxed? After seeing all these videos about Sony APM honeycomb speakers, I've a feeling, you'd get more bass, even if the glass is tightly fixed to the sides. You can just close the back by placing the frame lying on the table. Sure, then the DML would be up-firing, but you can check the bass. Maybe you can even add some damping on the back.As Andreas alluded, there's really no concensus on the best way. But, in my own experience, what I find works best is a layer of double sided tape between the frame and the panel around most (or all) of the perimeter. The best tape is one with good damping properites.
Below are a few pictures of a prototype I happened to build just last night. It's a glass panel (inspired by chdsl's recent posts) attached to a poplar frame using 1/2" wide double sided tape.
So far, this type of mounting to be the best I have found so far. Attaching the panel to the frame this way constrains the perimeter enough to get the most low frequency response out of the panel, while smoothing out the resonances.
I have found three tapes that work quite well:
3M Extreme: https://www.scotchbrand.com/3M/en_U...ing-Tape/?N=4335+3289430068+3294529207&rt=rud
3M 411: https://www.scotchbrand.com/3M/en_U...430038+3294529207&preselect=3293786499&rt=rud
Butyl Rubber Glazing Tape: https://www.amazon.com/Black-Butyl-Architectural-Glazing-Tape/dp/B000KZUWAI/ref=sr_1_4?crid=3D9AC50KPAR7X&keywords=crl+1/8"+x+1/2"+butyl+tape&qid=1670271106&s=industrial&sprefix=crl+1/8+x+1/2+butyl+tape,industrial,73&sr=1-4
Incidentally, I don't recommend this tape: 3M Indoor: https://www.scotchbrand.com/3M/en_U...7&preselect=5584757+8716348+3293786499&rt=rud
This provides no significant damping. But try it if you are interested in seeing the effect.
Don't fear damping. Counter-intuitively, damping the perimeter does not reduce output. It will tame some spikes however and reduce "ringing"
As shown in the images, I don't usually go all the way to the corners with the mounting tape, but stop a few inches short. This is only because I do a lot of prototyping and I found that it's much easier to separate a panel from the frame if you don't go all the way to the corners! But there is very little effect of leaving the corners free vs. taped in my experience.
The best width (and thickness) of the tape will vary depending on the panel, and so far the only way I know how to optimize it is by trial and error. For my 5 mm plywood panels, about 1/2" wide works pretty well. Going wider seems only to overconstrain the panel, driving up the fundamental frequency without any increase in damping. Going much narrower reduces the damping and exacerbates the ringing and spikes and dips in the response.
Using spots of tape every inch or two can work about the same, but is more effort than applying a continuous strip, so I usually opt for the strip method. But too few spots is like going too narrow (spikes and ringing).
Eric
View attachment 1116974
View attachment 1116975
View attachment 1116976
Makes you wonder doesn't it!Looks like we can turn any standard cone speaker into a DML speaker, just cut the cone and add a honeycomb to the existing surround with some spikes fixed to it and the voice coil.
Eric
Here's a guy breaking up the Technics honeycomb driver. He maybe nuts, but we can learn something from his antics.
I keep trying to nudge everyone here to think about DML subs!Makes you wonder doesn't it!
Eric
I think these Sony or Technics honeycomb membranes are not actually DMLs. Maybe they wanted a rigid membrane, just to move together with the voice coil, so the speaker driver won't get the 'cone breakup'. The honeycomb membrane is so rigid and placed perpendicular to the voice coil, it won't flex as the cone surface. Whether the honeycomb membrane is circular or a square, it was flexibly held at the perimeter. Then it was put in a box, and some of those boxes were bass reflex. In those boxes, the mid and the tweeter, whether made from the same honeycomb material or not, were placed outside that main part of the box, in a separate enclosure. I saw this in some of the Sony APMs dismantling videos.
What if, if we take, say, an EPS sheet, cut it into a circle or a small square and fix it flexibly from the perimeter and transfer the vibrations from the exciter to it from a distance, say through a stiff cone, or some spikes fixed to it? What if we put the whole thing in a box? Of course, it won't be a DML then. Well, I'll have to go to sleep now, maybe I'll dream about this.
What if, if we take, say, an EPS sheet, cut it into a circle or a small square and fix it flexibly from the perimeter and transfer the vibrations from the exciter to it from a distance, say through a stiff cone, or some spikes fixed to it? What if we put the whole thing in a box? Of course, it won't be a DML then. Well, I'll have to go to sleep now, maybe I'll dream about this.
You could be right. I assumed they were intended to be BMR's but maybe not. It struck me as odd that they felt the need to do 3 ways when they (appeared) to have a DML panel that could (presumably) do high frequency just fine all by itself. Maybe the crossover cut them off before they went to DML mode. Indeed it could be that their intention was simpy a pistonic speaker where the stiffness of the "cone" came from the honeycomb structure instead of a cone shape. Anyone know how these were marketed? I only became interested in speakers within the last seven years or so, so I'm not familiar with older stuff like many here.I think these Sony or Technics honeycomb membranes are not actually DMLs. Maybe they wanted a rigid membrane, just to move together with the voice coil, so the speaker driver won't get the 'cone breakup'.
Eric
I liked the video of the guy fixing the Sony job way better than this guy destroying it! Painful!Here's a guy breaking up the Technics honeycomb driver. He maybe nuts, but we can learn something from his antics.
Eric is right the Sony APM drivers were originally designed for their ultra high end Esprit range and were not designed as DML’s but were intended to solve the cone breakup problem by using a very stiff honeycomb plate with drive distributed by the struts you can see on the woofer. I remember reading a review of the original ‘cost no object’ flagship system. I can only find images online of the Esprit APM 4’s with the ‘simplified’ curved wall cabinets. The original flagship speakers had a very expensive race track cabinet plan shape and hand built drivers.
Having said that, with what we know after experimenting with DML’s it would not surprise me if the woofer did act in DML mode despite the designers intention, but they were crossed over at a low frequency ( via Bessel function XO’s which was another first) and so maybe the measurements never revealed their full range performance.
Burnt
Attachments

Last edited:
Andreas,I keep trying to nudge everyone here to think about DML subs!
One key word : infraflex. Have a look here #45, and in the same thread #50 and #54. There are some links and a synthesis. the original information is in French.
Christian
You've noticed that Sony APM driver doesn't have a 'dust cap' (video) and that the voice coil cylinder (bobbin) is quite large. If sound comes from the coil outside its plane, outside the bobbin, it comes from inside too, that is, from both sides of the coil. The bobbin is restricted to a to and fro movement by the magnet system, and whatever the vibrations transferred are from the top of the bobbin, from one side. In a normal cone speaker, maybe even the dust cap transfers the missing vibrations from the inside of the circle. Here, with the APM, Sony had dropped that. Sony had transferred the vibrations, either by angled tubes or by a semi-open stiff cone to a flat surface. It looks like the idea was to transfer the vibrations from a certain distance from the voice coil to the flat panel. You may have noticed, that the panel didn't exactly parallel to top area of the bobbin, but had many variations. (video Technics this time.) It looks like different parts of the top of the bobbin vibrates at (slightly ?) different frequencies.
Here our DML exciters have some sort of a plate pasted/fixed over the small voice coil bobbin. This bobbin (its perimeter) is somehow fixed to the container of the exciter, by a spider, maybe not that flexible as in a normal speaker, or not at all flexible. The sound appears when the dust cap/plate touches a surface. With higher volume, even the exciter gives out sound, maybe tiny, maybe screechy, whatever that's fixed to the top of the small bobbin gives that sound. Someone here might have dismantled a exciter. Anyway, for the sake of the experiment, why not try to convey the vibrations away from the exciter plane (by a stiff cone or something) to the panel? If possible, even fix the panel flexibly by the perimeter?
Here our DML exciters have some sort of a plate pasted/fixed over the small voice coil bobbin. This bobbin (its perimeter) is somehow fixed to the container of the exciter, by a spider, maybe not that flexible as in a normal speaker, or not at all flexible. The sound appears when the dust cap/plate touches a surface. With higher volume, even the exciter gives out sound, maybe tiny, maybe screechy, whatever that's fixed to the top of the small bobbin gives that sound. Someone here might have dismantled a exciter. Anyway, for the sake of the experiment, why not try to convey the vibrations away from the exciter plane (by a stiff cone or something) to the panel? If possible, even fix the panel flexibly by the perimeter?
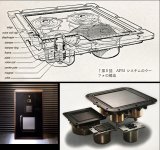
For those wanting to explore @aagas nudge on DML subwoofers the following diagram from the original Sony APM design might be of interest. The woofer looks a lot like four exciters, a composite panel and a flexible surround to me. The woofer design was intended for use in either an IB or a reflex cabinet. The speaker shown in the first composite image is the 4 way which was released in Japan at a price of 1,000,000 Yen in 1979. The ones that I heard, many many years ago at a Heathrow Show were the smaller two way APM 6's which were very impressive at the time.
Burnt
Burnt
Attachments
@BurntCoil
Thanks for the image.
The voice coil cap touching/fixed to the flat honeycomb panel, to move with the voice coil as it moves/vibrates. The panel is sort of an enlarged dust cap as in standard cone speakers. APM stands for “Accurate Pistonic Motion.”

Our DML panels are like those dust caps, only flat and large.
Thanks for the image.
The voice coil cap touching/fixed to the flat honeycomb panel, to move with the voice coil as it moves/vibrates. The panel is sort of an enlarged dust cap as in standard cone speakers. APM stands for “Accurate Pistonic Motion.”
Our DML panels are like those dust caps, only flat and large.
Last edited:
@chdls you are welcome. Yes I read it that way as well. For anyone interested in trying it I think its very doable. A picture frame chassis with an EPS/XPS/ply plate and four exciters and you are done. The high QTS you seem to get with the picture frame and canvas suggests it would work as an open baffle bass driver. Quite tempted myself.
Burnt
Burnt
Sony APM are similar to BMR drivers in which they have more efficiency in there pistonic motion then exciters.
Exciters need a powerful amp to push them into pistonic motion.
Exciters need a powerful amp to push them into pistonic motion.
A Russian repairing one of the first APM-6 with that 4 transducers attached to the woofer. Later Sonny had moved to one transducer with minimum 4 angled rods to transfer the vibrations, and later in the high end APM-66ES to 8 rods.
- Home
- Loudspeakers
- Full Range
- A Study of DMLs as a Full Range Speaker