Fast, furious, and always rightHello Dneu2011,
I was perhaps a little bit fast with my assessment?
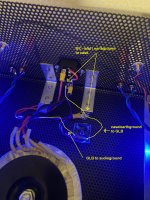
But I add a pic how your groundloopbreaker should be connected.
Cheers
Dirk


Don’t forget to check this suggestion too. This was culprit for me in the past.also , check that front metal part of volume pot body is in contact with case
I have done a new PCB layout with smaller form factor (12cm x 12cm), the layout is heavily refer to the original. The power switch is a real power switch and phone jack acts as switch to pre-amp and phone-amp mode. The sound fit my preferences and thanks for PaPa to share this great phone amp.

Ground plane is used for bare-amp and also used to stack up with the ACAmini.

The ACP+ board also have a +24V output to share the power supply for the ACA mini.

So, a whole system is setup for phone amp, pre-amp, and power amplifier. Can enjoy the music with headphone or speakers.

Ground plane is used for bare-amp and also used to stack up with the ACAmini.
The ACP+ board also have a +24V output to share the power supply for the ACA mini.
So, a whole system is setup for phone amp, pre-amp, and power amplifier. Can enjoy the music with headphone or speakers.
I am very excited to have the ACP+ boards in my possession, shipped from the USA from the DIYA store.
I have long been kicking myself for not grabbing the full kit when it was last in stock and am looking forward to my first full DIY build (discounting a few passive pot-in-box ‘preamps’).
As a newbie I will no doubt have some questions to ask here as I progress, but I will do my best to read and learn using my own initiative.
My first question is about the parts that shipped with the full kit (when it was available) - is there a list of these parts recorded anywhere?
I have read the BOM in Nelson’s article, but would like to use the specific parts that were included rather than boutique types, if possible.
For example, I can get 2% Takman resistors from a UK ‘Hifi’ supplier - but presumably the 1% articles shipped in the parts kit were industrial types (and far cheaper). It would be great to know what these were.
Thanks in advance.
The good news is that I am restocking the kits as we speak. There are a lot of parts to the kit sourced from various sources, so its taken a bit so please hang in there. FYI, I just glanced at my spreadsheet and its listing 124 parts right now and that does not include the boards.I am very excited to have the ACP+ boards in my possession, shipped from the USA from the DIYA store.
I have long been kicking myself for not grabbing the full kit when it was last in stock and am looking forward to my first full DIY build (discounting a few passive pot-in-box ‘preamps’).
Check out Nelson's article where he lists all the parts he used and is referenced at the top of this thread. I used that list to generate the store kit's BOM, but as you might imagine, YMMV when trying to find the exact parts listed as I did especially given how tricky it is to get some specific, higher-end parts these days. If you have questions about specific choices, feel free to post here or DM me. We are all glad to help. 🙂As a newbie I will no doubt have some questions to ask here as I progress, but I will do my best to read and learn using my own initiative.
My first question is about the parts that shipped with the full kit (when it was available) - is there a list of these parts recorded anywhere?
The preamp will work fine with those resistors assuming they measure out close to the values specified in Nelson's design, but you don't have to be super pedantic about the percentage rating of the resistors. The one place you should try to keep things pretty close are where things are matched, and there are two places where this is done: the specific LSK JFETs which the store sells in matched pairs are important. Also the resistor and the J113 that are used to create the constant current source (CCS). The j113 is matched to a specific resistor which then results in the correct current. If you buy random JFETs you may get the wrong current.I have read the BOM in Nelson’s article, but would like to use the specific parts that were included rather than boutique types, if possible.
For example, I can get 2% Takman resistors from a UK ‘Hifi’ supplier - but presumably the 1% articles shipped in the parts kit were industrial types (and far cheaper). It would be great to know what these were.
But beyond those parts you should be ok with parts that are rated as specified. Remember as Papa Nelson often says, this is entertainment not surgery, so relax and enjoy the fruits of your labor! The suggestion is to build these projects as close as you can to the original designer's specification but once you get it working, feel free to experiment, measure and listen to other parts. Thats one of the coolest things in these projects: make it sound the best to YOUR ears.
--Tom
Thanks in advance.
Thanks Tom. I ought to have waited for the full kit to come online, but I was impatient. Not very cost effective to make another shipment to the UK just for parts, so I will cobble them together from UK suppliers.The good news is that I am restocking the kits as we speak. There are a lot of parts to the kit sourced from various sources, so its taken a bit so please hang in there. FYI, I just glanced at my spreadsheet and its listing 124 parts right now and that does not include the boards.
Check out Nelson's article where he lists all the parts he used and is referenced at the top of this thread. I used that list to generate the store kit's BOM, but as you might imagine, YMMV when trying to find the exact parts listed as I did especially given how tricky it is to get some specific, higher-end parts these days. If you have questions about specific choices, feel free to post here or DM me. We are all glad to help. 🙂
The preamp will work fine with those resistors assuming they measure out close to the values specified in Nelson's design, but you don't have to be super pedantic about the percentage rating of the resistors. The one place you should try to keep things pretty close are where things are matched, and there are two places where this is done: the specific LSK JFETs which the store sells in matched pairs are important. Also the resistor and the J113 that are used to create the constant current source (CCS). The j113 is matched to a specific resistor which then results in the correct current. If you buy random JFETs you may get the wrong current.
But beyond those parts you should be ok with parts that are rated as specified. Remember as Papa Nelson often says, this is entertainment not surgery, so relax and enjoy the fruits of your labor! The suggestion is to build these projects as close as you can to the original designer's specification but once you get it working, feel free to experiment, measure and listen to other parts. Thats one of the coolest things in these projects: make it sound the best to YOUR ears.
--Tom
Actually I’ve made a start and it’s not quite so arduous as I’d imagined. I’ve gone for Vishay 1% resistors and Silmic / Nicichon caps. I’ll get some extra resistors to test the J113s as per the guidance earlier in this thread.
Am I correct in thinking the 610 Mosfets don’t need to be matched?
I have JFETS courtesy of the store.
610: no need to match.Thanks Tom. I ought to have waited for the full kit to come online, but I was impatient. Not very cost effective to make another shipment to the UK just for parts, so I will cobble them together from UK suppliers.
Actually I’ve made a start and it’s not quite so arduous as I’d imagined. I’ve gone for Vishay 1% resistors and Silmic / Nicichon caps. I’ll get some extra resistors to test the J113s as per the guidance earlier in this thread.
Am I correct in thinking the 610 Mosfets don’t need to be matched?
I have JFETS courtesy of the store.
113’s: Good to have a bunch. RS has them.
JFETs: good, 6-8mA preferred.
regarding 113’s, be sure to confirm pinout as there are multiple suppliers who seem to make a habit out of inverting the legs on these.
also make sure your lab PSU/PSU gives 24 volts, and that you take care setting up the test circuit. It is good to have a stack of transistors and resistors as the IDSS of these can vary wildly, for example, some of the store kits use 150R resistors to get these down to 1mA current. I had to use 12-13R with my 113’s. To cover that whole range, you would need a hefty bunch of 113’s.
I also sourced parts myself and matched needed bits.
did not save one single penny on that

As a fun learning experiment, try obtaining "lesser spec" parts in addition to these and see what differences are audible to your ears or measurable.Thanks Tom. I ought to have waited for the full kit to come online, but I was impatient. Not very cost effective to make another shipment to the UK just for parts, so I will cobble them together from UK suppliers.
Actually I’ve made a start and it’s not quite so arduous as I’d imagined. I’ve gone for Vishay 1% resistors and Silmic / Nicichon caps. I’ll get some extra resistors to test the J113s as per the guidance earlier in this thread.
That is correct. The MOSFETs do not need matching; just the JFETs (and resistor with the matching J113). Nelson has described how to do the matching of the resistor to j113, and I posted an article earlier in the thread but reach out if you can't figure out how its done.Am I correct in thinking the 610 Mosfets don’t need to be matched?
Cool.I have JFETS courtesy of the store.
Enjoy!
--Tom
The good news is that I am restocking the kits as we speak. There are a lot of parts to the kit sourced from various sources, so its taken a bit so please hang in there. FYI, I just glanced at my spreadsheet and its listing 124 parts right now and that does not include the boards.
Check out Nelson's article where he lists all the parts he used and is referenced at the top of this thread. I used that list to generate the store kit's BOM, but as you might imagine, YMMV when trying to find the exact parts listed as I did especially given how tricky it is to get some specific, higher-end parts these days. If you have questions about specific choices, feel free to post here or DM me. We are all glad to help. 🙂
The preamp will work fine with those resistors assuming they measure out close to the values specified in Nelson's design, but you don't have to be super pedantic about the percentage rating of the resistors. The one place you should try to keep things pretty close are where things are matched, and there are two places where this is done: the specific LSK JFETs which the store sells in matched pairs are important. Also the resistor and the J113 that are used to create the constant current source (CCS). The j113 is matched to a specific resistor which then results in the correct current. If you buy random JFETs you may get the wrong current.
But beyond those parts you should be ok with parts that are rated as specified. Remember as Papa Nelson often says, this is entertainment not surgery, so relax and enjoy the fruits of your labor! The suggestion is to build these projects as close as you can to the original designer's specification but once you get it working, feel free to experiment, measure and listen to other parts. Thats one of the coolest things in these projects: make it sound the best to YOUR ears.
--Tom
I wanted to update anyone interested in the full kits about the post above. I ordered the remaining components for the kits last night and it looks like with shipping delays and logistics, that the kits are likely to be sent down to the store near the end of May.
......I really need to type slower than I think. Which is really slow
ha!
slowly getting a grip - how's being ZM all day long ......
Hi,
I selected 4 J113 bought on mouser and I found the following value across a 100ohm resistor:
1,96v
1,67v
1,72v
1,79v
Can I use the two in the middle in an ACP+?
What vale of r4 I have to use?
Thank you
Matteo
I selected 4 J113 bought on mouser and I found the following value across a 100ohm resistor:
1,96v
1,67v
1,72v
1,79v
Can I use the two in the middle in an ACP+?
What vale of r4 I have to use?
Thank you
Matteo
Any of the J113 can be used. However it is convenient to use the same value of R4 for both channels so select the closest matching pair of J113, in this case the two in the middle.
The resistor needs to be selected for 10mA of current through the J113. Use Ohm's Law to calculate the current:
I = V/R, therefore I = 1.695V/100 Ohm = 0.017A = 17 mA
I used the average Voltage drop so one J113 will have slightly higher actual current and the other slightly lower actually current, but close enough.
The 17mA is higher than 10mA. If the current is too high, increase the value of R4. If the current is too low, decrease the value of R4. So in your case R4 needs to be increased. This will be a case of increase R4, then measure the voltage drop, and recalculate. Then adjust R4 further if necessary.
Since you are quite a ways off, try something closer to 150 Ohm to start.
I've been using OPPO205 for all my HD650 listening needs. Not too bad, typical over-processed, a bit harsh digital audio sound... but good enough for all general listening needs.
I also have Holo May DAC that feeds Aleph J via XLRs. The other day I used DAC's RCA outputs that I connected straight to my HD650... sweet Mary Mother of God... absolute and utter bliss. Naturally, I decided to build either ACP+ or WAMMY.
I can't decide. The more I read both threads... the harder it gets... any suggestions from fellow DIY-ers who had the same struggle??
Boky, having both of these great HPAs, the ACP+ is perfectly enjoyable to my ears. The Whammy, which might be closer to the source, is sitting and waiting. Just my experience. Cheers
Just another opinion:
Whammy is a fun project for rolling OP-amps and can handle big ohm headphones with grace. I thought Whammy was very intriguing and analytic. For longer listnings my tinnitus did not agree with the clean whammy sound.
ACP+ with 32ohms headphones is relaxing and with great enjoyment.
Whammy is a fun project for rolling OP-amps and can handle big ohm headphones with grace. I thought Whammy was very intriguing and analytic. For longer listnings my tinnitus did not agree with the clean whammy sound.
ACP+ with 32ohms headphones is relaxing and with great enjoyment.
I tried the B1K, ACP+ and Wayne’s linestage, as linestages/pre’s and not for headphones.I've been using OPPO205 for all my HD650 listening needs. Not too bad, typical over-processed, a bit harsh digital audio sound... but good enough for all general listening needs.
I also have Holo May DAC that feeds Aleph J via XLRs. The other day I used DAC's RCA outputs that I connected straight to my HD650... sweet Mary Mother of God... absolute and utter bliss. Naturally, I decided to build either ACP+ or WAMMY.
I can't decide. The more I read both threads... the harder it gets... any suggestions from fellow DIY-ers who had the same struggle??
my absolute favourite so far is the ACP+. It strikes a lovely balance between punch and clarity, and smoothness. Like tubes with solid bass and top end extension. But having built it naked, it sits in a closet now since I have toddlers. Worth noting too, is that the wallwart is complete crap if used with noisy mains. So I have parts for a future Salas UltraBIB, awaiting doing 🙂 Or one can use Mark Johnsons SMPS filter.
Wayne’s linestage is great too, and what I currently listen too. It is probably closer to the Whammy sound signature.
you really can’t go wrong with these choices, IMO 🙂
- Home
- Amplifiers
- Pass Labs
- Amp Camp Pre+Headphone Amp - ACP+