Goddamn, that’s gonna end in some serious sugarcane with your AJ’s
Hehe🙂
Well, i promise, i am not going to run them H2 and triode preamp goodies in series 🙂
As mister N Pass says: as i understand him - That would way to much of a good thing.
🙂
Got bass???
🤘🙂
Last edited:
last night I had a dream - having just one H2 in chain is not enough
best to have at least 3, daisy-chained, and then KB1

best to have at least 3, daisy-chained, and then KB1
Like Yngwie Malmsteen used to say: what’s the deal with «less is more»? More is… more!!

Tre Excess (3XS)
Hey there Mr Pass 🙂
Thank you for the music.
Music! 🔥😎🔥
Like Yngwie Malmsteen used to say: what’s the deal with «less is more»? More is… more!!
Funny that you mention it. Exactly these scentences: Less is more. More is more.
I have been thinking lately. On the subject old school tone controls.
When it comes to DSP:s, they are killing musicality. Both in car and in the home.
They suck the life out of the system in my experience.
I only use DSP:s for crossover work. As an equalizer they suck the life out of the system.
Well, thats just my take on the subject. 🙂
Often less is more! But somtimes: More is much More! 🤗
Off and beyond the charts on the old school forgotten cool:
Last edited:
I'm wondering if grounding issues could be to blame. The NCore is completely floating ground, the B1 has ground connected to mains-ground.Thumps or voltage spikes can fry input stages, sensitive components like JFETs etc. This happened to me once with an ACP+ connected to an iphone. I forgot to turn down the volume before disconnecting because of an incoming call. I fried a precious JFET from Papa himself upon reconnecting the shitty phone.
anywz, that phone is never going near my gear again. But the error, like in your friends case, is a typical F40 error. Not the Ford, but as in the error is 40 centimeters from the amp (us/gremlins).
If you are absolutely certain the amp is fried, and certain that it happened when turning on the B1K, then I guess Bob’s your uncle. I wouldn’t feel at guilt for building it for him. It is not a recommended way to go about treating ones gear, be it with or without thumps.
OTOH, here is a great opportunity for your friend to leave class D and join the fearless gang 🙂
regards,
Baby V
Anyway, I gave him my non-NuTube B1 (and he has two new NCore amp-modules) and I now have the NuTube at home happily playing Canto Ostinato

Sounds like a happy marvelous endingI'm wondering if grounding issues could be to blame. The NCore is completely floating ground, the B1 has ground connected to mains-ground.
Anyway, I gave him my non-NuTube B1 (and he has two new NCore amp-modules) and I now have the NuTube at home happily playing Canto Ostinato

Sounds like a happy marvelous ending
Sounds like a happy marvelous ending
Well. Joe is dead. Calm down. Listen to teh music 🙂
Listen 🙂
No obvious humz and bussez is expected and…
Calm your tits?🙃
Last edited:
Almost... He wants the NuTube back! Guess I'll have to build that second one I have lying around somewhere 🌞Sounds like a happy marvelous ending
I am about to mount the NuTube.
I am using rubber isolating standoffs for the PCB and Vibrapods for the chassis itself. I was just going to put the two little squares of foam double sided tape between the NuTube and PCB to start. You think this will be ok? I was thinking this would be a good starting point to see what the microphonics are like, can always add more measures later if there are issues.
Side note, I find it odd that the supplied kit standoffs act as a chassis ground point and the DC jack also acts as a chassis ground point.
I am using rubber standoffs so the PCB is isolated from the chassis ground that way. Only chassis ground point in my build is via the DC jack.
When I built mine, I used the double-sided tape stuck to the board and the NuTube, and soldered the NuTube into the board. This left me with a relatively solid connection between the tube and the board. This was, in my experience, a mistake. I get ring from the pre when switching between inputs turning it on, or any mechanical rap of the table on which it sits. After the ring dies out (2-3 seconds), I enjoy it. I have not been able to make it ring through speaker sound bouncing around the room and resonating, so I've left it as is.I was just going to put the two little squares of foam double sided tape between the NuTube and PCB to start
When I was initially testing it, I was able to get the speaker to make it resonate or at least give it a more harsh metallic sound. That was operating it in-system without the top-cover on. When I put the cover on, the metallic harshness went away.
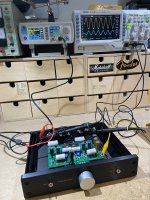
If you don't have something that lets the tube "float" as depicted in post 7382 (what is that rig and board? Awesome!) then I'd recommend using the foam tape simply as a spacer when soldering the NuTube to the board, then pull the spacer out, letting the NuTube float on its own prongs.
My experience supports what Toadroller is advising. I used a temporary spacer when soldering the NuTube with the leads barely protruding through the circuit board holes to get maximum length on the unsupported part of the leads. The NuTube was only supported by the leads in a cantilevered fashion. I had no ringing whatsoever. Sensitivity to ringing does seem to vary by the NuTube being used so that may be why I never had any ringing.When I built mine, I used the double-sided tape stuck to the board and the NuTube, and soldered the NuTube into the board. This left me with a relatively solid connection between the tube and the board. This was, in my experience, a mistake. I get ring from the pre when switching between inputs turning it on, or any mechanical rap of the table on which it sits. After the ring dies out (2-3 seconds), I enjoy it. I have not been able to make it ring through speaker sound bouncing around the room and resonating, so I've left it as is.
When I was initially testing it, I was able to get the speaker to make it resonate or at least give it a more harsh metallic sound. That was operating it in-system without the top-cover on. When I put the cover on, the metallic harshness went away.
If you don't have something that lets the tube "float" as depicted in post 7382 (what is that rig and board? Awesome!) then I'd recommend using the foam tape simply as a spacer when soldering the NuTube to the board, then pull the spacer out, letting the NuTube float on its own prongs.
I finally got time to assemble the kit. And i don't know if this is normal, but my 270 resistor is hot. I can't hold my finger on it for longer than 7s. All voltages are on point as per 6L6 guide (except for the zeener which is 9v instead of 9.5v).
Anyone knows if thats normal or not?
Anyone knows if thats normal or not?
Yes, the 270 Ohm resistor will get hot. That is why it is a 3 Watt resistor, to be able to dissipate the heat of 0.060A x 0.060A x 270 Ohm = 1.0W
The voltage drop at the 9.1V zener diode should be closer to 9.1V than 9.5V. 9.5V may be a typo.
The voltage drop at the 9.1V zener diode should be closer to 9.1V than 9.5V. 9.5V may be a typo.
I guess yeah, but it really feels too hot, can't hold my finger on it for long (closer to short, 7-10s max). I have no means to measure temperature at this time. It is risen 1.5mm above the board, nice clean shiny soldering.
I asked Lenny at Academy Audio to comment on this because I've been running mine at +/-15vdc (using a Mean Well module with PO89ZB filters to convert the available 24vdc to +/-15vdc) without problems, and the Muses spec sheet says max voltage is +/-18vdc.ChrisM91 - If you go for the Academy Audio Muses board, do not run +15 / -15 VDC into it. I did that on my 1st unit & the Muses chip fried. Went back to A/A & they advised +/-12VDC to be safe, but the web site still shows 15VDC.
A/A would not replace the unit, but did give me a discount of purchasing a 2nd unit, however you have to purchase the whole kit.
Now A/A Muses VC is working well and sounds great, I ran a totally independent power line into the pre to power the A/A Muses & a input selector board.
Cheers
His reply confirms the acceptable voltage range (edited for brevity):
The VCU (with Remote and LED display) is tested to work well with a regulated dual power supply providing +/-9V...+/-16V at < 50mA per rail. The VCU+Remote version takes less than 10mA per rail.
New information to me:
The MUSES volume control chip, which is the core of this product, is very sensitive to the order in which the power is applied. If the negative rail is absent for a little while, the chip gets destroyed, and pulls higher current. It may get quite hot to touch.
Because of this, he recommends:
Never use two separate power supplies or two lab power supplies to power the VCU. Always double check your wiring to make sure both power rails are energized, and no one is shorted.
Best regards,
Lenny
Up and running, all voltages within spec. T7 and T8 at 9.5V +/- 5mV. Gain is 6.35 Av. Going to try an audio test later today.
May and try and find some weather stripping to put on the underside of the chassis cover to help with isolation/microphonics.
May and try and find some weather stripping to put on the underside of the chassis cover to help with isolation/microphonics.
Attachments
So I have been playing around with different things on the Korg preamp for about a week I have a stock DIYaudio store B1 Korg and a modified version one with:
-GAZ's single ended Artemis power supply
-3300uf audio caps in the 4 power supply positions
-1000uf audio caps for the rest of the non signal caps.
-Different signal path caps.
In the DC blocking signal caps I tried a couple of different things. I first tried high end 10uf Stealth caps using wire leads to run to the caps. There was a hum which I suspect was due to all of the wires. It sounded fuller and richer than the stock unit but the hum was too much and washed out any potential gains from using boutique caps. So I decided it's probably better to save these for different project.
I am not an engineer but I do know that Mr. Pass doesn't seem to like caps in the signal path. So my thought is that using as small a cap that is of the film variety is probably the closest to no cap. So I switched to .22 WIMA on the input, 1uf in the middle position leading to the grids, and 4.7uf caps on the output. These caps were just something that I had in my parts drawer. I may try some small value PPP boutique caps.
The modified version sounds really nice. Switching between the stock preamp, and the modified version, the stock sounds thinner, a little harsher on the edges (Of coarse still very excellent due to the wonderful circuit design. Thank you Mr. Pass!). The modified version has a bigger sound, the spacial details float a little more. The whole sound is still very detailed. The bass is a bit more reinforced. Horns sound a little richer which makes listening to artists like Von Freeman and Arturo Sandoval very fun. I don't click the skip button as readily when busier songs from artists like Radiohead come on like. Arturo Sandoval is a very good trumpetist and worth checking out if you haven't. He is both very technically fascinating but his slower jazz pieces are very soulful. I just rediscovered him recently. Listening to a song like London Grammer's Rooting for You has a bit more decay to the sound. The bass at the end rumbles a bit more.
I think if I had only the stock unit and wanted to try two easy inexpensive mods, I would try increasing the size of the power supply caps to maybe 2,200uf like claud did in the stock chassis, and changing the caps out for films. Maybe the MKP vs the MKS like I did. Note that the 3300 uf caps will not fit in the standard chassis from the store unless you get a little creative. So all in all, about $30 on your next parts order could be your ticket for a fun little experiment. I suspect that the power supply is not a bottleneck as the tube takes longer to light due to the larger power supply caps on the modified unit.
Attached are a couple of pics. The wood chassis isn't complete yet. I'll post a pic of that when it's done.
https://www.audiosy.net/2021/03/17/first-look-artemis-single-rail-power-supply-rev-b/
https://www.mouser.com/ProductDetail/647-UKT1E332MHD
https://www.mouser.com/ProductDetail/647-UKA1E102MPD
https://www.mouser.com/ProductDetail/WIMA/MKS2D032201C00JA00?qs=2G4irm/qADzO1u6WizA70A==
https://www.mouser.com/ProductDetail/WIMA/MKS2B041001C00JSSD?qs=sJjjjplDs9sEiGXANiKLag==
Attachments


- Home
- Amplifiers
- Pass Labs
- B1 with Korg Triode