My first ever experience with a blown cap - I’m going to consider it a badge of honor. I was in the other room for the first boom, and right over top of the amp for the second. Luckily I had the lid on. Just loud pops is all. That stuff is nasty and gets everywhere, but it at least wipes up somewhat easily. It also eats through inks... 🙁
Attachments
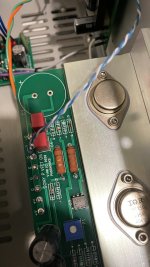
It is clear the silkscreen is wrong, but except for the blown cap, all the rest should be fine... I suppose / hope you had no speakers connected, Cody?
^ +1
I have the same situation. One of my boards is correct, and one is not.
Codyt - So sorry you had to go through that, but you may have just saved quite a few builders the same agony.


I have the same situation. One of my boards is correct, and one is not.
Codyt - So sorry you had to go through that, but you may have just saved quite a few builders the same agony.
Ok.....then something did "move" at the end......
Think I will use a lab supply first time and slowly turn up the voltage and check voltage at caps....they can usually take a small voltage at "wrong" polarity......
Think I will use a lab supply first time and slowly turn up the voltage and check voltage at caps....they can usually take a small voltage at "wrong" polarity......
i had a big exploding cap from a photography studio flashlight.. very impressive, smelled like burned peanuts.
but damned, bad luck, hope nothing else is destroyed... but how can it be, two batches of silkscreen ?
but damned, bad luck, hope nothing else is destroyed... but how can it be, two batches of silkscreen ?
If another batch of PCB's have wrong silkscreen then better Diyers check all polarisations
with the original article pictures https://www.firstwatt.com/pdf/art_diy_sony_vfet_pt1.pdf
with the original article pictures https://www.firstwatt.com/pdf/art_diy_sony_vfet_pt1.pdf
It also eats through inks... 🙁
Oh no... the ID of the Vfet is gone!!!! + handwriting of Nelson from the measurements!! Even worse!!! 😱
At least, the Vfet should still have its soul & smoke inside..
Sorry about this.
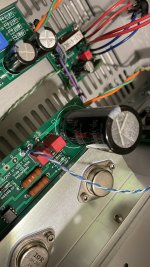
It is obvious that as many as 8 boards from a prototype batch went out the door
with the rest. There is one difference - the polarity on the board of C1 is reversed.
If you have the C1+ mark on the edge of the board, then it is wrong. If the C1+
mark is on the bracket side, it is right.
The boards are otherwise OK, so you may need to rotate C1 when installing, or
pull it out and reverse it if you haven't already fired up the board.
If you have already put power to the board with a load, then you need a new
cap, and we will send them right out.
Ok.....then something did "move" at the end......
Think I will use a lab supply first time and slowly turn up the voltage and check voltage at caps....they can usually take a small voltage at "wrong" polarity......
You clearly see the trace on the PCB going to -O => negative pole of the cap should be connected here.
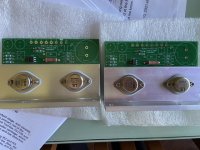
My OS boards are not like Cody's
Silkscreen has C1+ at the Alu heatsink (bottom right side of boards)
My boards are V1R0
Silkscreen has C1+ at the Alu heatsink (bottom right side of boards)
My boards are V1R0
Attachments
Last edited:
It would be Cody who would get to discover this...
😉
They all say V1R0, so go by where the C1+ is.
Worst case, new cap.
😉
They all say V1R0, so go by where the C1+ is.
Worst case, new cap.
For a pictorial... Since I happen to have one of each.
Thanks again Codyt, Nelson and all others for pointing this out.

Thanks again Codyt, Nelson and all others for pointing this out.

^ Yes. And I managed to lift one of pads underneath the capacitor while removing it. Not the first time that’s happened. Fortunately I have adhesive copper tape on hand for such occasions.
I think everybody is missing the silver lining - I have the coveted, ultra-rare prototype boards 😀
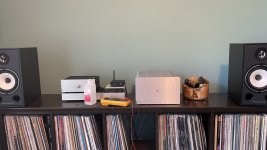
In all seriousness though, I’m glad that we got this figured out early. After some consultation with Jim (and Nelson, indirectly) I got my backup pair of Rubycon 🙂 in place and the amp is now making music! One thing I need to keep an eye on is the 20v measurement. The left channel fired right up where I left off, but I needed all of the pot on the right channel to get to 19.5v. I’m going to measure distortion, etc later and will report back.
In all seriousness though, I’m glad that we got this figured out early. After some consultation with Jim (and Nelson, indirectly) I got my backup pair of Rubycon 🙂 in place and the amp is now making music! One thing I need to keep an eye on is the 20v measurement. The left channel fired right up where I left off, but I needed all of the pot on the right channel to get to 19.5v. I’m going to measure distortion, etc later and will report back.
Attachments
My first ever experience with a blown cap - I’m going to consider it a badge of honor. I was in the other room for the first boom, and right over top of the amp for the second. Luckily I had the lid on. Just loud pops is all. That stuff is nasty and gets everywhere, but it at least wipes up somewhat easily. It also eats through inks... 🙁
sorry to hear that, but imagine how many other builders you saved from the same trouble
I think everybody is missing the silver lining - I have the coveted, ultra-rare prototype boards 😀
In all seriousness though, I’m glad that we got this figured out early. After some consultation with Jim (and Nelson, indirectly) I got my backup pair of Rubycon 🙂 in place and the amp is now making music! One thing I need to keep an eye on is the 20v measurement. The left channel fired right up where I left off, but I needed all of the pot on the right channel to get to 19.5v. I’m going to measure distortion, etc later and will report back.
Totally tangental, but what are the bookshelf speakers in your pic?
Chassis 055 just arrived. With feet, but no other screws or mounting hardware.
As with some other issues, I have some available hardware on hand to proceed with a trail build. However it would still be best to have the correct kit hardware to finish the chassis as intended.
As with some other issues, I have some available hardware on hand to proceed with a trail build. However it would still be best to have the correct kit hardware to finish the chassis as intended.
- Home
- Amplifiers
- Pass Labs
- DIY Sony VFET Builders thread