Wow, if this sounds half as good as it looks, it must be amazing @bergy
thanks Atilla!
Pass DIY Addict
Joined 2000
Paid Member
BWC54- very nice work. For your flexy rack, did you paint the metal hardware, or did you find a supplier with black-oxide finish? Years later, I'm wishing I had painted my hardware. Maybe I'll just try to wrap it in black tape...
no, they are on the PSU
Ah, so you only posted PSU pics. Thought b/c there weren't other photos, it must all be in one box. Love to see the signal chassis, since you did such a nice job on the PSU.

BWC54- very nice work. For your flexy rack, did you paint the metal hardware, or did you find a supplier with black-oxide finish?
Eric, my rack came with the black hardware from Salamander Design.
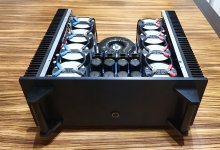
So you DID shoehorn the signal circuit in among those caps (not exactly among...just behind). That's a tight fit! Well done.


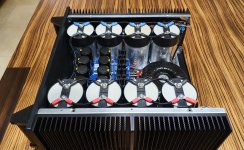
Sorry Carlp I wasn't clear, my amp is made in just one chassis,
the big caps are all in parallel to the electrolytic ones in the PSU filter
I suddenly feel so underpowered

BA2018 and M2x
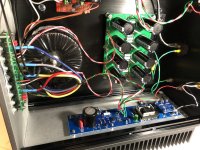
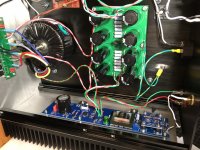
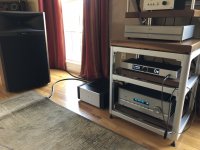
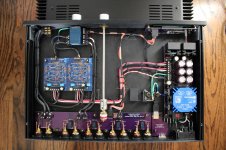
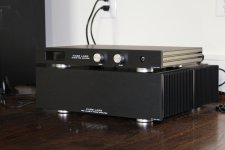
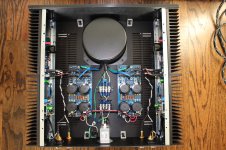
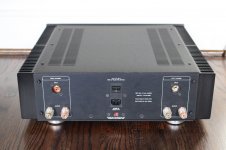
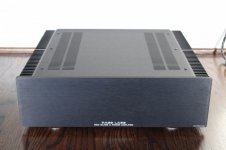
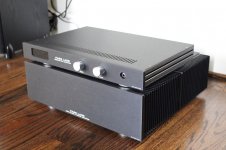
I recently completed my BA2018 preamp and M2x power amp builds and am loving them. I posted a few photos in the relevant threads but thought I’d share them here as well. You’ll have to excuse the dust on the floor!
Next up I’m working on a Pearl II with external power supply.
Gary
I recently completed my BA2018 preamp and M2x power amp builds and am loving them. I posted a few photos in the relevant threads but thought I’d share them here as well. You’ll have to excuse the dust on the floor!
Next up I’m working on a Pearl II with external power supply.
Gary
Attachments
-
 C0BECA61-035F-442E-9489-1980932ADF09.jpeg432.9 KB · Views: 390
 -
 721E998E-BBD4-4186-84F7-BD095A87AD8C.jpeg527.4 KB · Views: 549
 -
 E03FE28D-B2FB-4EE8-B835-FAE187B90367.jpeg698 KB · Views: 548
 -
 2513D0C8-AE52-484B-9DEB-D07FEEFF1B71.jpeg890.8 KB · Views: 530
 -
 33811FE4-4E63-47D2-801B-E9ABE633C70E.jpeg766.6 KB · Views: 789
 -
 0FEC7E52-F09A-4F4D-919A-6ED8593253C9.jpeg483.2 KB · Views: 742
 -
 C3377D37-BEE1-4DB0-899D-3A74EFC2ED3D.jpeg411.2 KB · Views: 734
 -
 5A9503C1-70C1-40FB-80C8-C48CEF3B2360.jpeg476.8 KB · Views: 753
 -
 7D28796D-D8D5-4B57-8EB5-8052FF010412.jpeg503.2 KB · Views: 788
Last edited:
First amp build in many years (10+), M2X making great music. Standard Ishikawa for now.
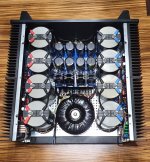
Wow! A Plitron!
even more rare than Toshiba JFETs and Semisouth now 😀
Found in the archives
My original diy efforts from 07/08, back when there was no such thing as the store or UMS or even case suppliers. You waited for a heatsink group buy or bought salvage heatsinks ...
Funny story - I missed the R-Theta group buy but was fortunate enough to find a fellow member who foolishly bought too many and put some up for sale locally. The F4 and F5 were made with these heatsinks by slapping end plates on them and strapping psu boards and transformers on the endplates. I think that member's name was Dennis something 😀. That's the story of how I met Dennis Hui 14ish years ago.
Cheers Dennis
That's a Plitron hanging on the underside of the F2. I took the F2 apart to redo the wiring a couple of years ago and added the missing 10uF caps and then took it apart again about a year ago to try swapping a 400W 24V SMPS in place of the Plitron but never got it put back together. I was trying to salvage the Plitron for other projects but overestimated my ability to complete things that I start 😛
The family has grown significantly since then. Missing from the picture - Aleph J, M2, F6, (2) SissySIT, F7-like, (Babel) J2 and a few in various stages of activity (can't call it progress)
(Left to right - F2, F5, F4)


F2-board

F2-psu

F2-side with Plitron

F2-top

F5-board

F4-psu

F4-board

My original diy efforts from 07/08, back when there was no such thing as the store or UMS or even case suppliers. You waited for a heatsink group buy or bought salvage heatsinks ...
Funny story - I missed the R-Theta group buy but was fortunate enough to find a fellow member who foolishly bought too many and put some up for sale locally. The F4 and F5 were made with these heatsinks by slapping end plates on them and strapping psu boards and transformers on the endplates. I think that member's name was Dennis something 😀. That's the story of how I met Dennis Hui 14ish years ago.
Cheers Dennis
That's a Plitron hanging on the underside of the F2. I took the F2 apart to redo the wiring a couple of years ago and added the missing 10uF caps and then took it apart again about a year ago to try swapping a 400W 24V SMPS in place of the Plitron but never got it put back together. I was trying to salvage the Plitron for other projects but overestimated my ability to complete things that I start 😛
The family has grown significantly since then. Missing from the picture - Aleph J, M2, F6, (2) SissySIT, F7-like, (Babel) J2 and a few in various stages of activity (can't call it progress)
(Left to right - F2, F5, F4)
F2-board
F2-psu
F2-side with Plitron
F2-top
F5-board
F4-psu
F4-board
I recently completed my BA2018 preamp and M2x power amp builds and am loving them. I posted a few photos in the relevant threads but thought I’d share them here as well. You’ll have to excuse the dust on the floor!
Next up I’m working on a Pearl II with external power supply.
Gary
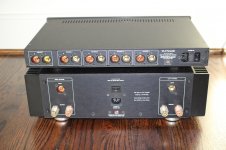
Wow! Very nice and clean work, Gary! Is the power amp cabinet a 3U 400mm dissipante?
First amp build in many years (10+), M2X making great music. Standard Ishikawa for now.
nice M2x. You can compare to your INT250, right?
Wow! Very nice and clean work, Gary! Is the power amp cabinet a 3U 400mm dissipante?
very nice built.
yes...its that a 3U housing?
chris
I recently completed my BA2018 preamp and M2x power amp builds and am loving them. I posted a few photos in the relevant threads but thought I’d share them here as well. You’ll have to excuse the dust on the floor!
Next up I’m working on a Pearl II with external power supply.
Gary
A very nice pair!

- Home
- Amplifiers
- Pass Labs
- Pictures of your diy Pass amplifier