Chris,
R8/LTP Bias can be replaced with a 1K ohm resistor should you choose. And LTP bias pot should be set to 68K beforehand.
Best,
Anand.
Thank you Anand. I realized that after I started installing parts. I didn’t read ahead far enough to take note of that.
 I did turn the pot all the way up to get the 1K equivalent, but the single resistor would have been a lot simpler!
before wiring and even mounting in the case, post big well lit pics of boards, so boyz can confirm that you did well with several optional positions
it could save you later trouble
Will do. Thanks for the extra eyes!
Sorry, I was editing when you quoted me! To clarify:
R8/LTP Bias can be fixed and set with a 1K resistor.
R27 is the actual bias/AC gain and should be set to 68K value with the 100K pot prior to the final biasing procedure.
R7 is for minimizing DC offset and should be (re)adjusted as you “tweak” R27 during the final steps of setting up the bias of the amp.
Best,
Anand.
Last edited:
Sorry, I was editing when you quoted me! To clarify:
R8/LTP Bias can be fixed and set with a 1K resistor.
R27 is the actual bias/AC gain and should be set to 68K value with the 100K pot prior to the final biasing procedure.
R7 is for minimizing DC offset and should be (re)adjusted as you “tweak” R27 during the final steps of setting up the bias of the amp.
Best,
Anand.
Yes sir. I’ve preset R27 to 68K and R7 is currently set at its midpoint. R8 and it’s associated resistor (R6?) were assembled with the parts I bought, but may replace them both with a single 1K if it comes to it. Appreciate the guidance!
Last edited:
before wiring and even mounting in the case, post big well lit pics of boards, so boyz can confirm that you did well with several optional positions
it could save you later trouble
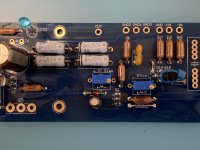
Per ZM’s request, please find hi-res photos below (sans C1). Glad I had a transistor tester on hand. Saved me from putting the transistors in backwards!
Attachments


Last edited:
now it's up to boyz
somehow, this pcb keeps hiding in my blind spot, whatever I learn about it, it's lost over night
somehow, this pcb keeps hiding in my blind spot, whatever I learn about it, it's lost over night
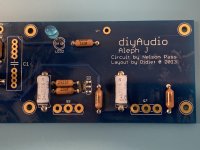
Second one done (sans C1). I was on a roll today, soldering to the music, and didn’t realize until I was cleaning the board that I didn’t leave any airspace beneath the big resistors. 😡 Can’t make leads longer, only shorter. So may order a new set when I order PSU parts today.
I like this project!
I like this project!
Attachments

you don't need that wristwrap with these parts
though, it can't harm, everyone is having different set of bad luck moments .......
edit: I'm personally more used of killing them by my own stupidity than with my own electricity
though, it can't harm, everyone is having different set of bad luck moments .......
edit: I'm personally more used of killing them by my own stupidity than with my own electricity
Last edited:
you don't need that wristwrap with these parts
though, it can't harm, everyone is having different set of bad luck moments .......
edit: I'm personally more used of killing them by my own stupidity than with my own electricity
Hehe... My house is unusually static-y this time of year, although my shop is on a concrete floor so less likely to be an issue. I only used it while handling the transistors. Beyond that I wasn't too worried. 🙂
My turntable and preamp go bonkers when static is around. I thought for sure I blew something up earlier this winter. A static pop when I touched the equipment rack, a high-pitch whine, then one channel went silent. Then a recurring pop-pop-pop-pop... Like a circuit periodically discharging or something. When I disconnected the turntable it stopped. Some kind of weirdness! 80s vintage 2-wire electrical plugs on them both. So I'll be gentle on this project where it makes sense.
Looking Good Chris, You are going to have this built in no time at all !!
I had a scrummage in my parts box and sadly I can't save you the additional order.
I came very close to picking up a set of Aleph X boards in response to your thread - looking for parts sobered the desire as there are already so many projects waiting that I will run out of rainy days.
..dB
I had a scrummage in my parts box and sadly I can't save you the additional order.
I came very close to picking up a set of Aleph X boards in response to your thread - looking for parts sobered the desire as there are already so many projects waiting that I will run out of rainy days.
..dB
Looking Good Chris, You are going to have this built in no time at all !!
I had a scrummage in my parts box and sadly I can't save you the additional order.
I came very close to picking up a set of Aleph X boards in response to your thread - looking for parts sobered the desire as there are already so many projects waiting that I will run out of rainy days.
..dB
Thanks! My case is somewhere between here and Italy, so I have some time to work on the power supply. Still a bit of research to do on that one before ordering parts. The "universiality" of it leaves a lot of options, so still sorting those out.
Ordered power supply parts today. Those big electrolytics are just a tad more expensive than the smaller ones on the amp boards. 🙂 Since I don't have the case on hand yet, I haven't decided whether to go with the discreet or monolithic bridges, so I ordered both. We'll see what fits when the case arrives. I'd sure like to do a dual-mono config, but the store is out of PSU boards. I think for my first project, a shared power supply will work just fine. I'll see what I can do to leave things a little bit flexible, just in case.
I really like Jeff's boards - it is as close as I am ever going to get to dual mono without using separate chassis. And I love the convenience of monolithic bridges.
I forget which case you chose in the end, if it was a 400 then there is ample room
I forget which case you chose in the end, if it was a 400 then there is ample room
I really like Jeff's boards - it is as close as I am ever going to get to dual mono without using separate chassis. And I love the convenience of monolithic bridges.
I forget which case you chose in the end, if it was a 400 then there is ample room
I ordered the 5U case, so should be more than enough for anything I can throw at it, seems like. I believe someone once mentioned that one could bias up the amp a bit more with more heat sink.
I agree: the mono bridges sure are compact and flexible. Those spiky heatsinks on those diode chips tho...

Last edited:
My first builds were tubed kits. Then I found this joint, and never went back. ACA kit monoblocks and sensitive speakers got me hooked.
I too started with the same Aleph J build, in a Deluxe 5u case. Single PSU. I did build a tower over the toroid to mount the switch circuit and soft start boards (that was 3 small boards and a mounted relay) I also “stacked” the PSU capacitor board on taller standoffs over the rectifier boards. This shielded the transformer somewhat, and makes it easier to access the amp boards. (Photos are in the “gallery” here)
Look into the Quasimodo system for choosing snubber values if you choose to use the diode boards. IMO, if you don’t wasn’t to use the snubber parts (many don’t) then the monolithic bridges are easy, and work well. (Get a cheap crimper, and tab connectors)
Look into the elegant, and small, H9KPXG board. This low voltage switch with soft start circuit, also designed by Marc Johnson, is a huge step up from what I cobbled together on my build. You can find people with extras, or look into ordering from a fab house.
Lastly, many Aleph J amps have turn on, and turn off “thumps” if you have very sensitive speakers, it can scare you.
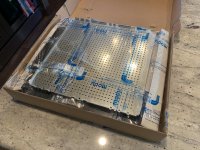
One humongous case arrived from Italy this week. May need to buy a forklift. 🙂
Power supply parts are delayed from Mouser, so hopefully they’ll arrive sometime this weekend. Outdoor weather is improving, so I’m going to need a few rotten weekends so I don’t feel bad about staying indoors and soldering.
Power supply parts are delayed from Mouser, so hopefully they’ll arrive sometime this weekend. Outdoor weather is improving, so I’m going to need a few rotten weekends so I don’t feel bad about staying indoors and soldering.
Attachments
Very Nice. The deluxe 5U is an excellent choice for a chassis.
There's been a lot of discussion about recent delays with Mouser and other parts shops.
Hopefully your parts will be here soon.
Have fun with your build.
There's been a lot of discussion about recent delays with Mouser and other parts shops.
Hopefully your parts will be here soon.
Have fun with your build.
Very Nice. The deluxe 5U is an excellent choice for a chassis.
There's been a lot of discussion about recent delays with Mouser and other parts shops.
Hopefully your parts will be here soon.
Have fun with your build.
Recent weather in the middle of the US has certainly affected their ship times. It’s all good. Can’t blame them for the weather! It’ll get here when it gets here. Plenty of other things to do.
Right after I posted the last note, I received notification that DIY Store has their PSUs back in stock. Wahoo! May still get that dual mono setup in this case.
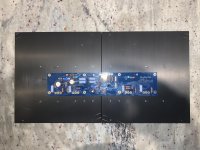
While waiting for parts to arrive, I started working in the case assembly. In the 4U case, the mounting holes are vertically centered in the heat sink. In the 5U they’re offset (by 1U—go figure!). I presume the ideal installation will have the FETs at the lowest part of the heat sink for most efficient use of metal?
Attachments
- Home
- Amplifiers
- Pass Labs
- New Aleph J builder from Wisconsin, USA