Pass DIY Addict
Joined 2000
Paid Member
I just love the tidy little cases that result from this great amp project! Nice work, bloozestringer!
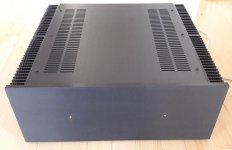
A few pictures of my finished M2......maybe a bit boring in standard case, but then easier to finish the project. My first diy power amp. Now I'm just in need of a DIY preamp......it never ends 
Attachments
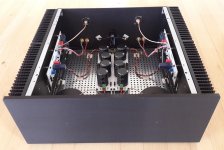
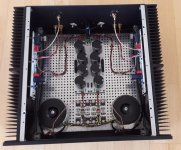

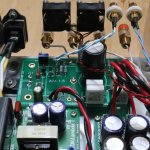
Thanks, it was an attempt to get them (and the capacitor bank) as far away from the autoformers as possible.
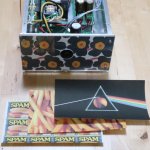
Just finish my Pearl2. Such a nice preamp, runing beautifully. Big Thank to Wayne for his contribution. 😛


Absolutely beautiful!!!!
You don't want to stack the enclosures like that in use, I've found the Pearl is genuinely quiet only when the power transformer is 1M away from the RIAA boards. But it's eerily silent.
You don't want to stack the enclosures like that in use, I've found the Pearl is genuinely quiet only when the power transformer is 1M away from the RIAA boards. But it's eerily silent.
to tanwa
Hello tanwa,
very nice and clean work! Enjoy it!
I love my PEARL 2 also... Thanks to Wayne!
Greets
Dirk
Hello tanwa,
very nice and clean work! Enjoy it!
I love my PEARL 2 also... Thanks to Wayne!
Greets
Dirk
bknielsen, tanwa,
Congratulations to both of you - very nice builds. Good job with the neat wiring and layout.
Congratulations to both of you - very nice builds. Good job with the neat wiring and layout.
Last edited:
I am trying, thank you 😛Absolutely beautiful!!!!
You don't want to stack the enclosures like that in use, I've found the Pearl is genuinely quiet only when the power transformer is 1M away from the RIAA boards. But it's eerily silent.
I got them from seller in China. You may easily search in Ebay.Very nice tanwa. Where did you get those cool enclosures?
batty,
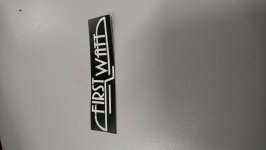
Nice work with the sticker - they say that imitation is the most sincere form of flattery 😀, but keeping in mind Mr. Pass's generosity, the general idea is that we DIYers should not infringe on his logos/copyrighted stuff. It's probably better if the sticker text is like "DIY M2" or "DIY M2 Clone" or something in similar vein.
Another sticker saying "With thanks to Nelson Pass" would be nice too - you can put that sticker on the front or the back, according to your aesthetic preference. 🙂
p.s. And I am in no way implying that you are trying to do anything wrong. We love our Pass amps and our DIY efforts, and we strive to adorn them in the best way possible. Please keep up the good DIY work and look forward to continued updates from you.
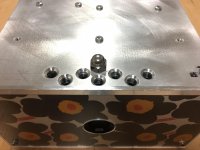
ACA
This is an ACA packed in a small case.
I bought the PCB from the DIY audio store, and I chose the other parts and switching power supply by myself.
I do not like the appearance of heat sinks and fins.
So I chose extruded aluminum (150x75x320mm,thickness 8mm,2kg) as the case.
I installed two small fans to improve heat dissipation.
The front panel has a two-layer structure of aluminum and transparent Plexiglass,
so I can change the face by sandwiching photos or something between them.
Many CRs are Japanese audio grade.
Resistance: Takman / REY50, Futaba / Metal Plate Cement (R1-4)
Cap: Nichicon, Rubycon / PMLCAP (C3)
I increased the Cap of the power supply (28000uf). There are no other changes.
I am satisfied with the sound quality very much.
But, as expected, the case gets terribly hot (~65celsius?).
I think the internal parts are fine as the fans circulate cold air, but I am not confident...
Thanks to Nelson, 6L6, the community for making this possible.
Attachments


yoshida, your amp is lovely. But you are not circulating the air, either pressuring or evacuating the box. Make some intake on the front floor of the box so the air can be drawn or blown over the base plate.
You may want to try a better thermal coupling with the side panels and use a bit of silicone grease and even two more bolts couple harder in order to increase that heat sink surface area.
Your front panel explains your concerns. 😀
On the other hand 65 degrees centigrade is not that hot, only the cooler the components, the longer they last and prevents you from dropping the amp when it burns your hands after picking it up. 🙁
Last edited:
65C is just right for the french fries!
A stack of washers between the front and side panels would create a discreet inlet/outlet to help with air flow.
A stack of washers between the front and side panels would create a discreet inlet/outlet to help with air flow.
This is an ACA packed in a small case.
I bought the PCB from the DIY audio store, and I chose the other parts and switching power supply by myself.
I do not like the appearance of heat sinks and fins.
So I chose extruded aluminum (150x75x320mm,thickness 8mm,2kg) as the case.
.
I believe that those Aluminum side panels would make 'Good' heat sinks.
IF you fixed the output devices onto them... without using fins and Fans
Wonderful enclosure! Beautiful construction!!
The advice to make more ventilation is very good - Perhaps the easiest is to add 3mm washers in between the top of the side rails and the lid; this will give a large opening for air to move freely. The fans can only move as much air as the aperture!
The advice to make more ventilation is very good - Perhaps the easiest is to add 3mm washers in between the top of the side rails and the lid; this will give a large opening for air to move freely. The fans can only move as much air as the aperture!
- Home
- Amplifiers
- Pass Labs
- Pictures of your diy Pass amplifier